About the Playwise HQ – HubSpot CRM Integration
This guide explains how to integrate Playwise HQ with HubSpot to keep competitive intelligence and deal outcomes in sync across both systems.
The integration allows you to sync deals between HubSpot and Playwise HQ, ensuring that competitive context, who you’re competing against, and why deals are won or lost, lives in a single, structured system rather than scattered across notes, fields, and spreadsheets.
Instead of competitive insights getting trapped in individual deals or post-mortems that no one revisits, Playwise HQ centralises this information and makes it accessible across your sales and enablement workflows, while still keeping HubSpot as the system of record for deal execution.
This is designed for sales, enablement, and RevOps teams that want competitive intelligence to compound over time, not reset every quarter.
Key Benefits:
- Automatic deal sync — Deals created or updated in HubSpot flow into Playwise HQ in real time, keeping your competitive pipeline view current without any manual data entry.
- Win/loss tracking from your CRM — When deals close in HubSpot, Playwise HQ captures the outcome and maps win/loss categories so you can analyse why you win and lose over time.
- Bidirectional data flow — Competitive insights captured in Playwise HQ (such as competitor tagging on deals) can sync back to HubSpot, enriching your CRM with intelligence your reps can act on.
- AI-powered field mapping — Playwise HQ uses AI to recommend how your HubSpot fields should map to Playwise fields, making setup faster and reducing configuration errors.
- Flexible reference data import — Import industries, opportunity stages, opportunity types, and win/loss categories from HubSpot, or merge them with data you have already configured in Playwise HQ.
How the Playwise HQ, Hubspot CRM Integration Works
The Playwise HQ ↔ HubSpot integration keeps deal execution and competitive intelligence connected, without changing how reps work day to day.
High-level flow:
- Deal context lives in HubSpot: HubSpot deals contain key information such as the customer, stage, and competitors involved.
- Deals sync into Playwise HQ: That deal and competitor context is synced into Playwise HQ, where it’s connected to relevant battlecards and historical win/loss data.
- Competitive insight is applied: Playwise HQ links each deal to structured competitive intelligence based on who you’re competing against.
- Outcomes flow back to HubSpot: Win/loss reasons captured in Playwise HQ are synced back to HubSpot, so deal records reflect not just outcomes, but why they happened.
- Reps access insight during active deals: Reps can reference up-to-date competitive insights while deals are still in progress.
Mental model:
HubSpot runs the deal. Playwise HQ captures and compounds competitive intelligence.
What You Need to Know Before Setting Up the Integration
Admin Role Required
- Only users with the Admin role in Playwise HQ can set up and manage integrations.
HubSpot Account Access
- You will need the ability to authorise third-party applications in your HubSpot portal. During setup, you will be redirected to HubSpot to sign in and grant Playwise HQ permission to access your CRM data. The permissions requested include read and write access to companies, deals, and contacts, as well as access to your field schemas and CRM user list.
- Your Hubspot account must have the required permissions to allow access to third party applications.
Subscription Plan Requirements
- The HubSpot integration is available on paid subscription plans (Standard, Premium, and Enterprise). It is also available during your trial period. Free plan accounts do not have access to integrations.
- You may need to check that your Hubspot plan allows you to connect with third party applications.
A Step by Step Guide on How to Integrate HubSpot with Playwise HQ to Sync Deals and Win/Loss Records
The setup process is guided by a step-by-step wizard. Follow each step below to connect HubSpot and configure deal and win/loss syncing.
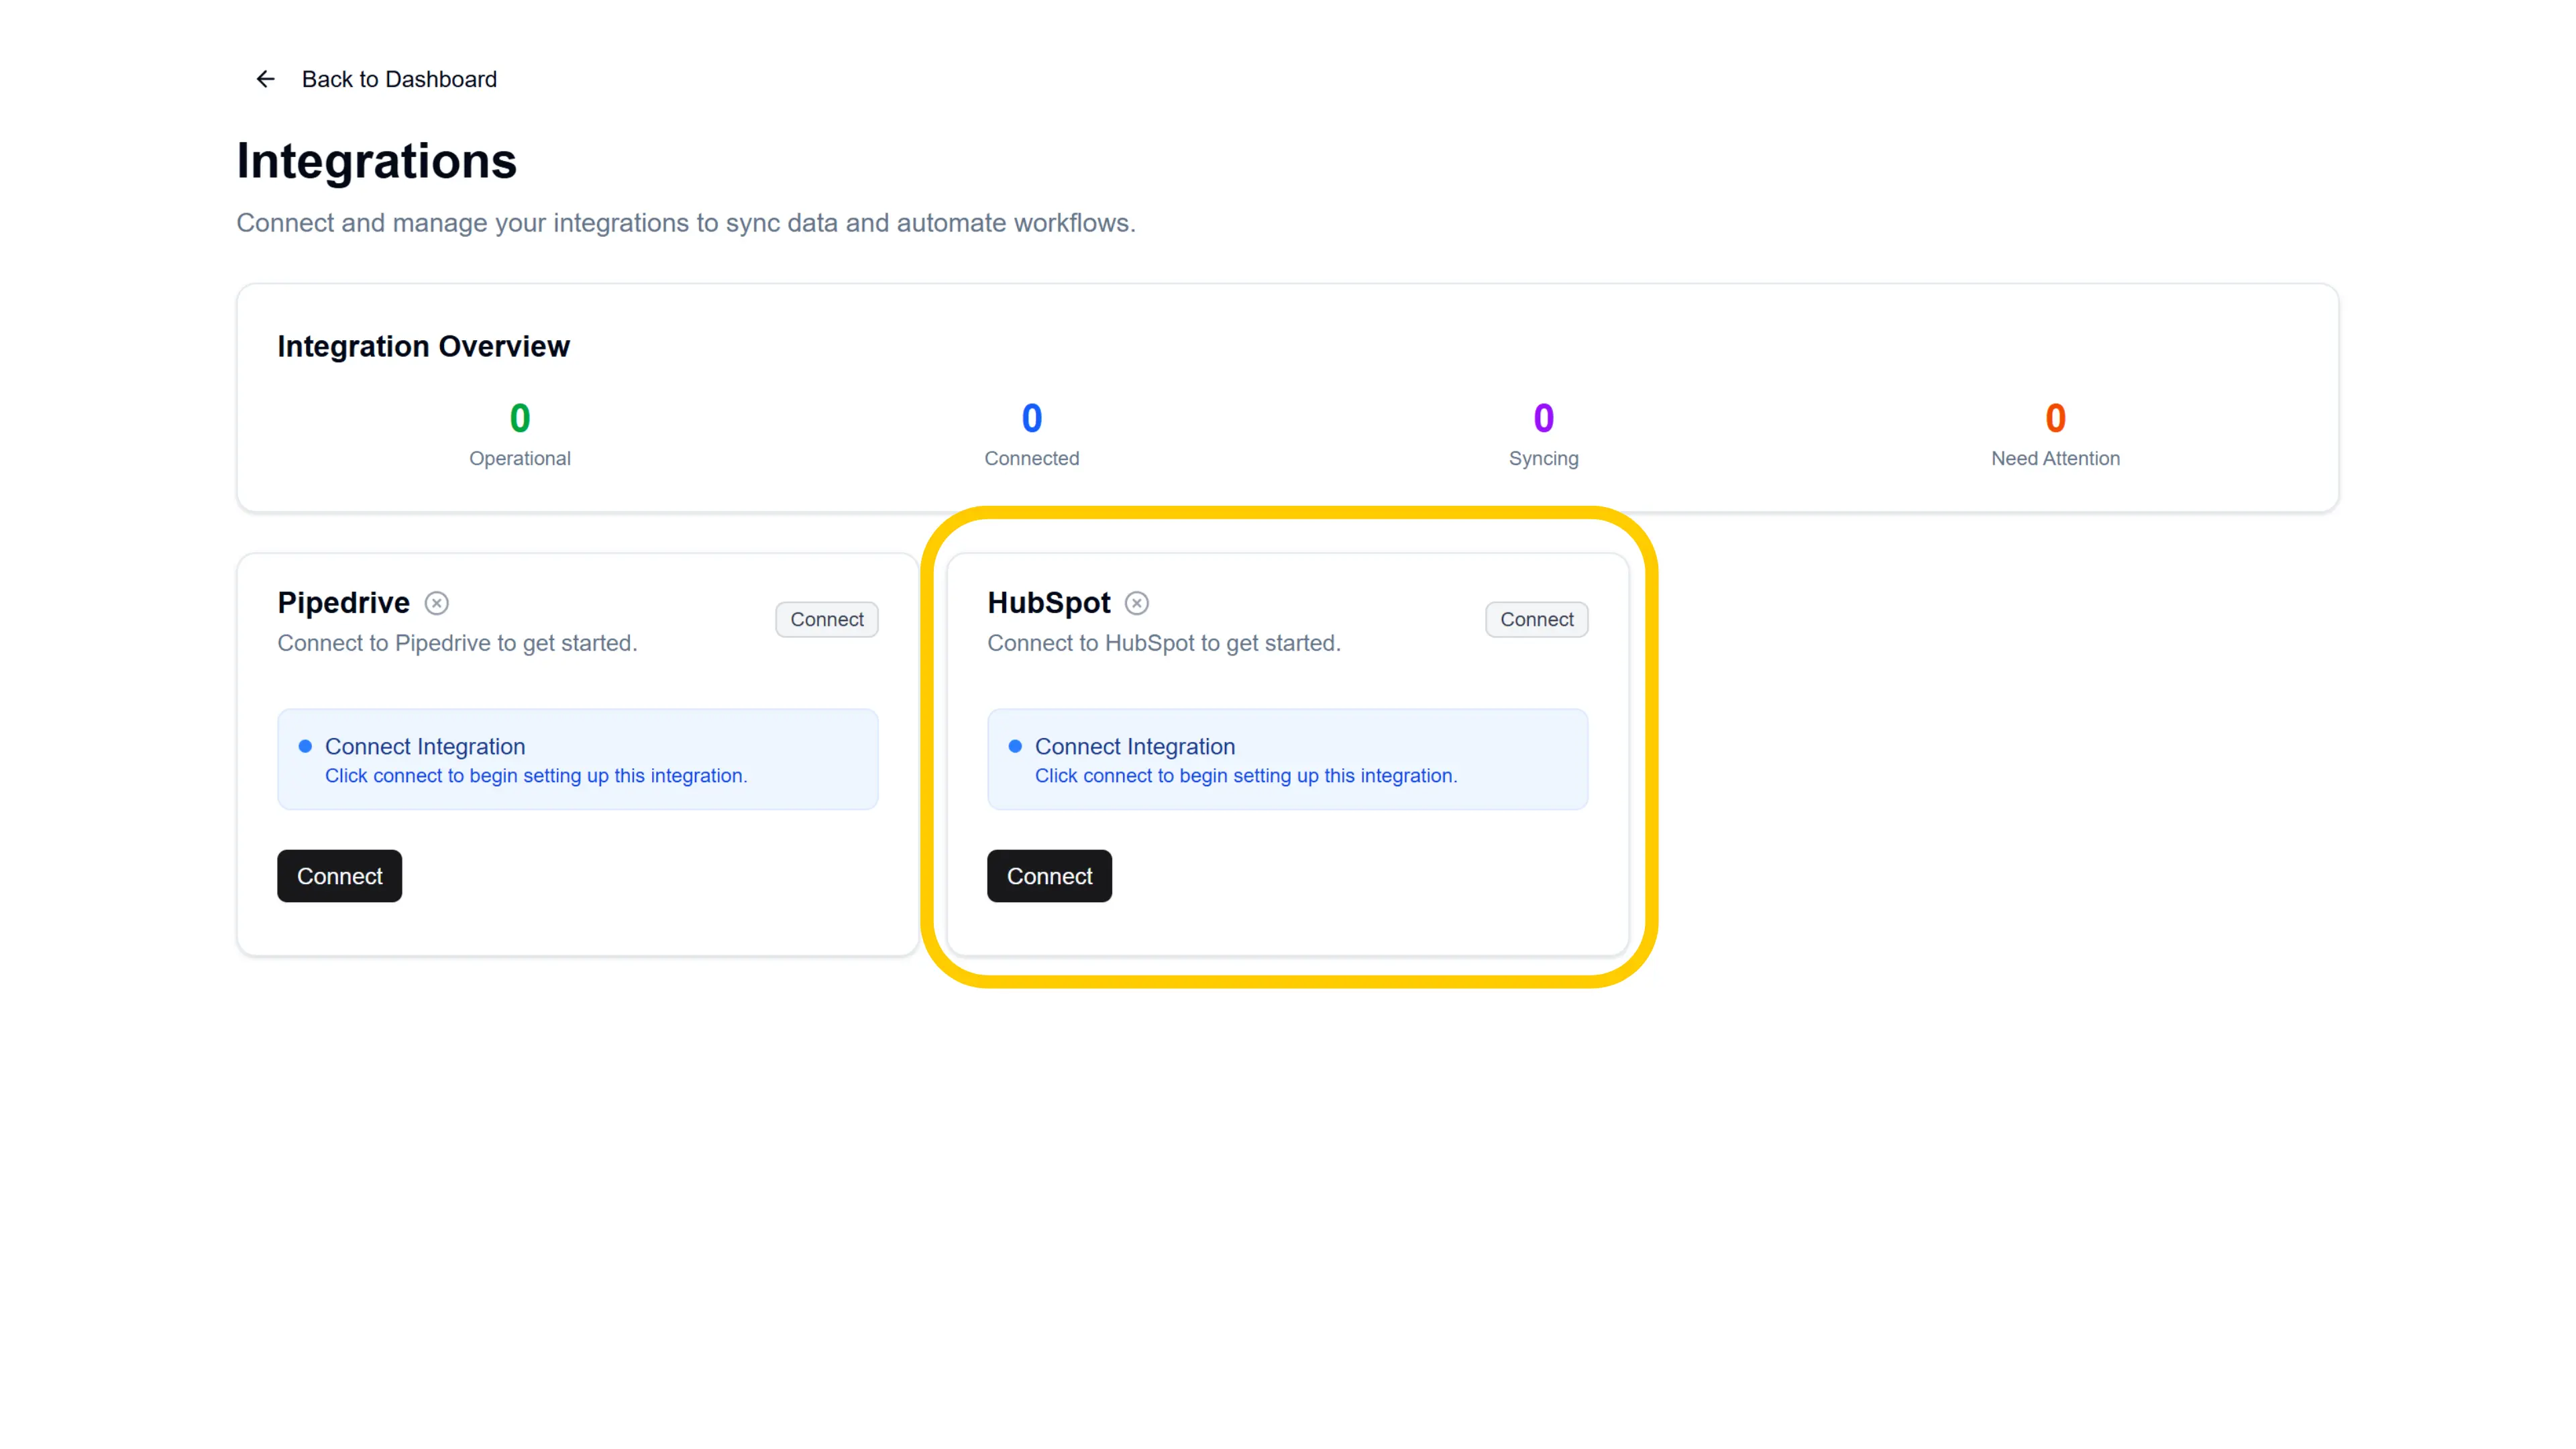
Step 1: Navigate to the Integrations Page
- Log in to your Playwise HQ account as an Admin.
- Click your profile icon in the top-right corner of the Dashboard.
- Select “Integrations” from the dropdown menu.

- You will see the Integrations overview page with tiles for each supported CRM platform. Find the HubSpot tile.
Step 2: Start the Connection
On the HubSpot tile, click the “Connect” button. This will open the integration setup wizard.
Note: If you previously connected HubSpot and your configuration still exists (e.g., after a temporary disconnect), clicking “Connect” will take you directly through the OAuth step and back to your management page — skipping the full wizard.
Step 3: Authorise Playwise HQ in HubSpot (OAuth)
The first step of the wizard is the OAuth connection.
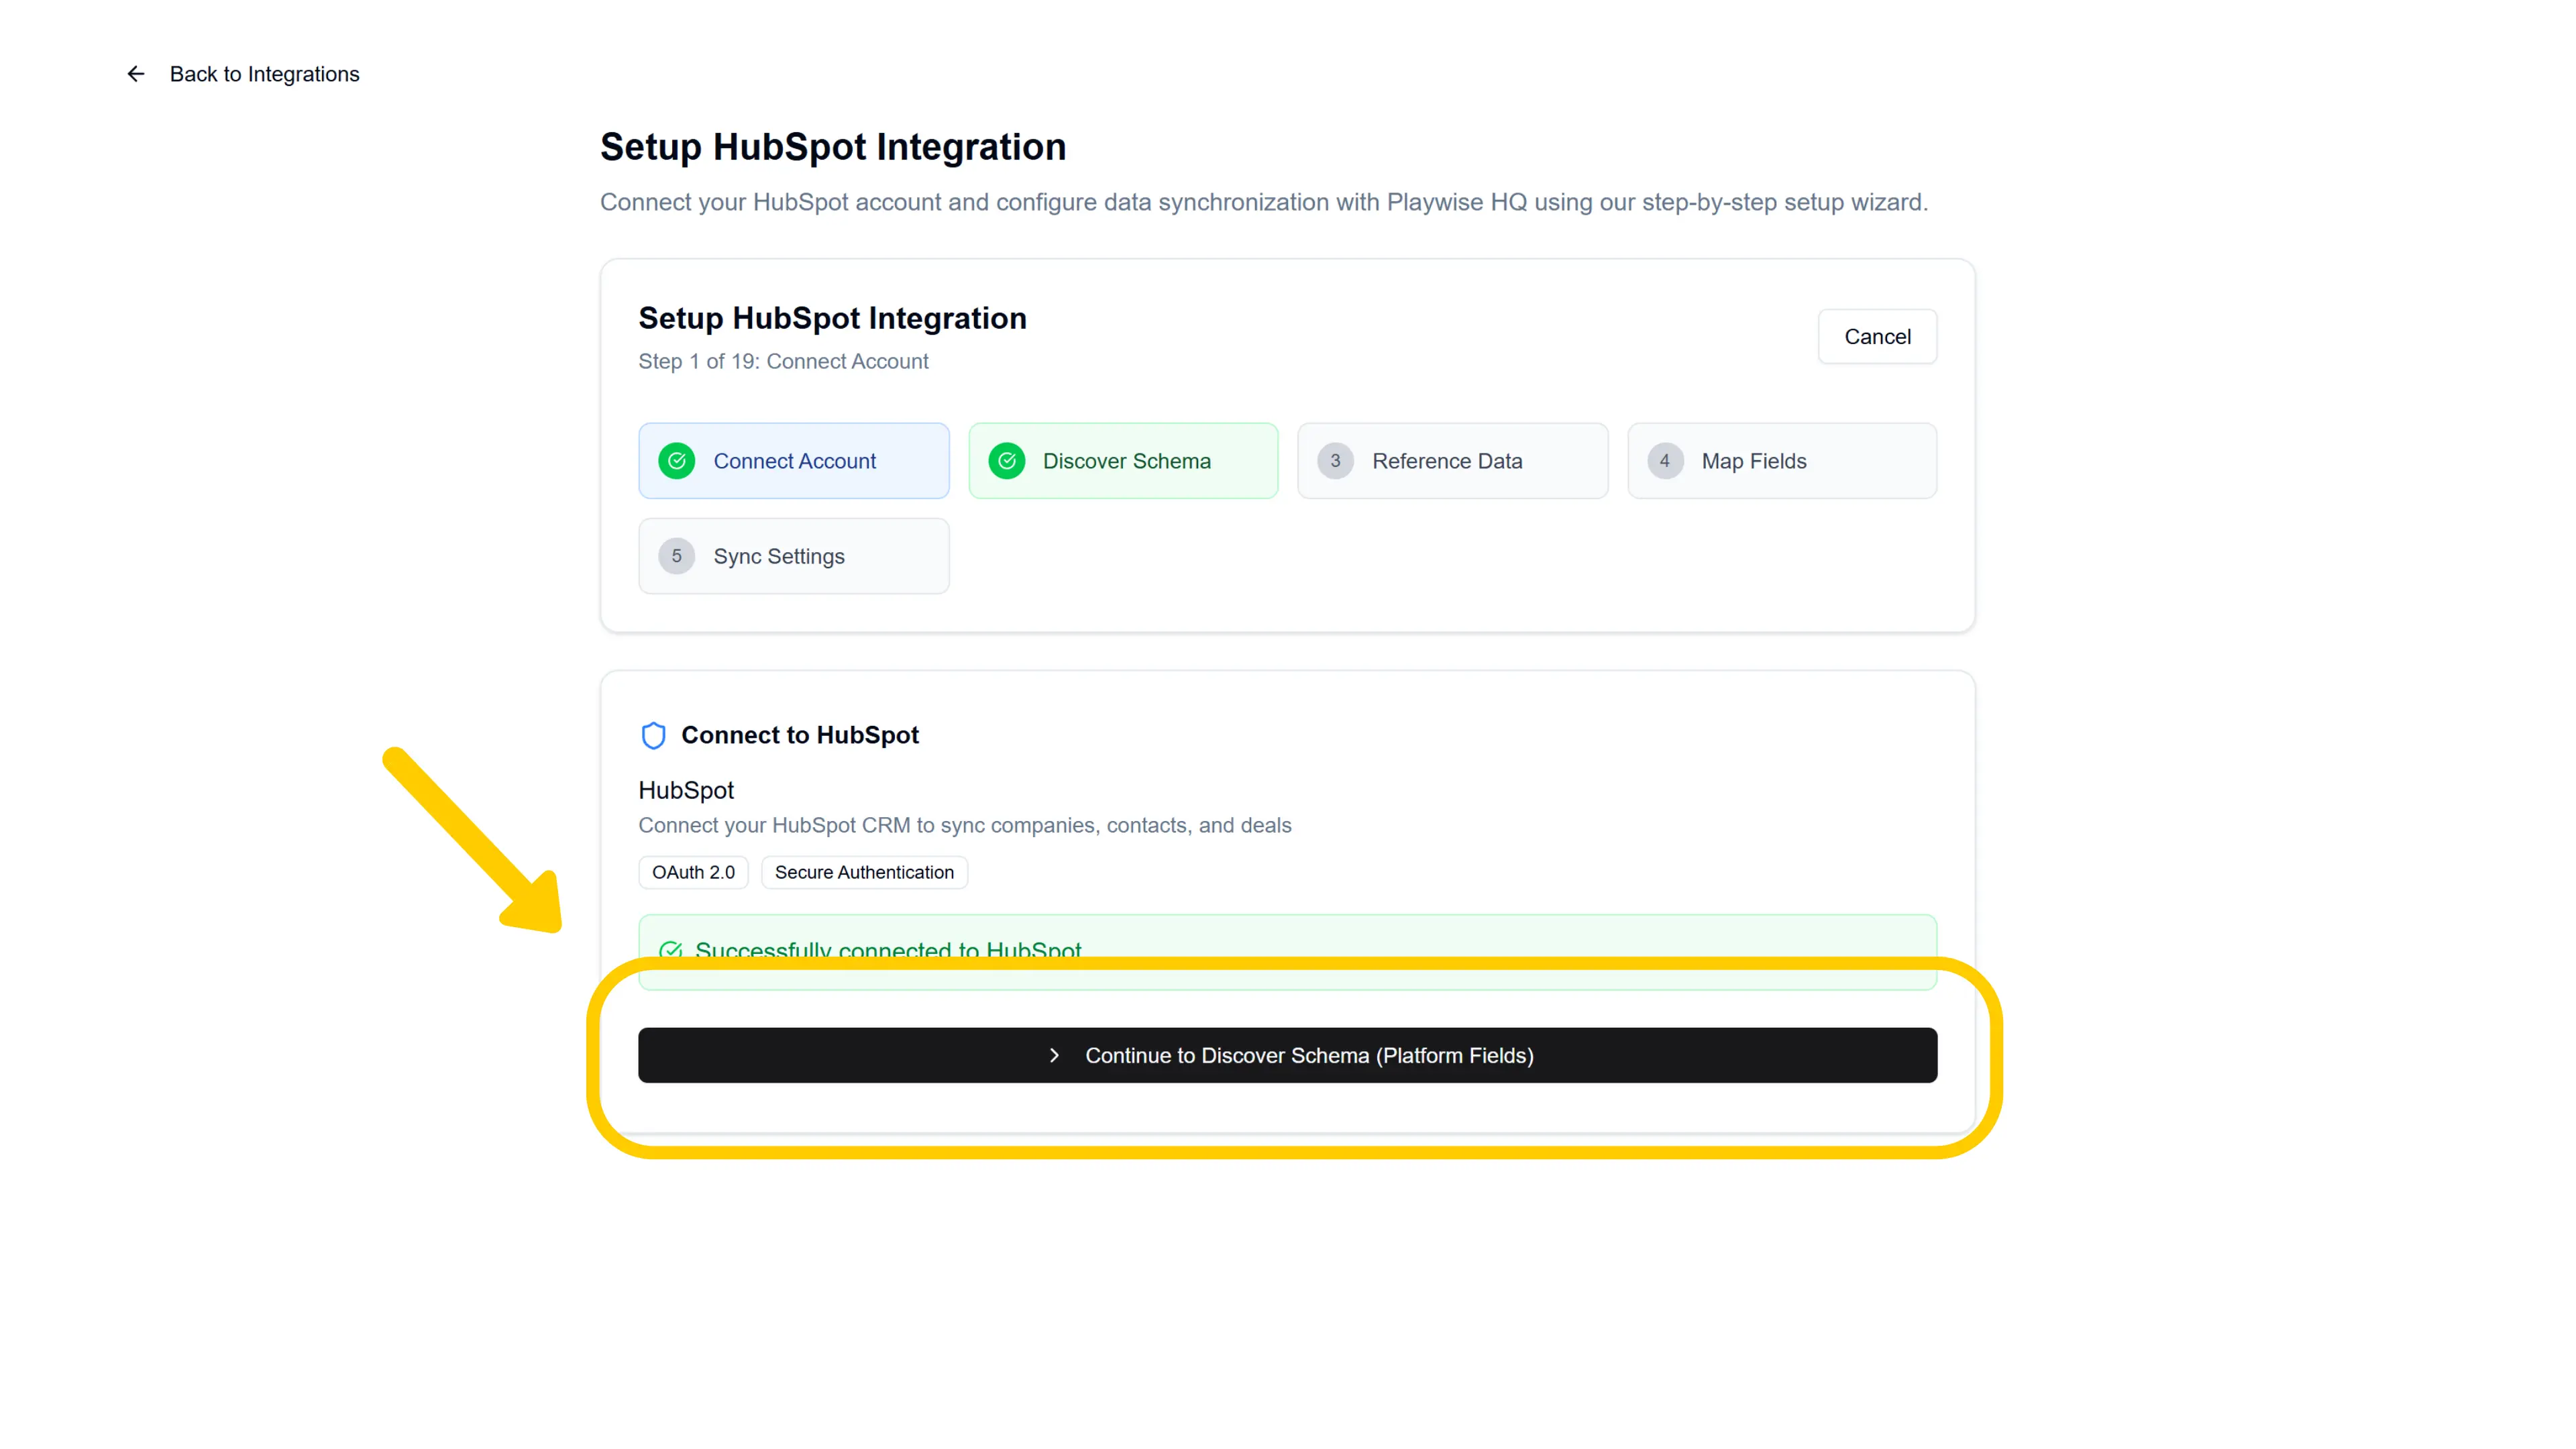
- You will see a card titled “Connect to HubSpot” with information about what happens during authorisation.
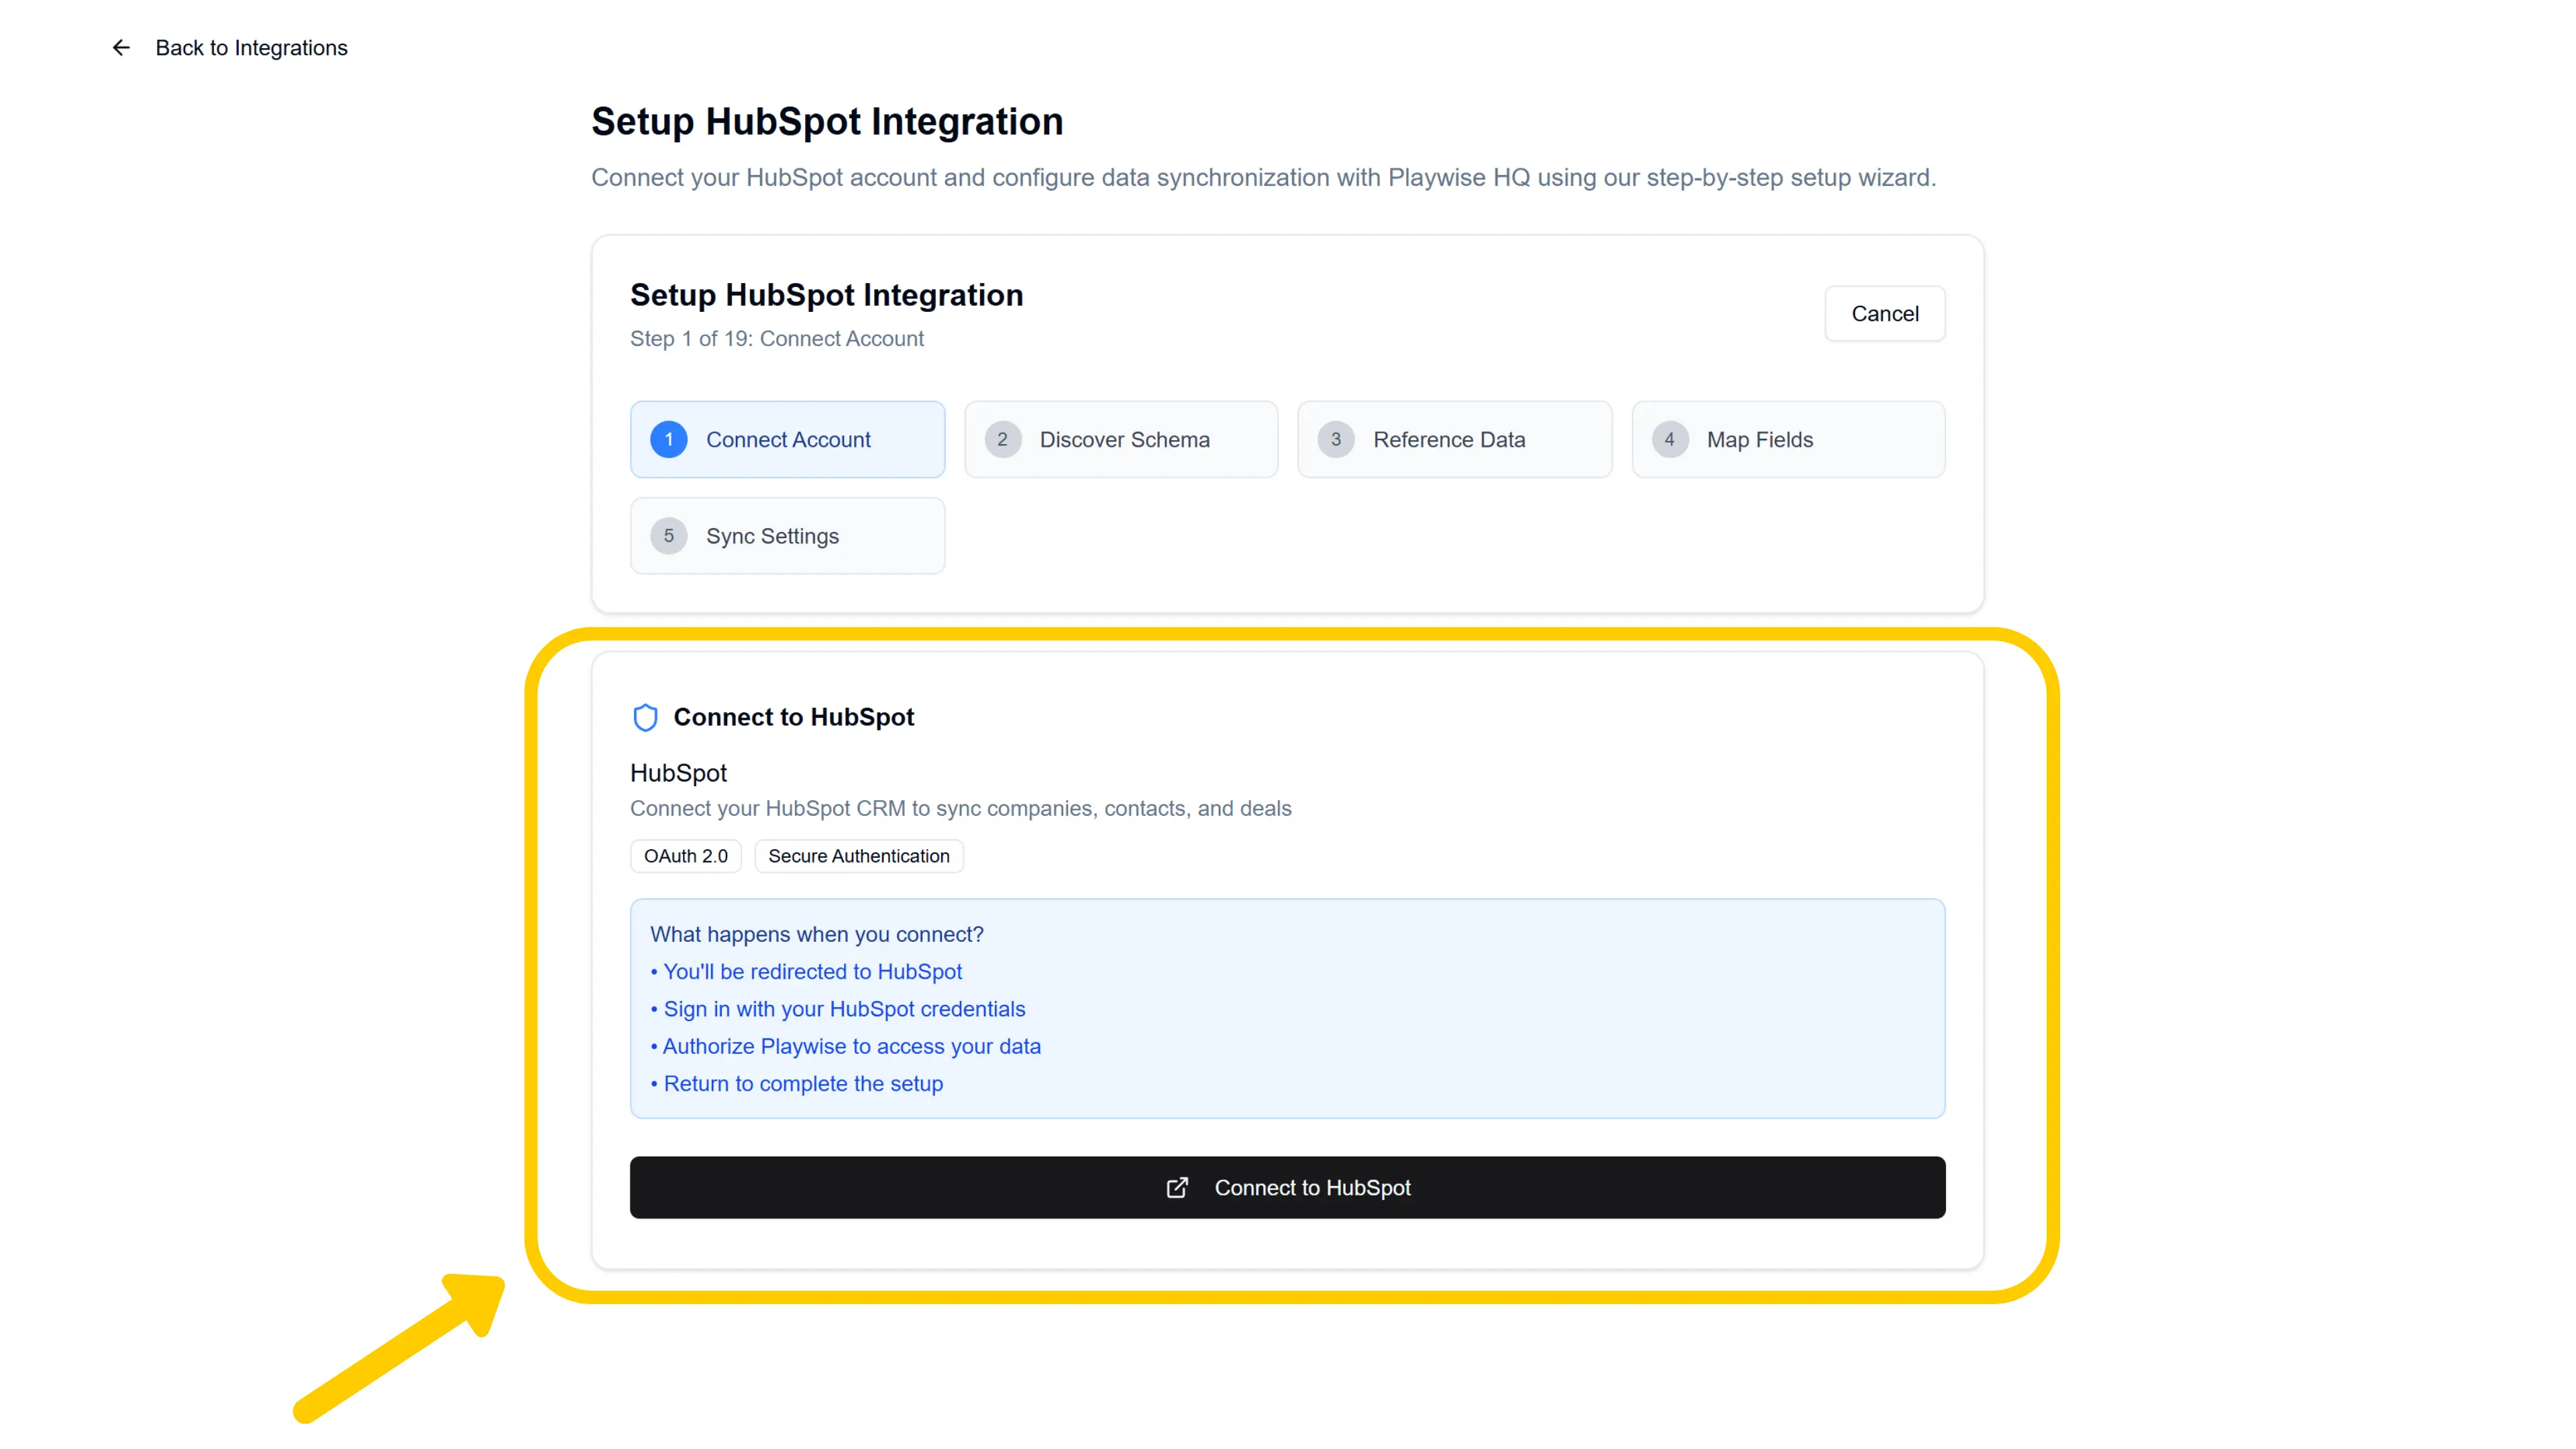
- Click the “Connect to HubSpot” button.
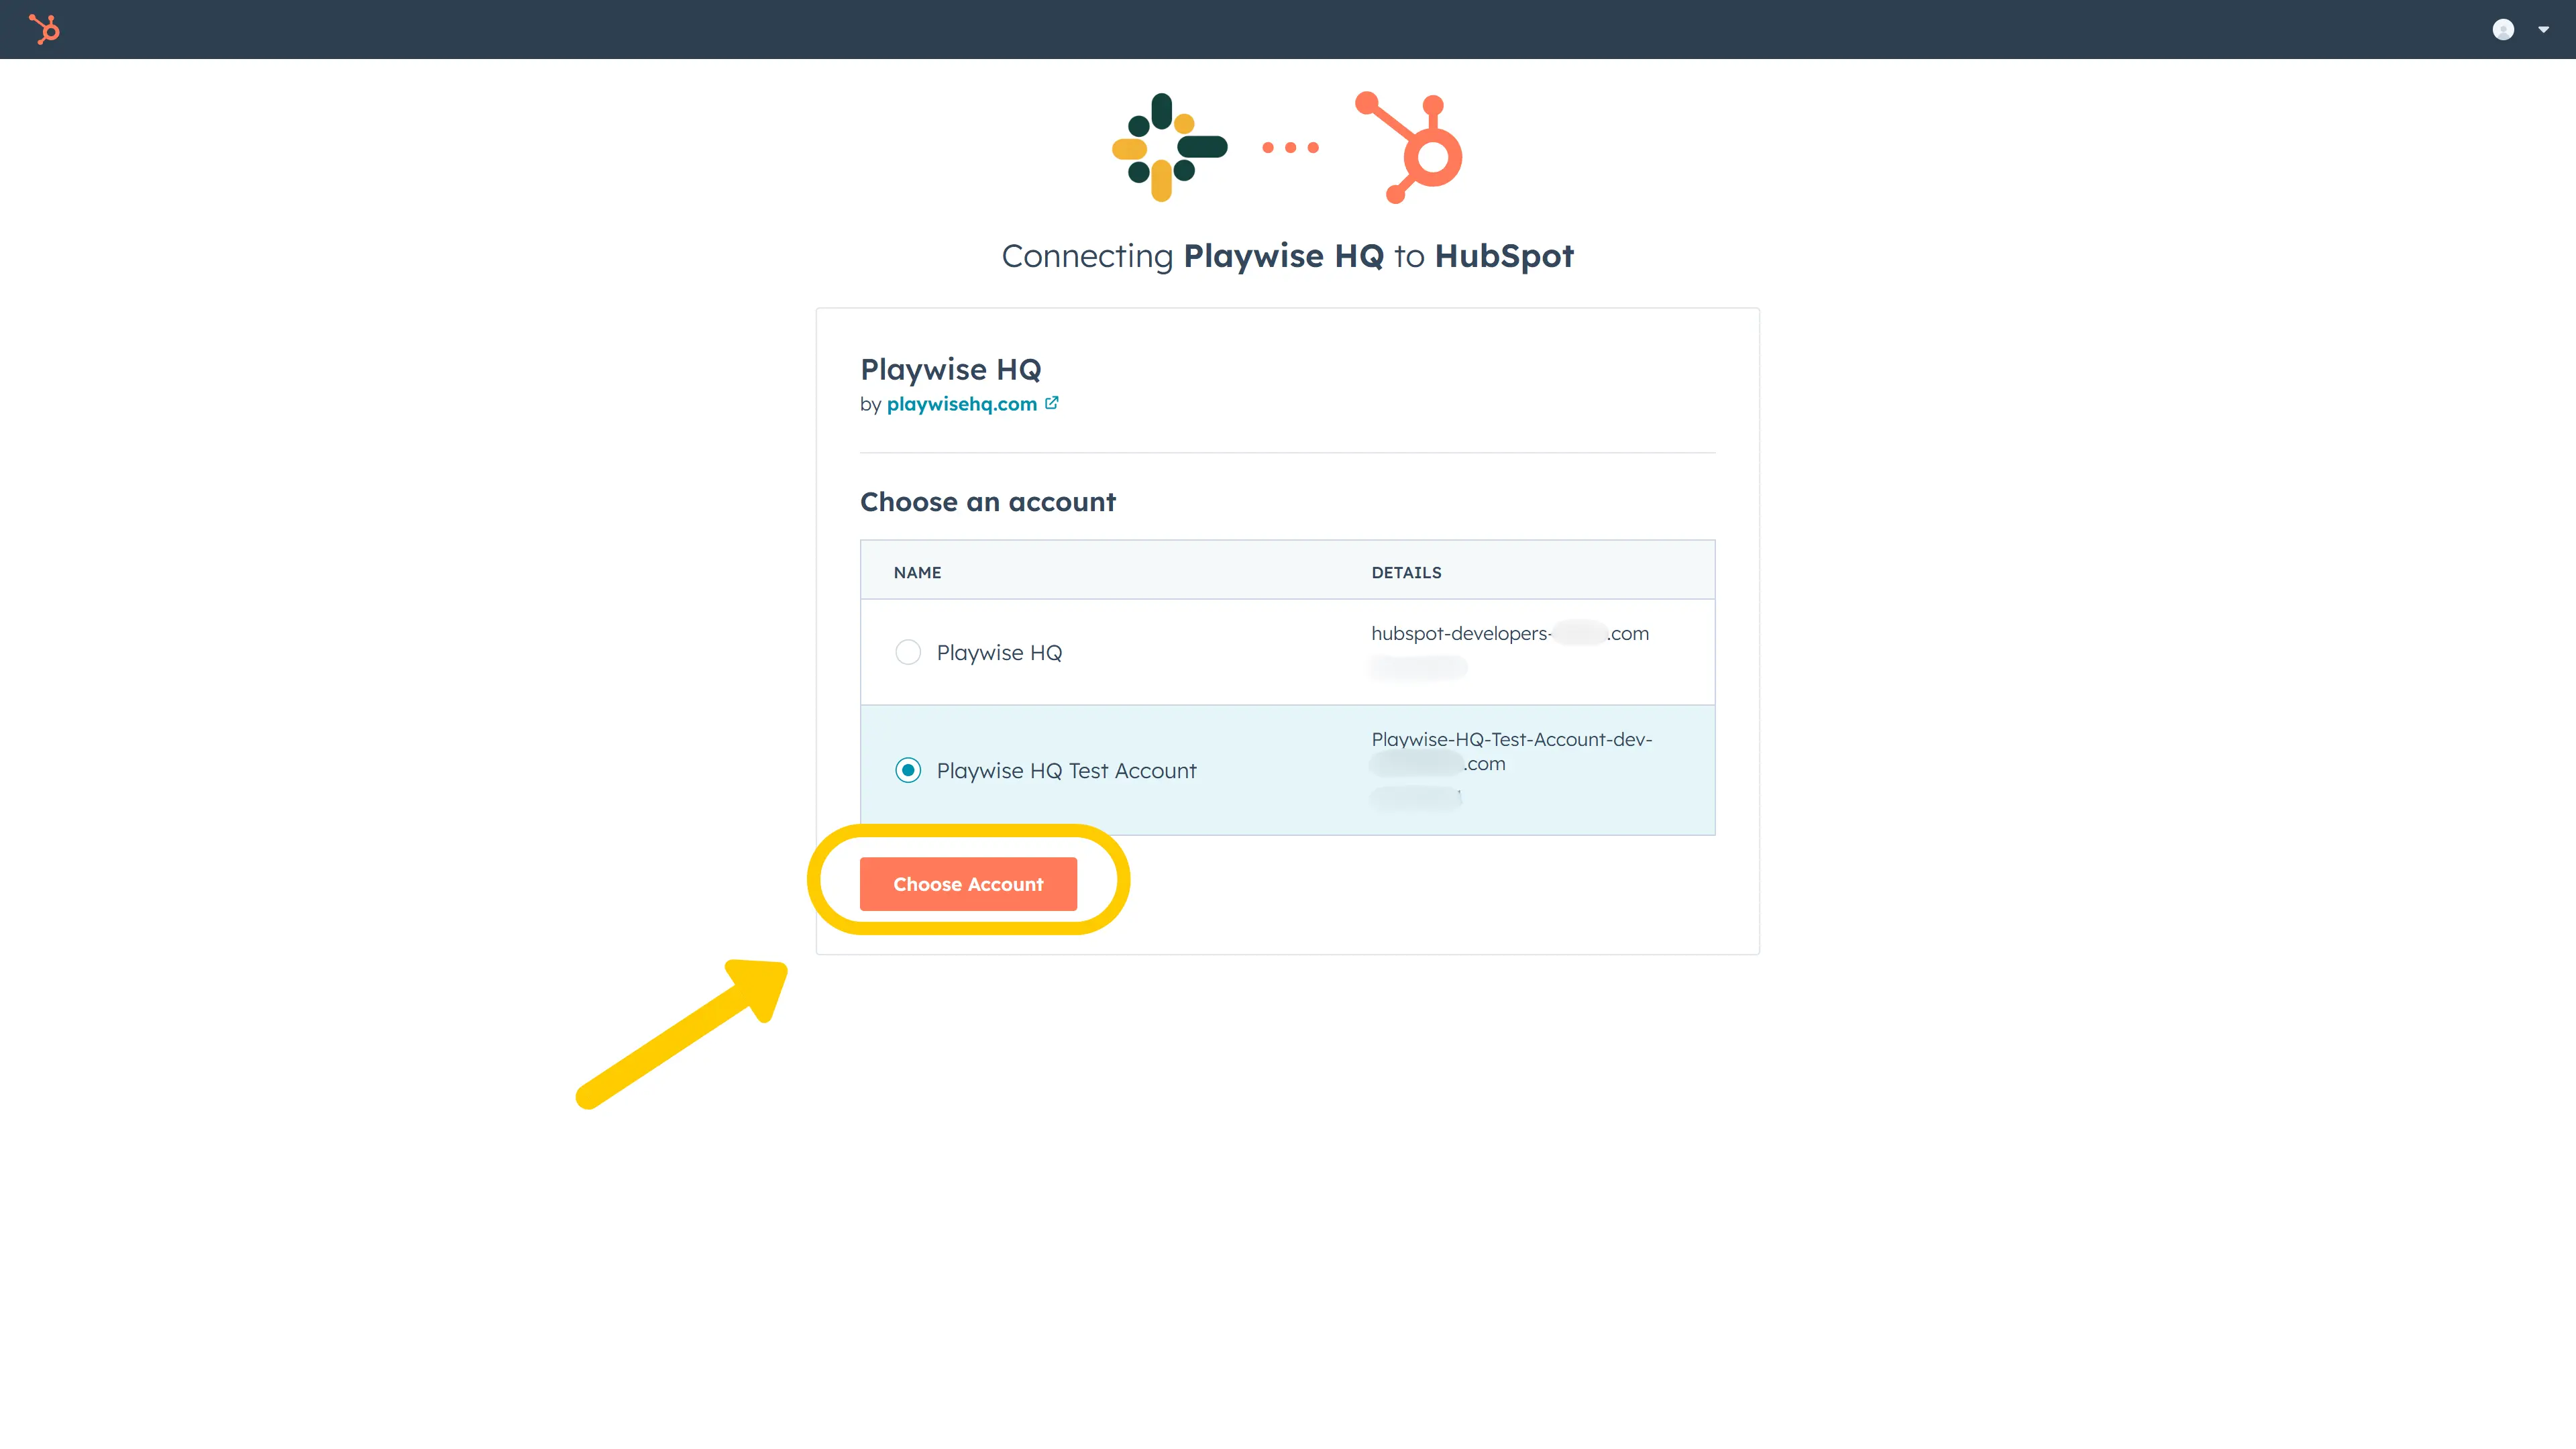
- You will be redirected to HubSpot’s login page. Sign in with your HubSpot credentials. You will then be asked to select your Hubspot account.
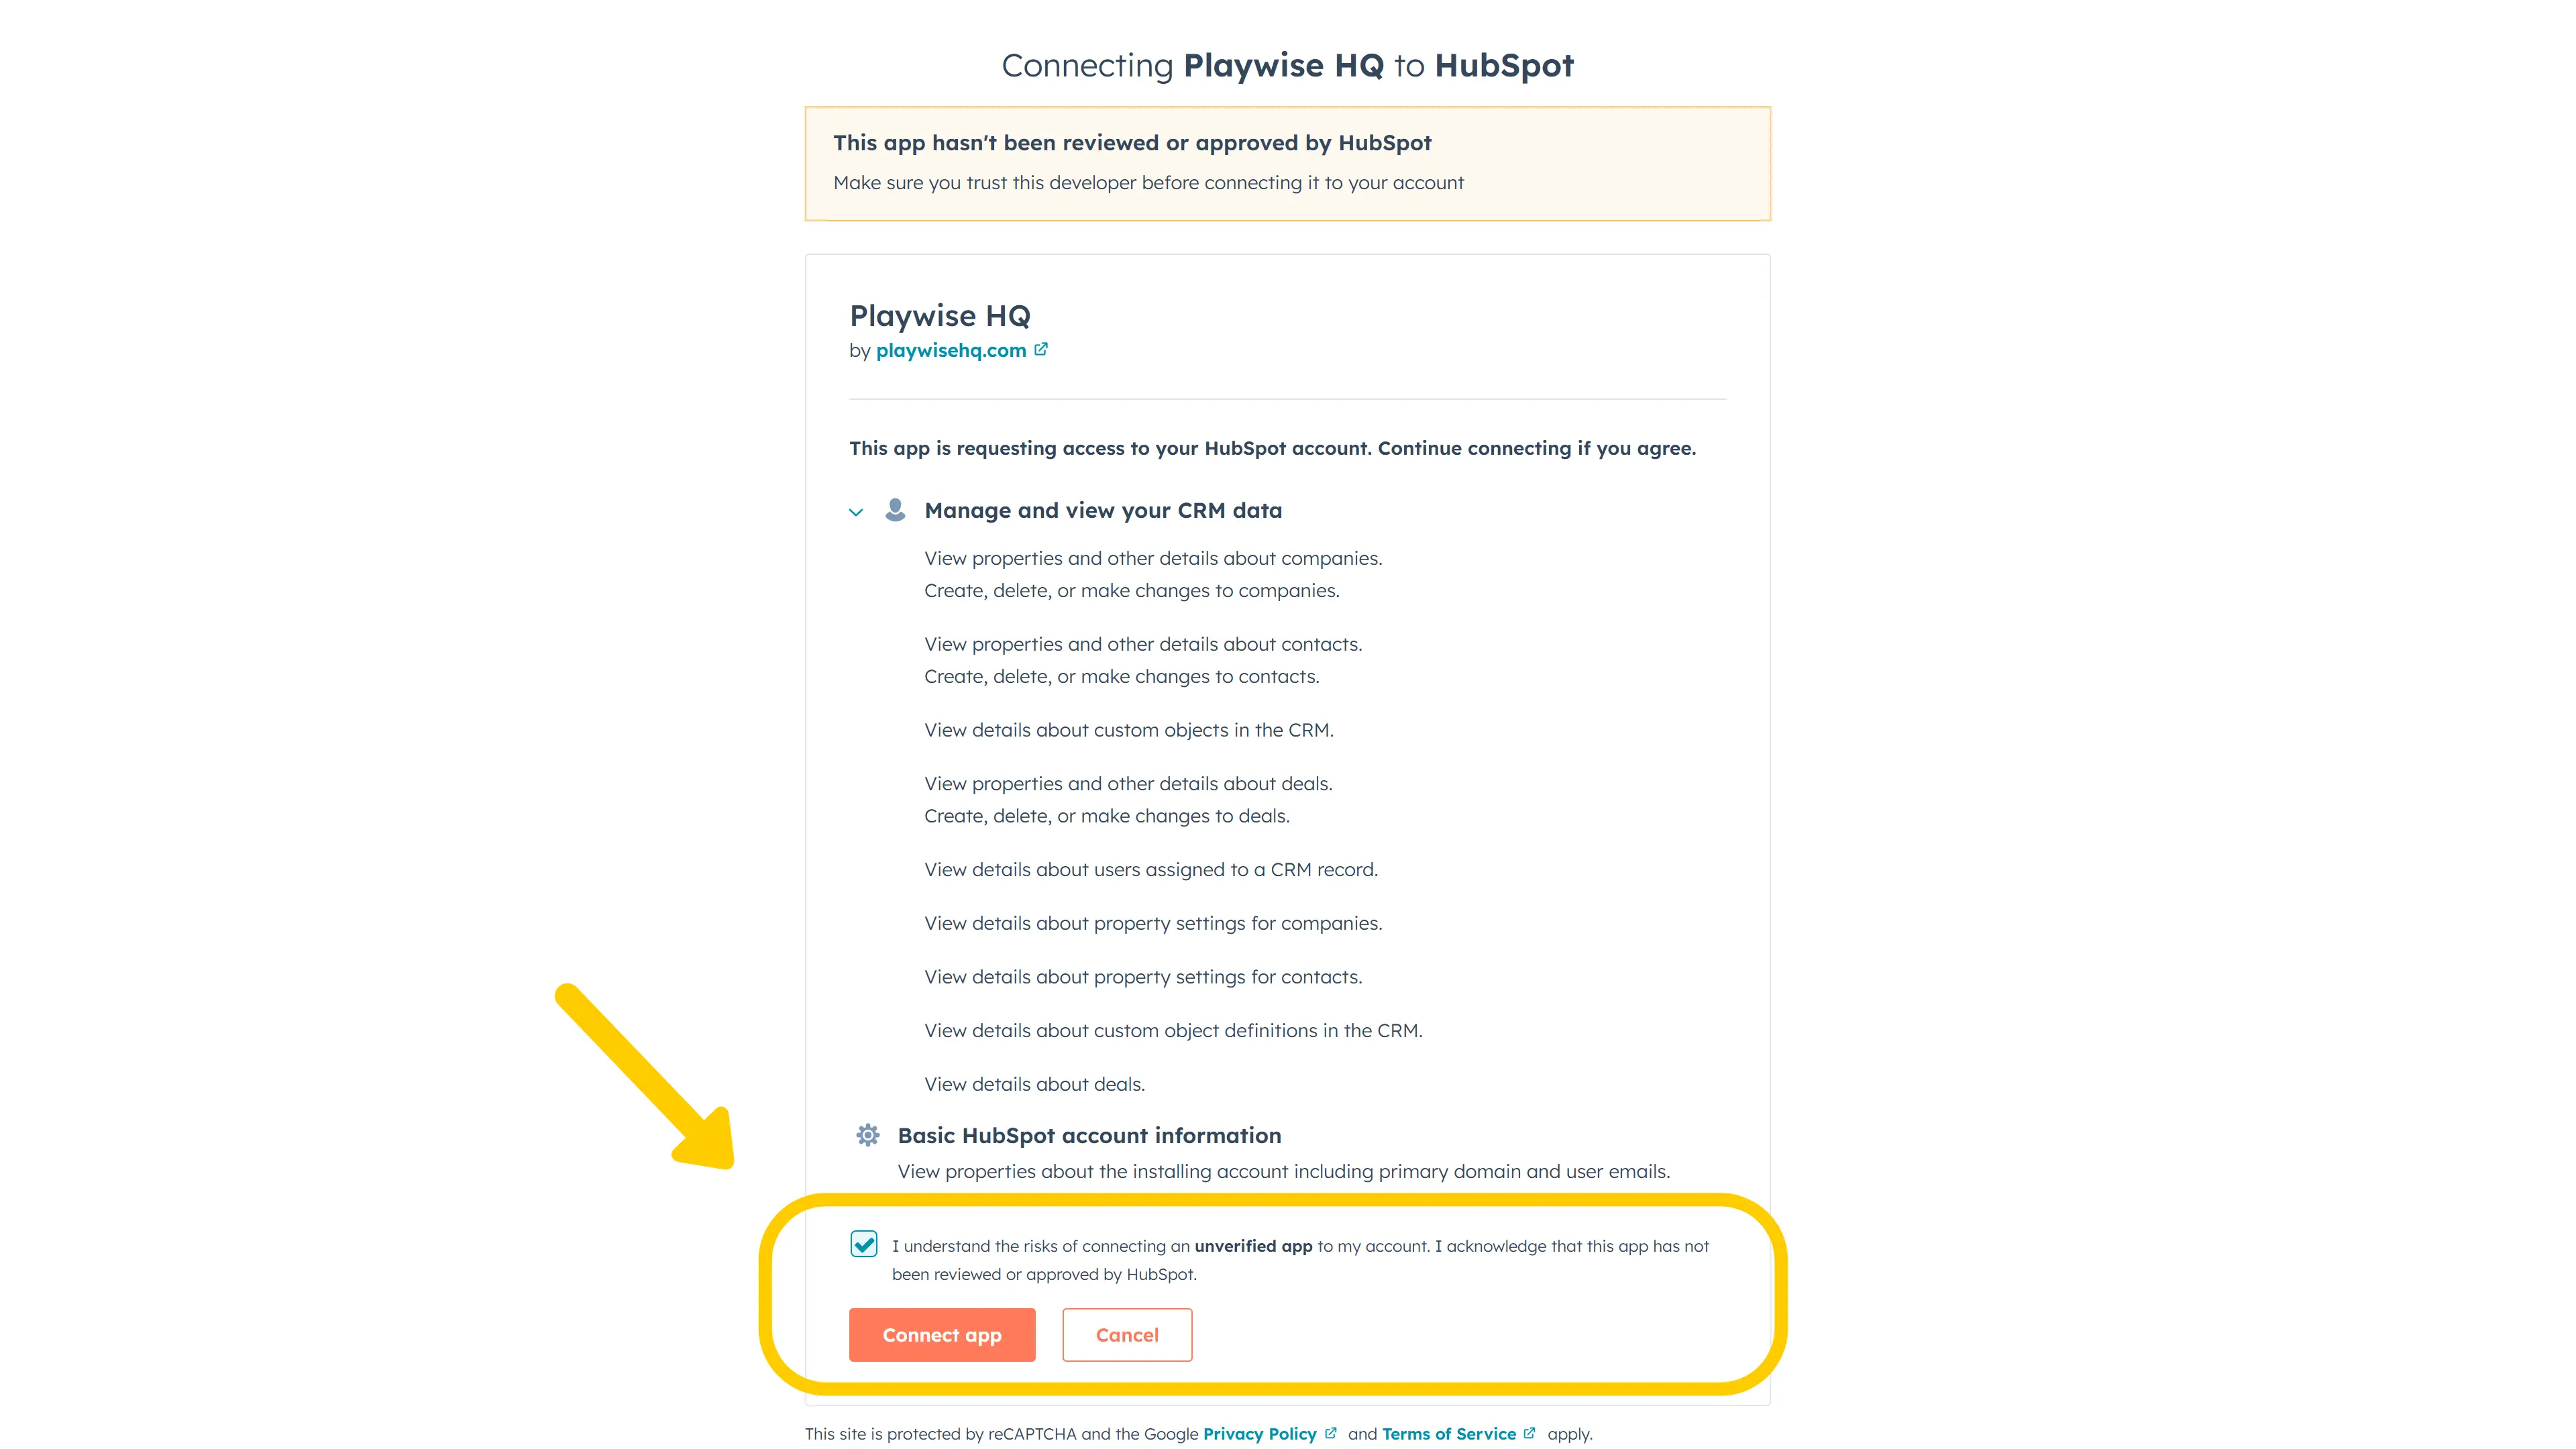
- HubSpot will ask you to authorise Playwise HQ to access your CRM data. Review the permissions and click “Connect app”.
- You will be redirected back to Playwise HQ. A green success message will confirm: “Successfully connected to HubSpot”.
- Click “Continue to Discover Schema (Platform Fields)” to proceed.
Step 4: Discover Your HubSpot Schema
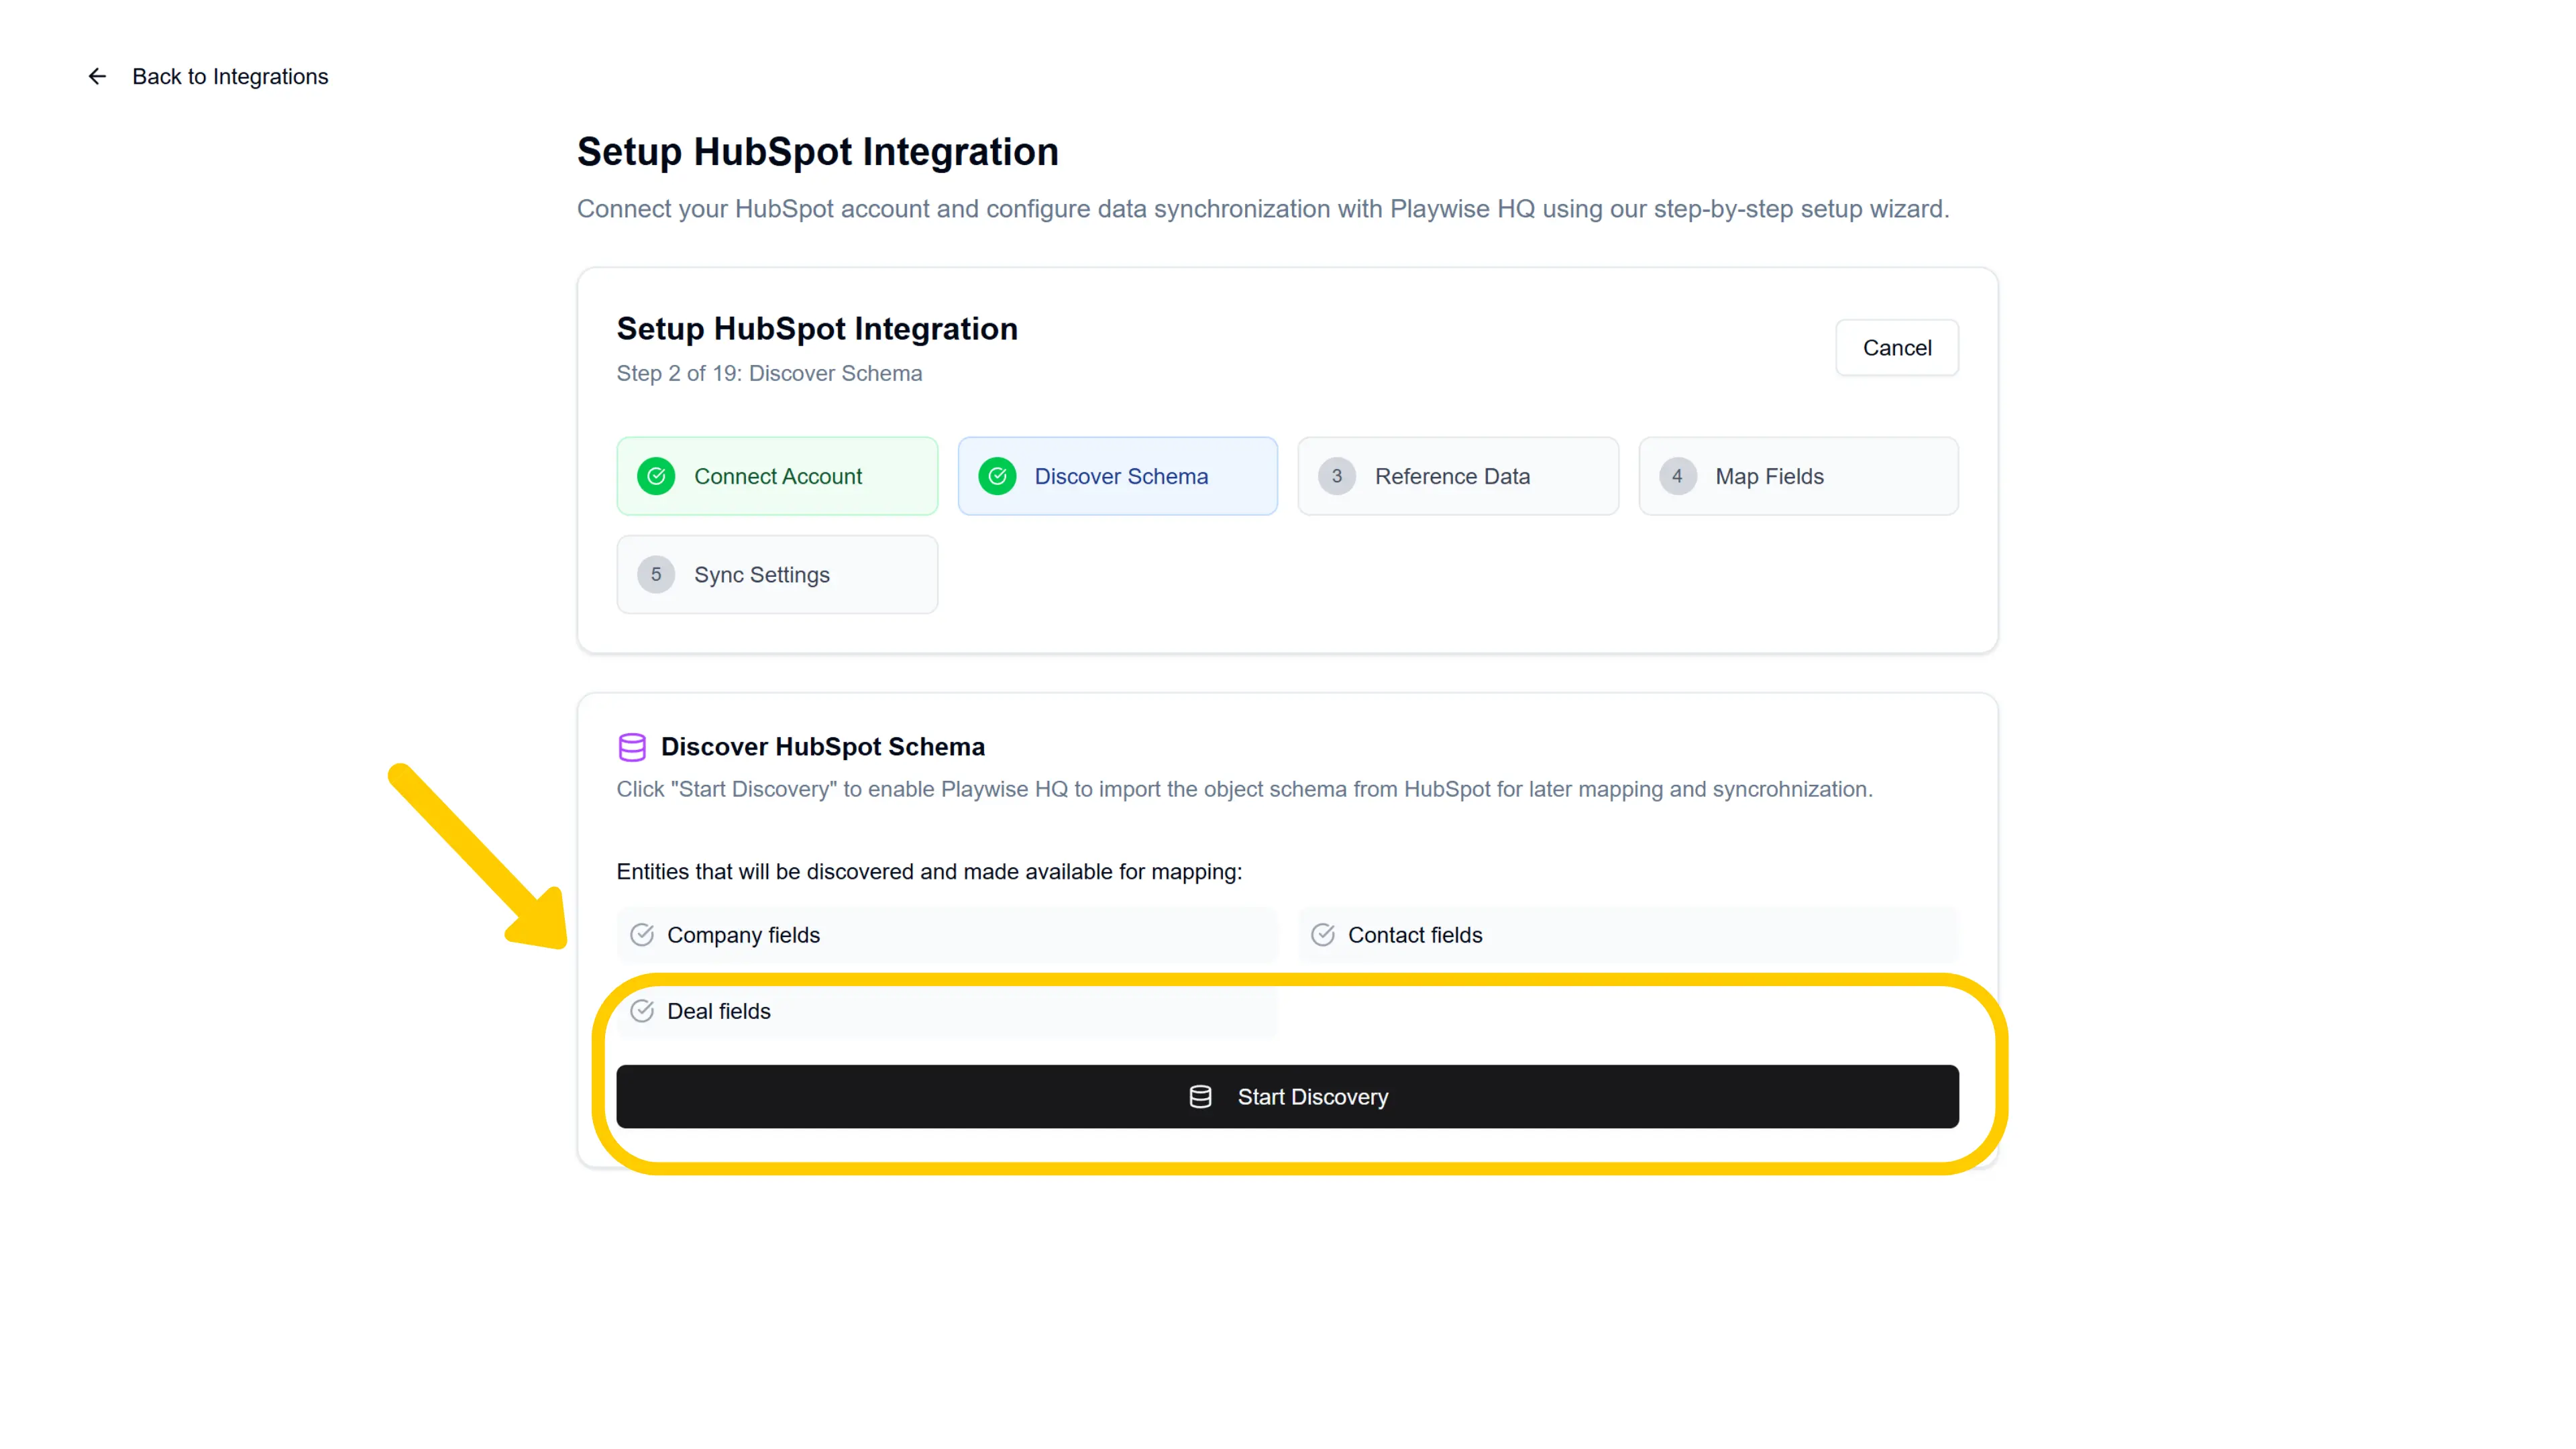
Playwise HQ needs to import the field structure from your HubSpot portal so it knows what data is available for mapping.
- You will see a card titled “Discover HubSpot Schema” listing the entities that will be discovered: Sales Account fields, Sales Account Opportunity fields, and Win/Loss Record fields.
- Click the “Start Discovery” button.
- A progress indicator will appear while Playwise HQ fetches your HubSpot field schemas, deal pipelines, and CRM users. This typically takes a few seconds.
- Once complete, a green success message will confirm: “Discovery completed successfully”. Click “Continue to Field Mapping” to proceed.
Step 5: Configure Reference Data — Industries
Before mapping individual fields, Playwise HQ walks you through importing reference data — the shared lists that both systems need to agree on.
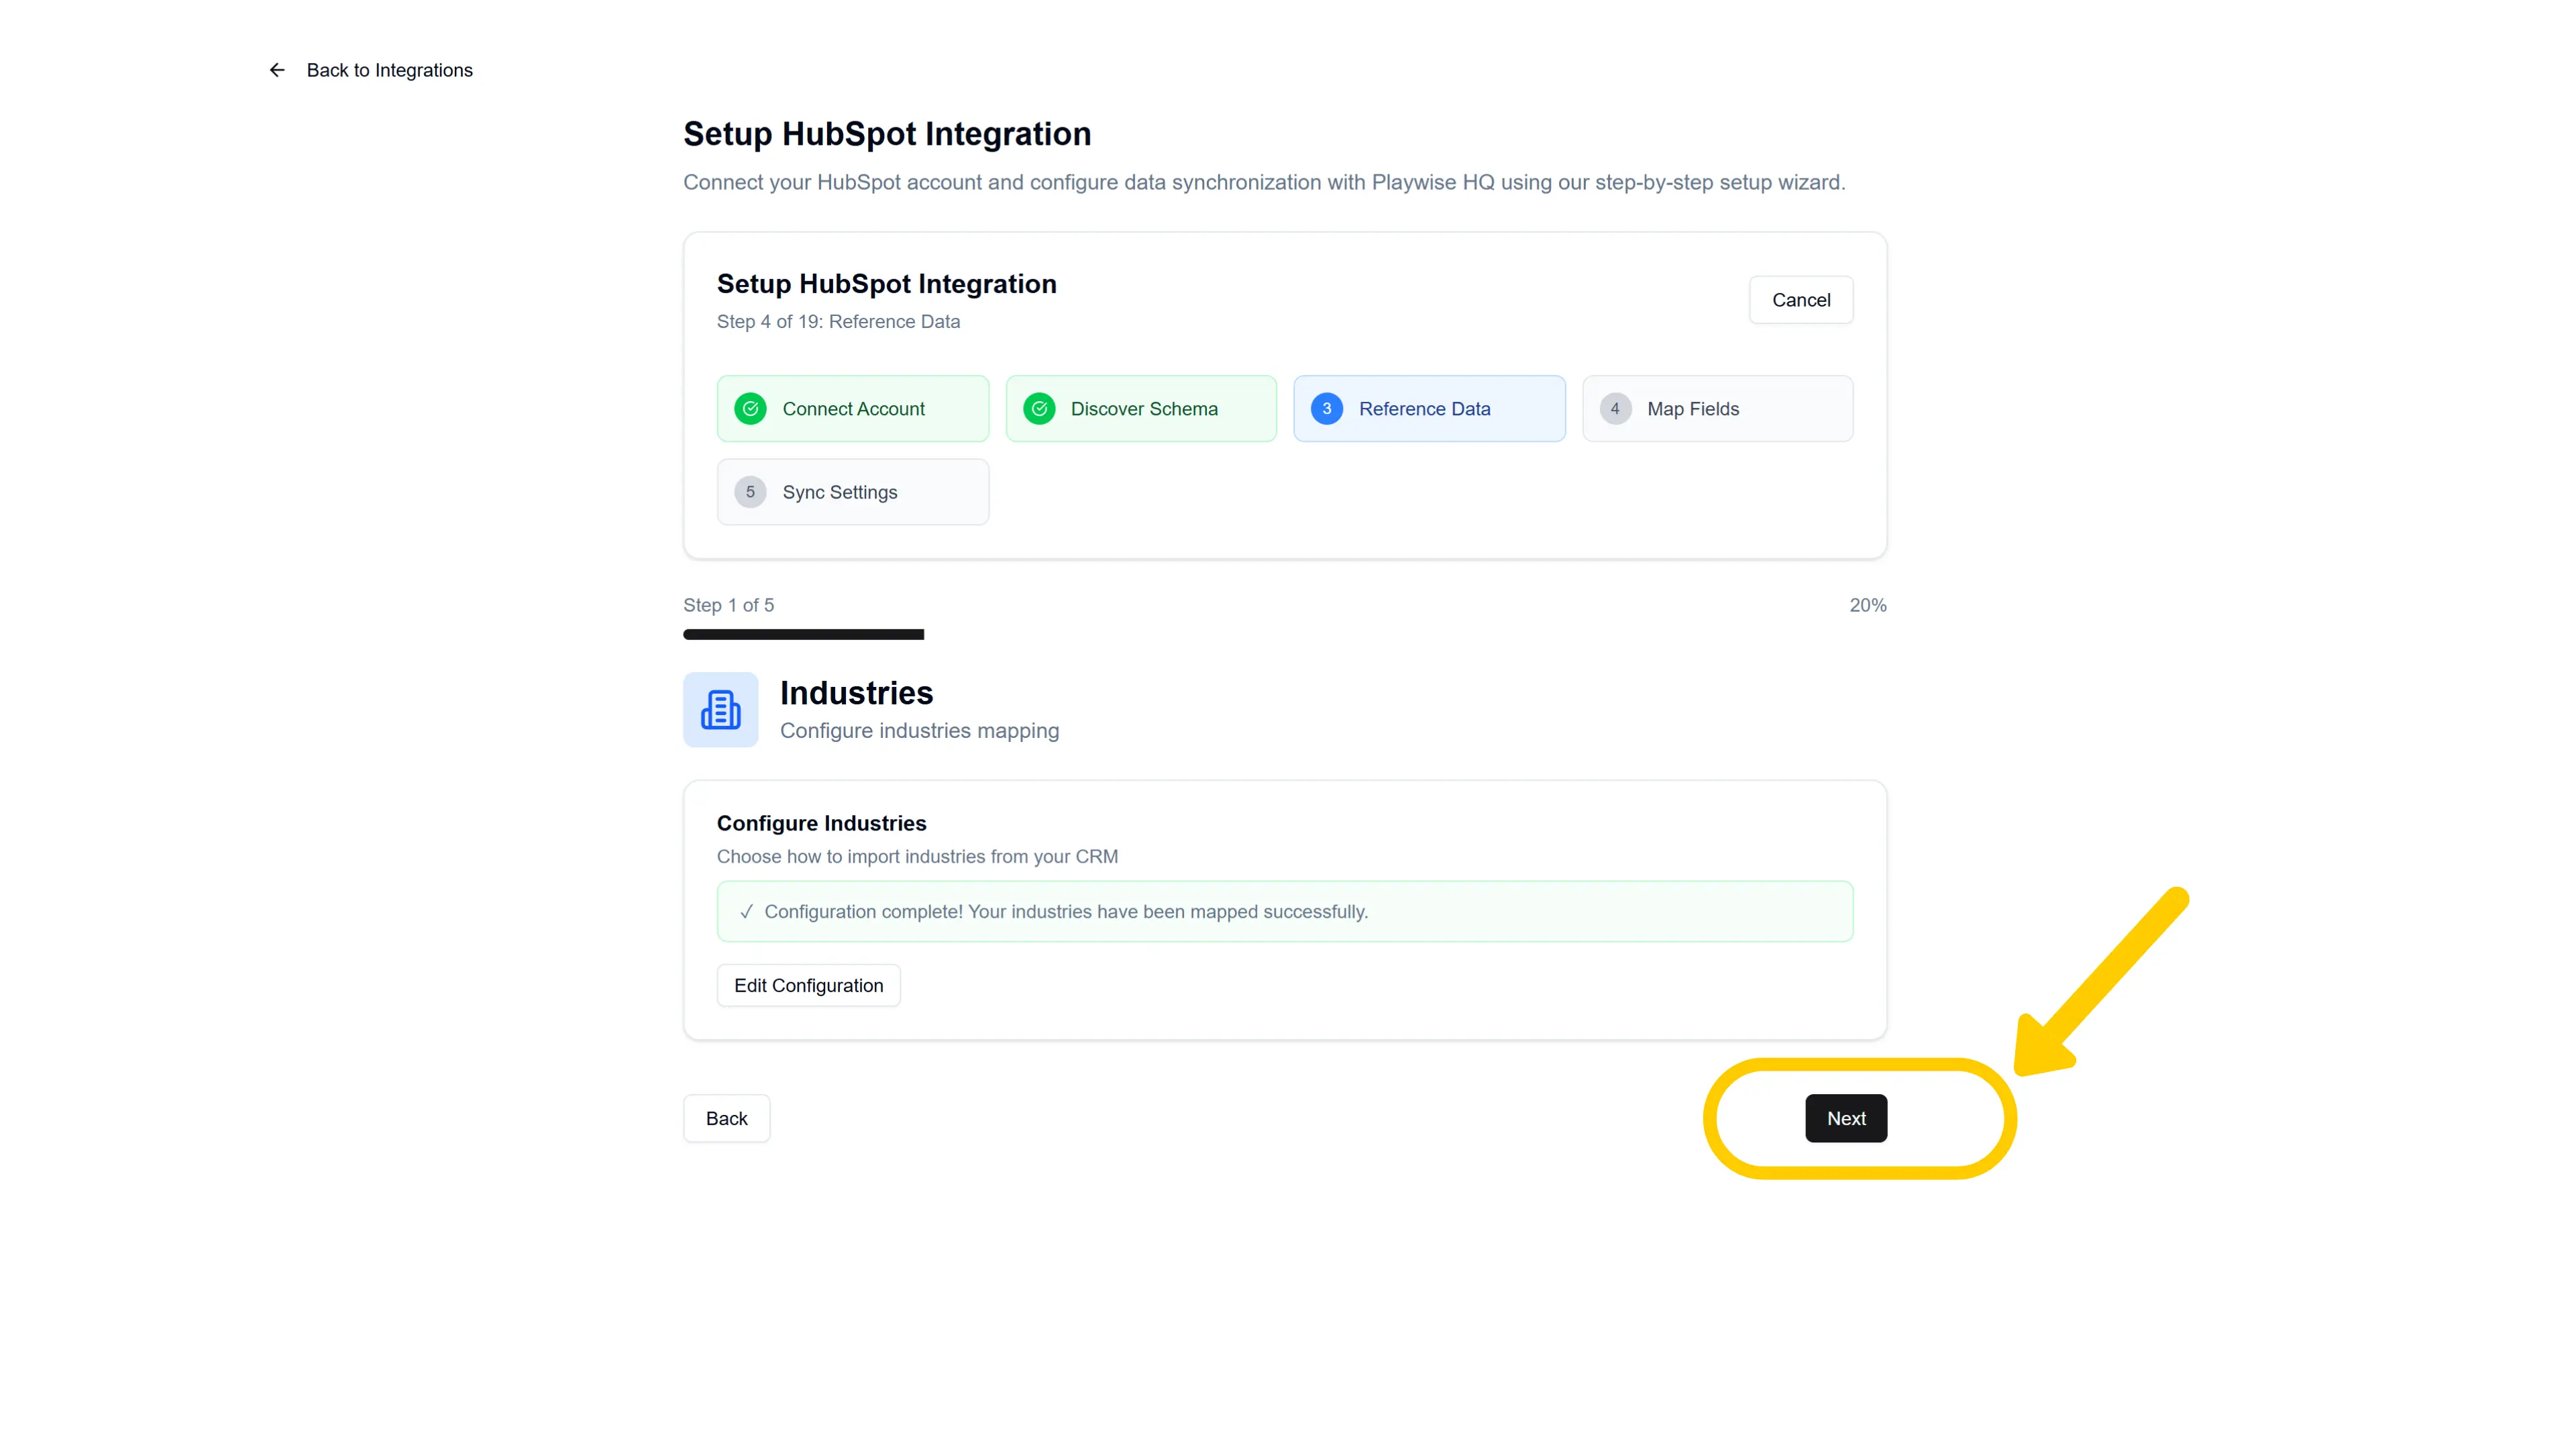
You will see an introduction screen titled “Reference Data Import” explaining that you will configure mandatory fields (Industries and Opportunity Stages) first, followed by optional fields. Click “Proceed to Import and Configuration”.
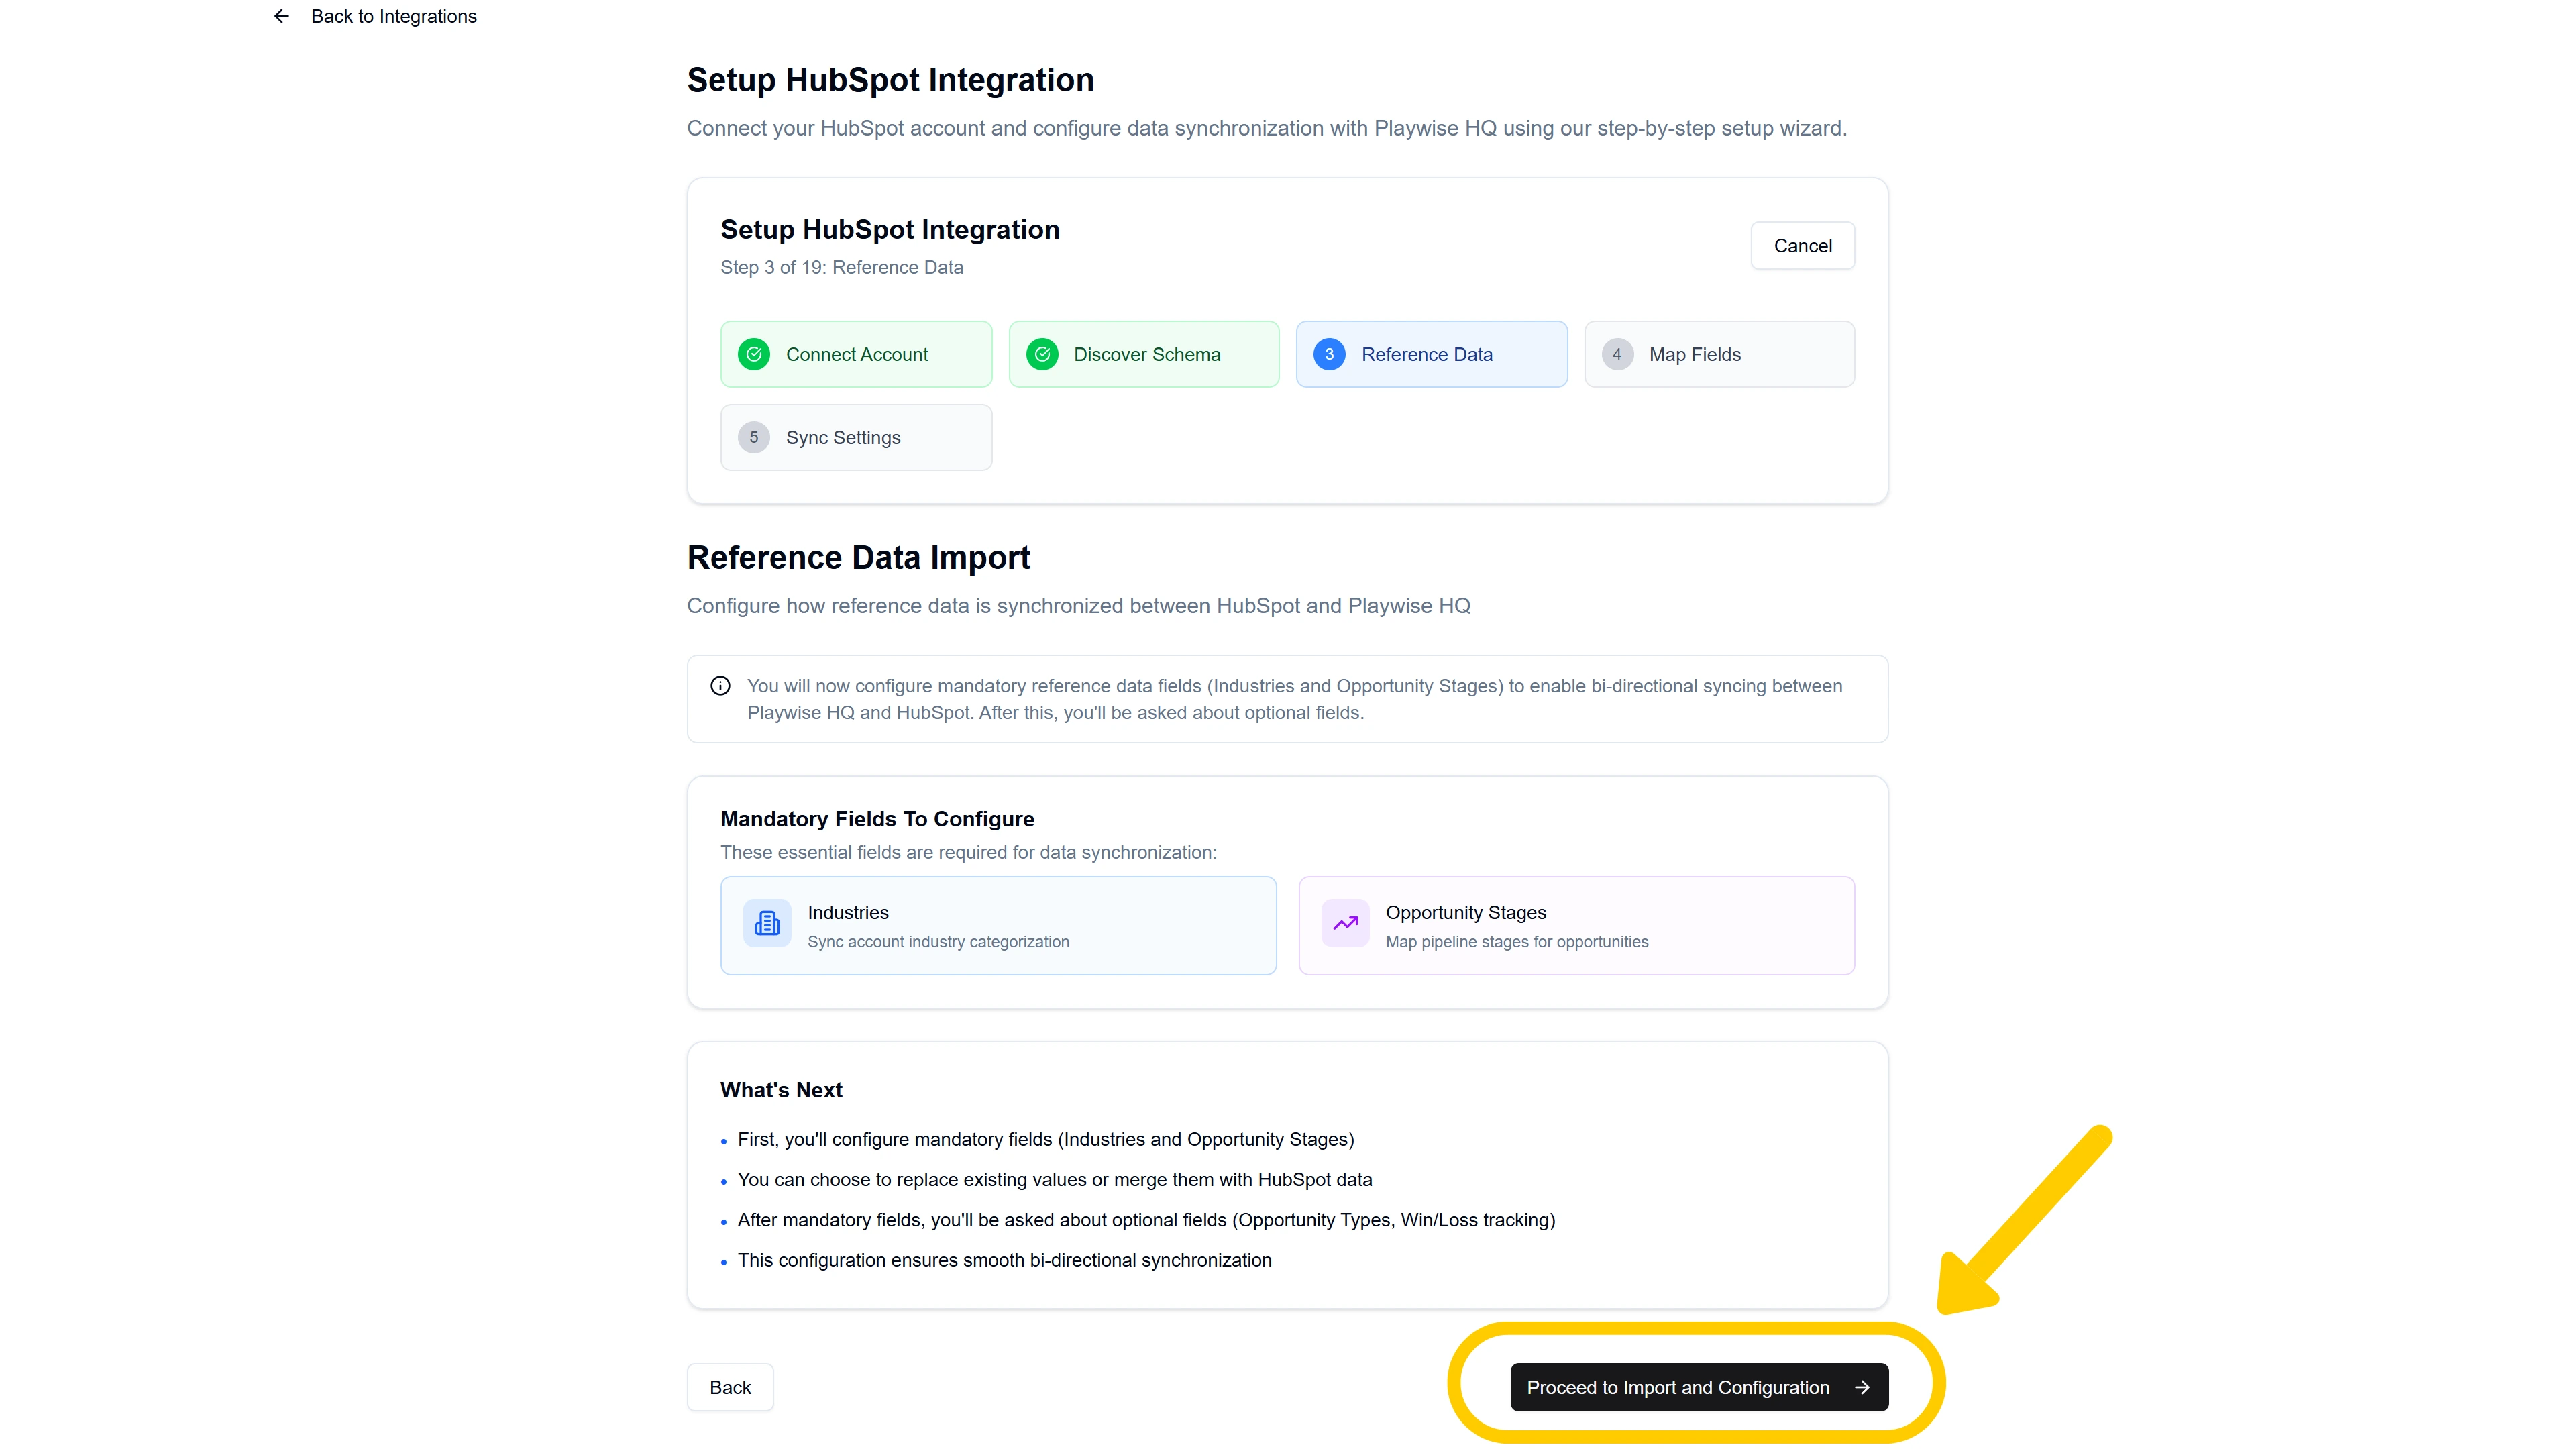
Then click “Import & Configure Mapping”
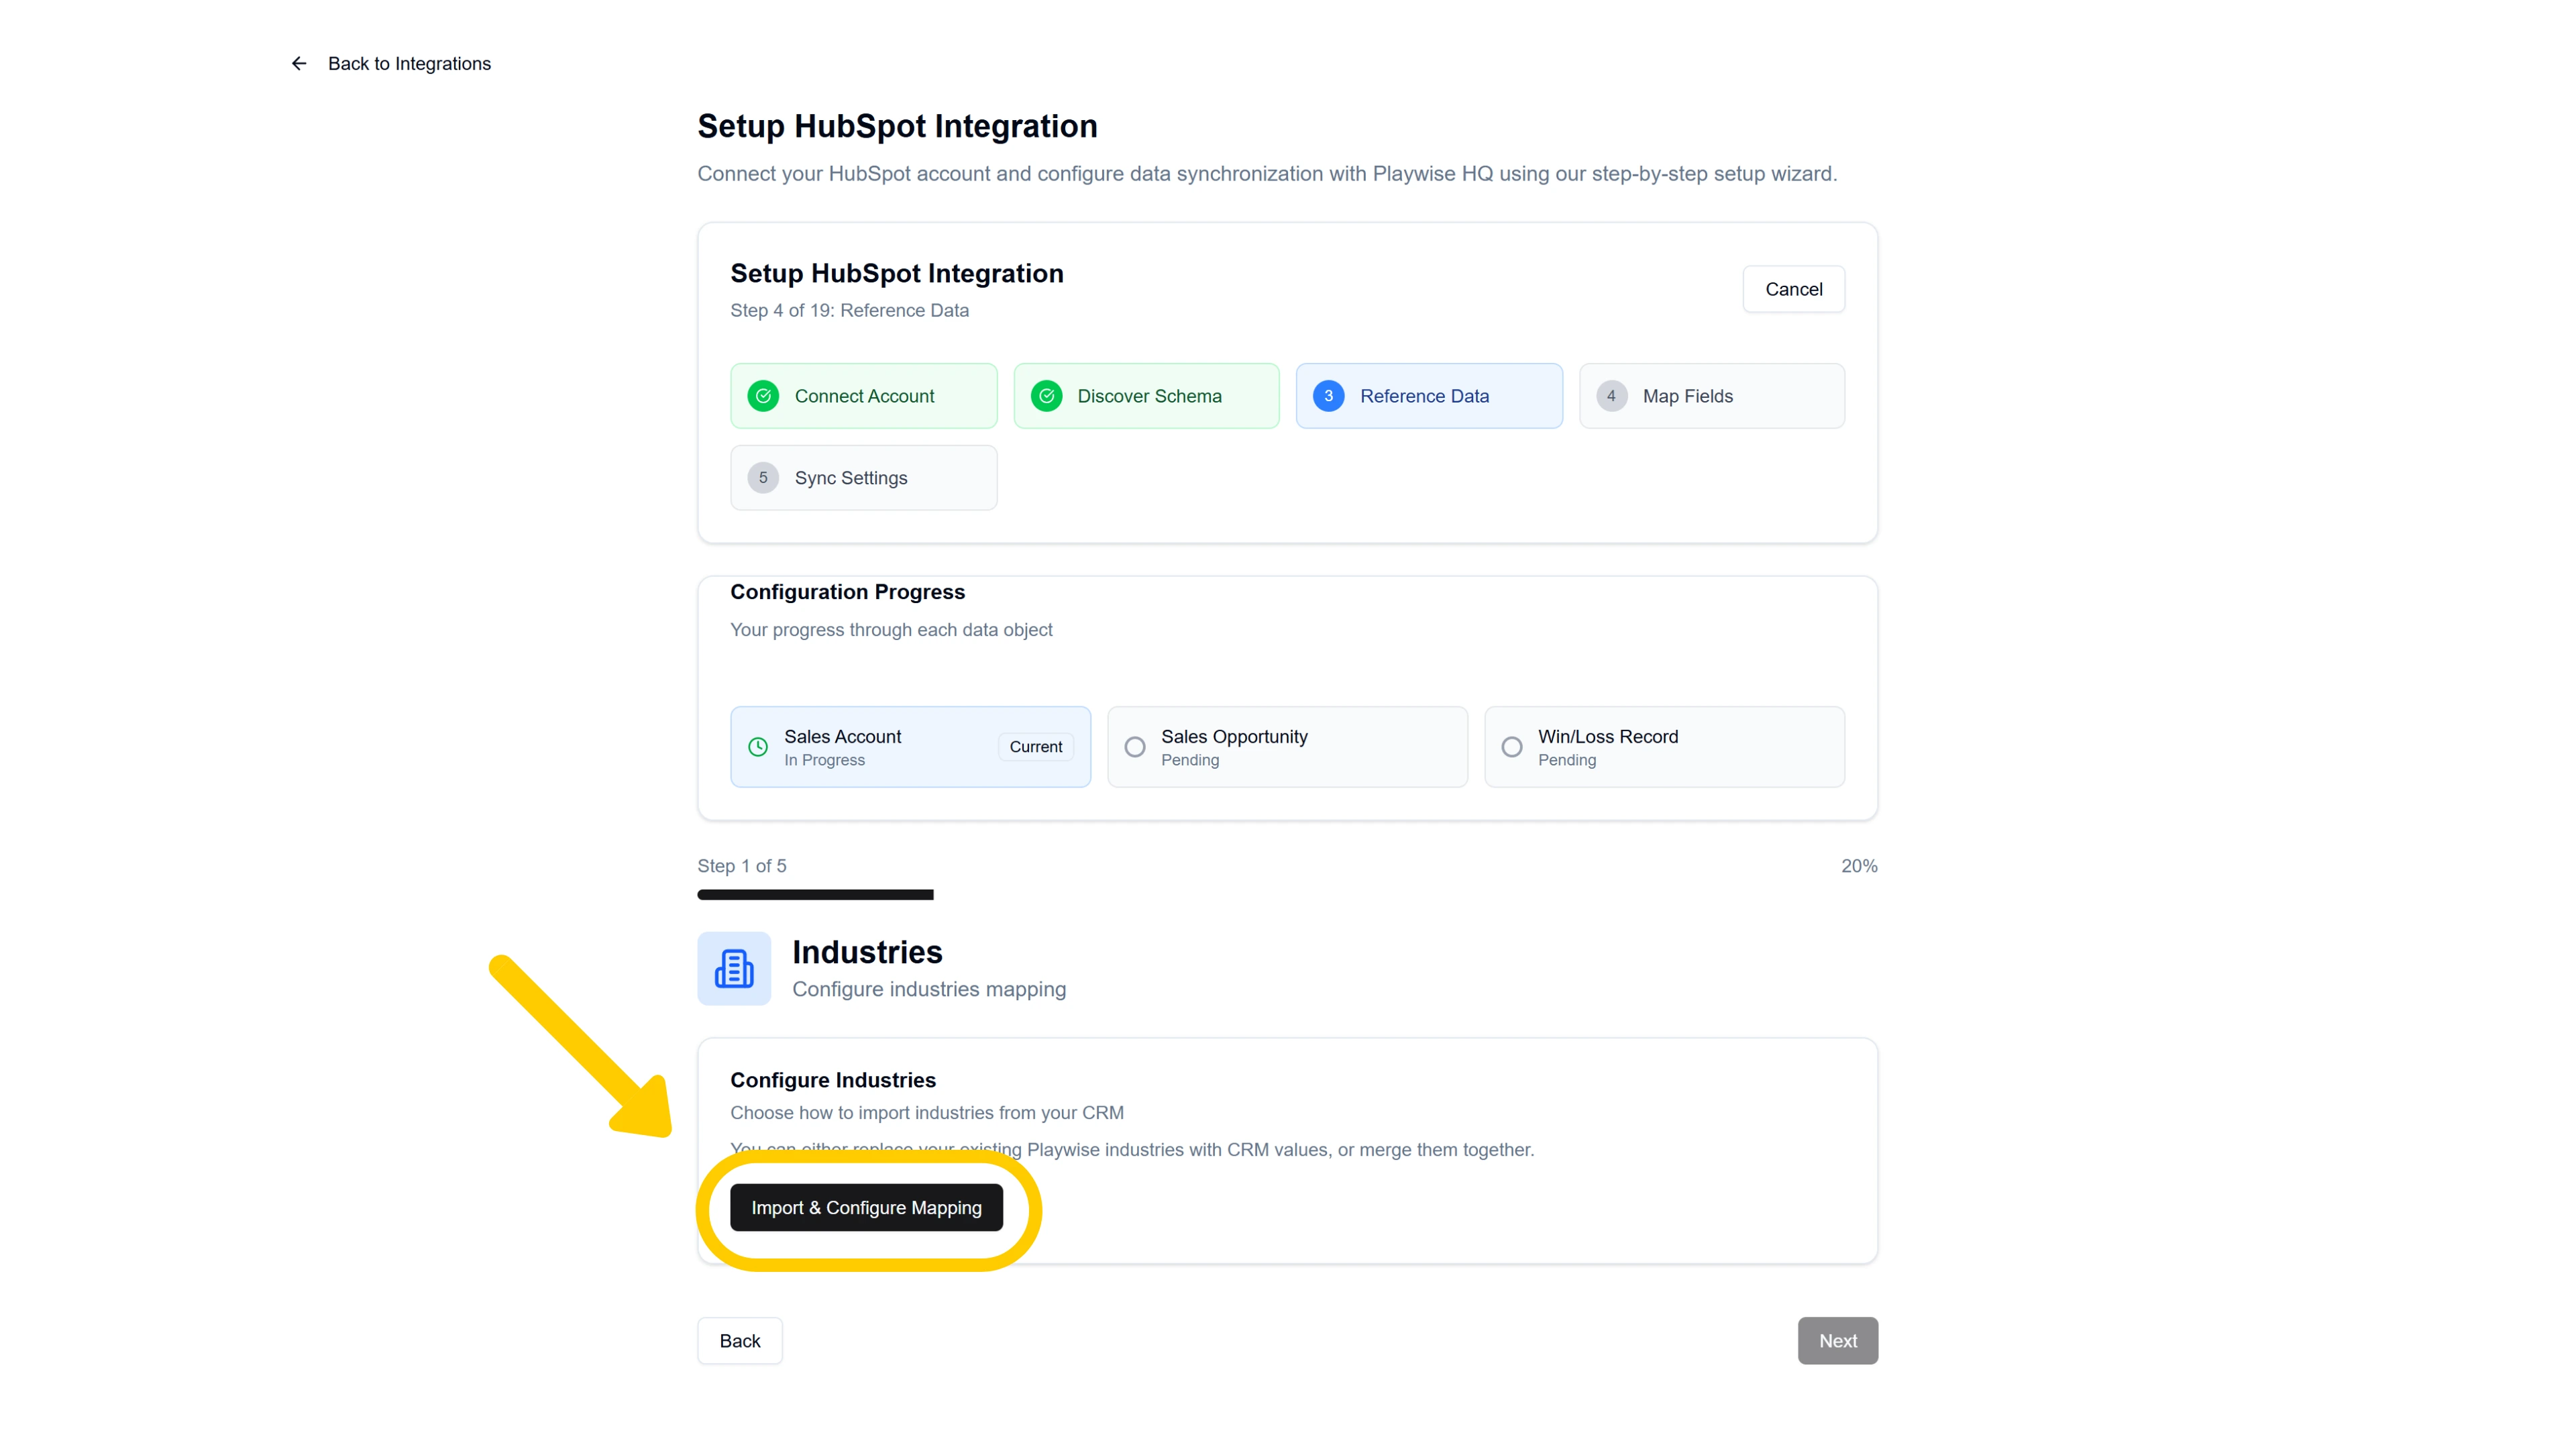
Importing Industries:
You will be asked how you want to handle industries. Choose one of two modes:
- Replace — Delete all existing Playwise HQ industries and import a fresh set from HubSpot. Choose this if you want HubSpot to be the single source of truth for industry lists.
- Merge — Keep your existing Playwise HQ industries and map them to their HubSpot equivalents. Any HubSpot industries that do not match an existing Playwise industry will be added as new entries.
If you chose Replace: Review the impact summary showing how many existing industries will be removed and how many new ones will be imported. Check the confirmation checkbox and click “Replace and Import”.
Note: If your Playwise HQ account is new or lightly used, you can choose to fully replace all existing industries with those from HubSpot.
This is the fastest option and avoids any manual mapping. It means that the default industry names used in Playwise HQ will be replaced by those in Hubspot.
If you chose Merge: Map each Playwise HQ industry to its HubSpot equivalent using the dropdown selectors. Unmapped HubSpot industries can be imported as new entries. Click “Apply Merge” when done.
A success notification will confirm the mapping was applied. Click “Next” to proceed to the next step of the integration process.
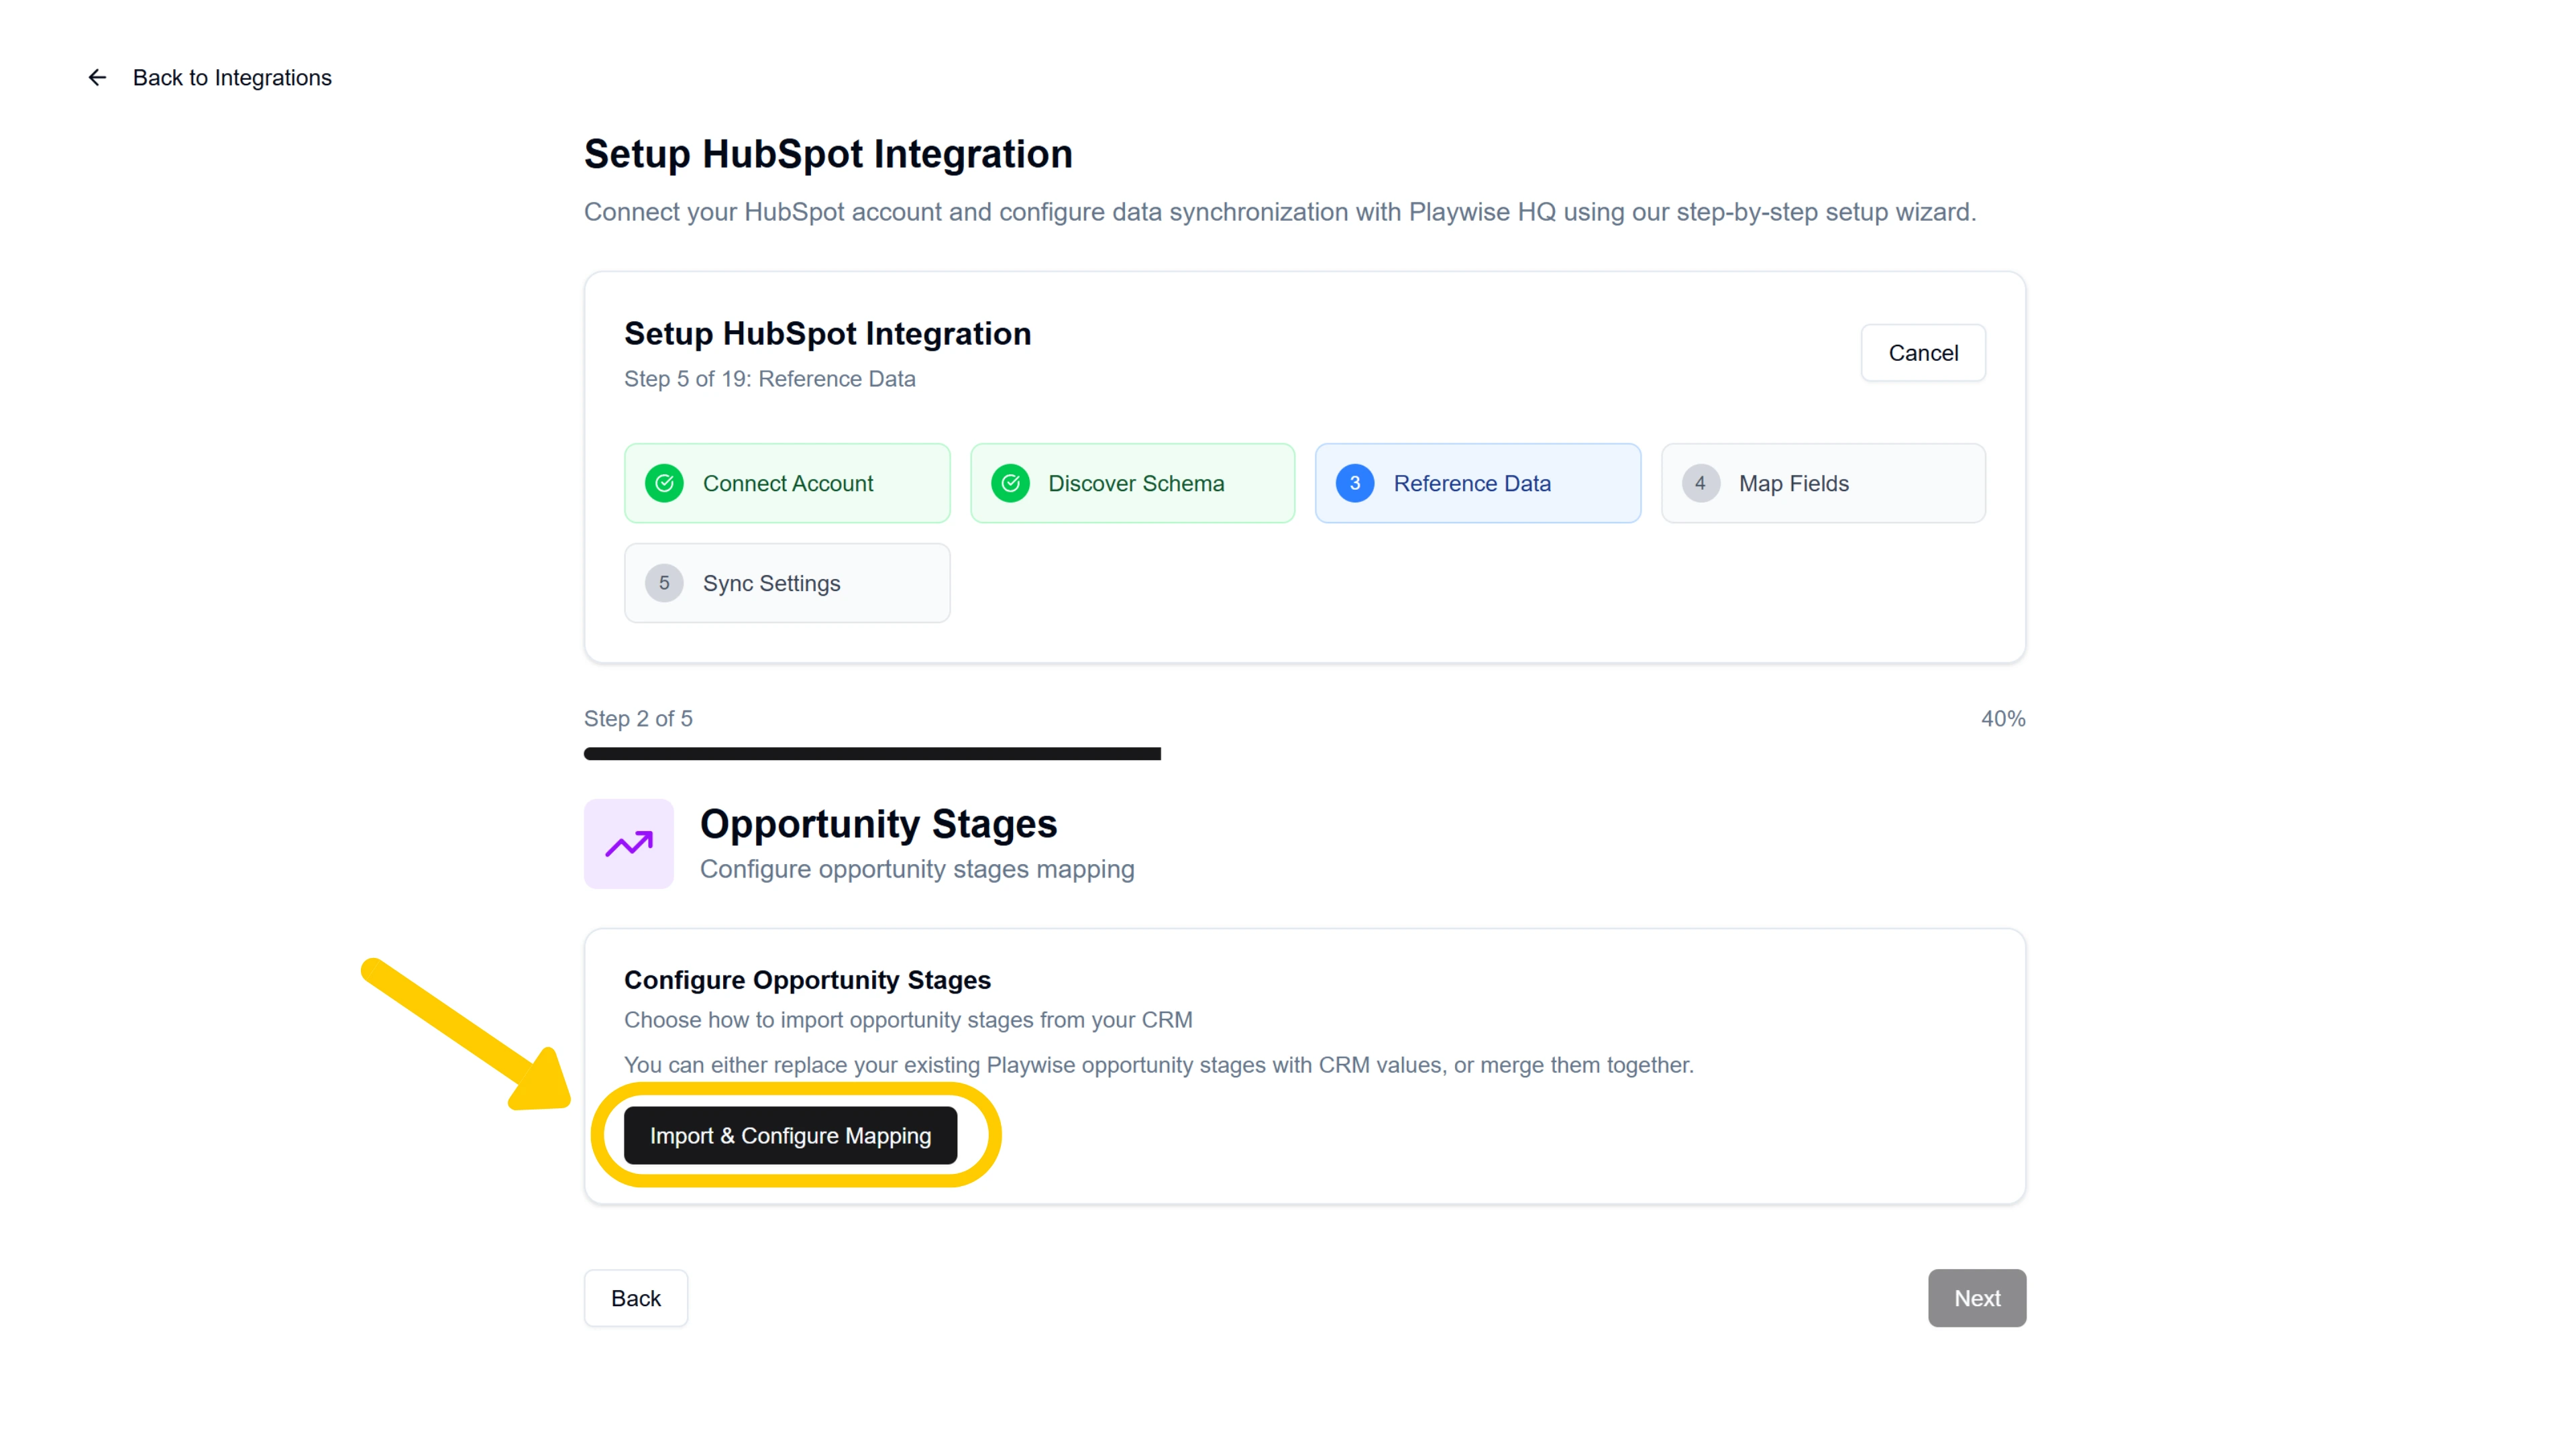
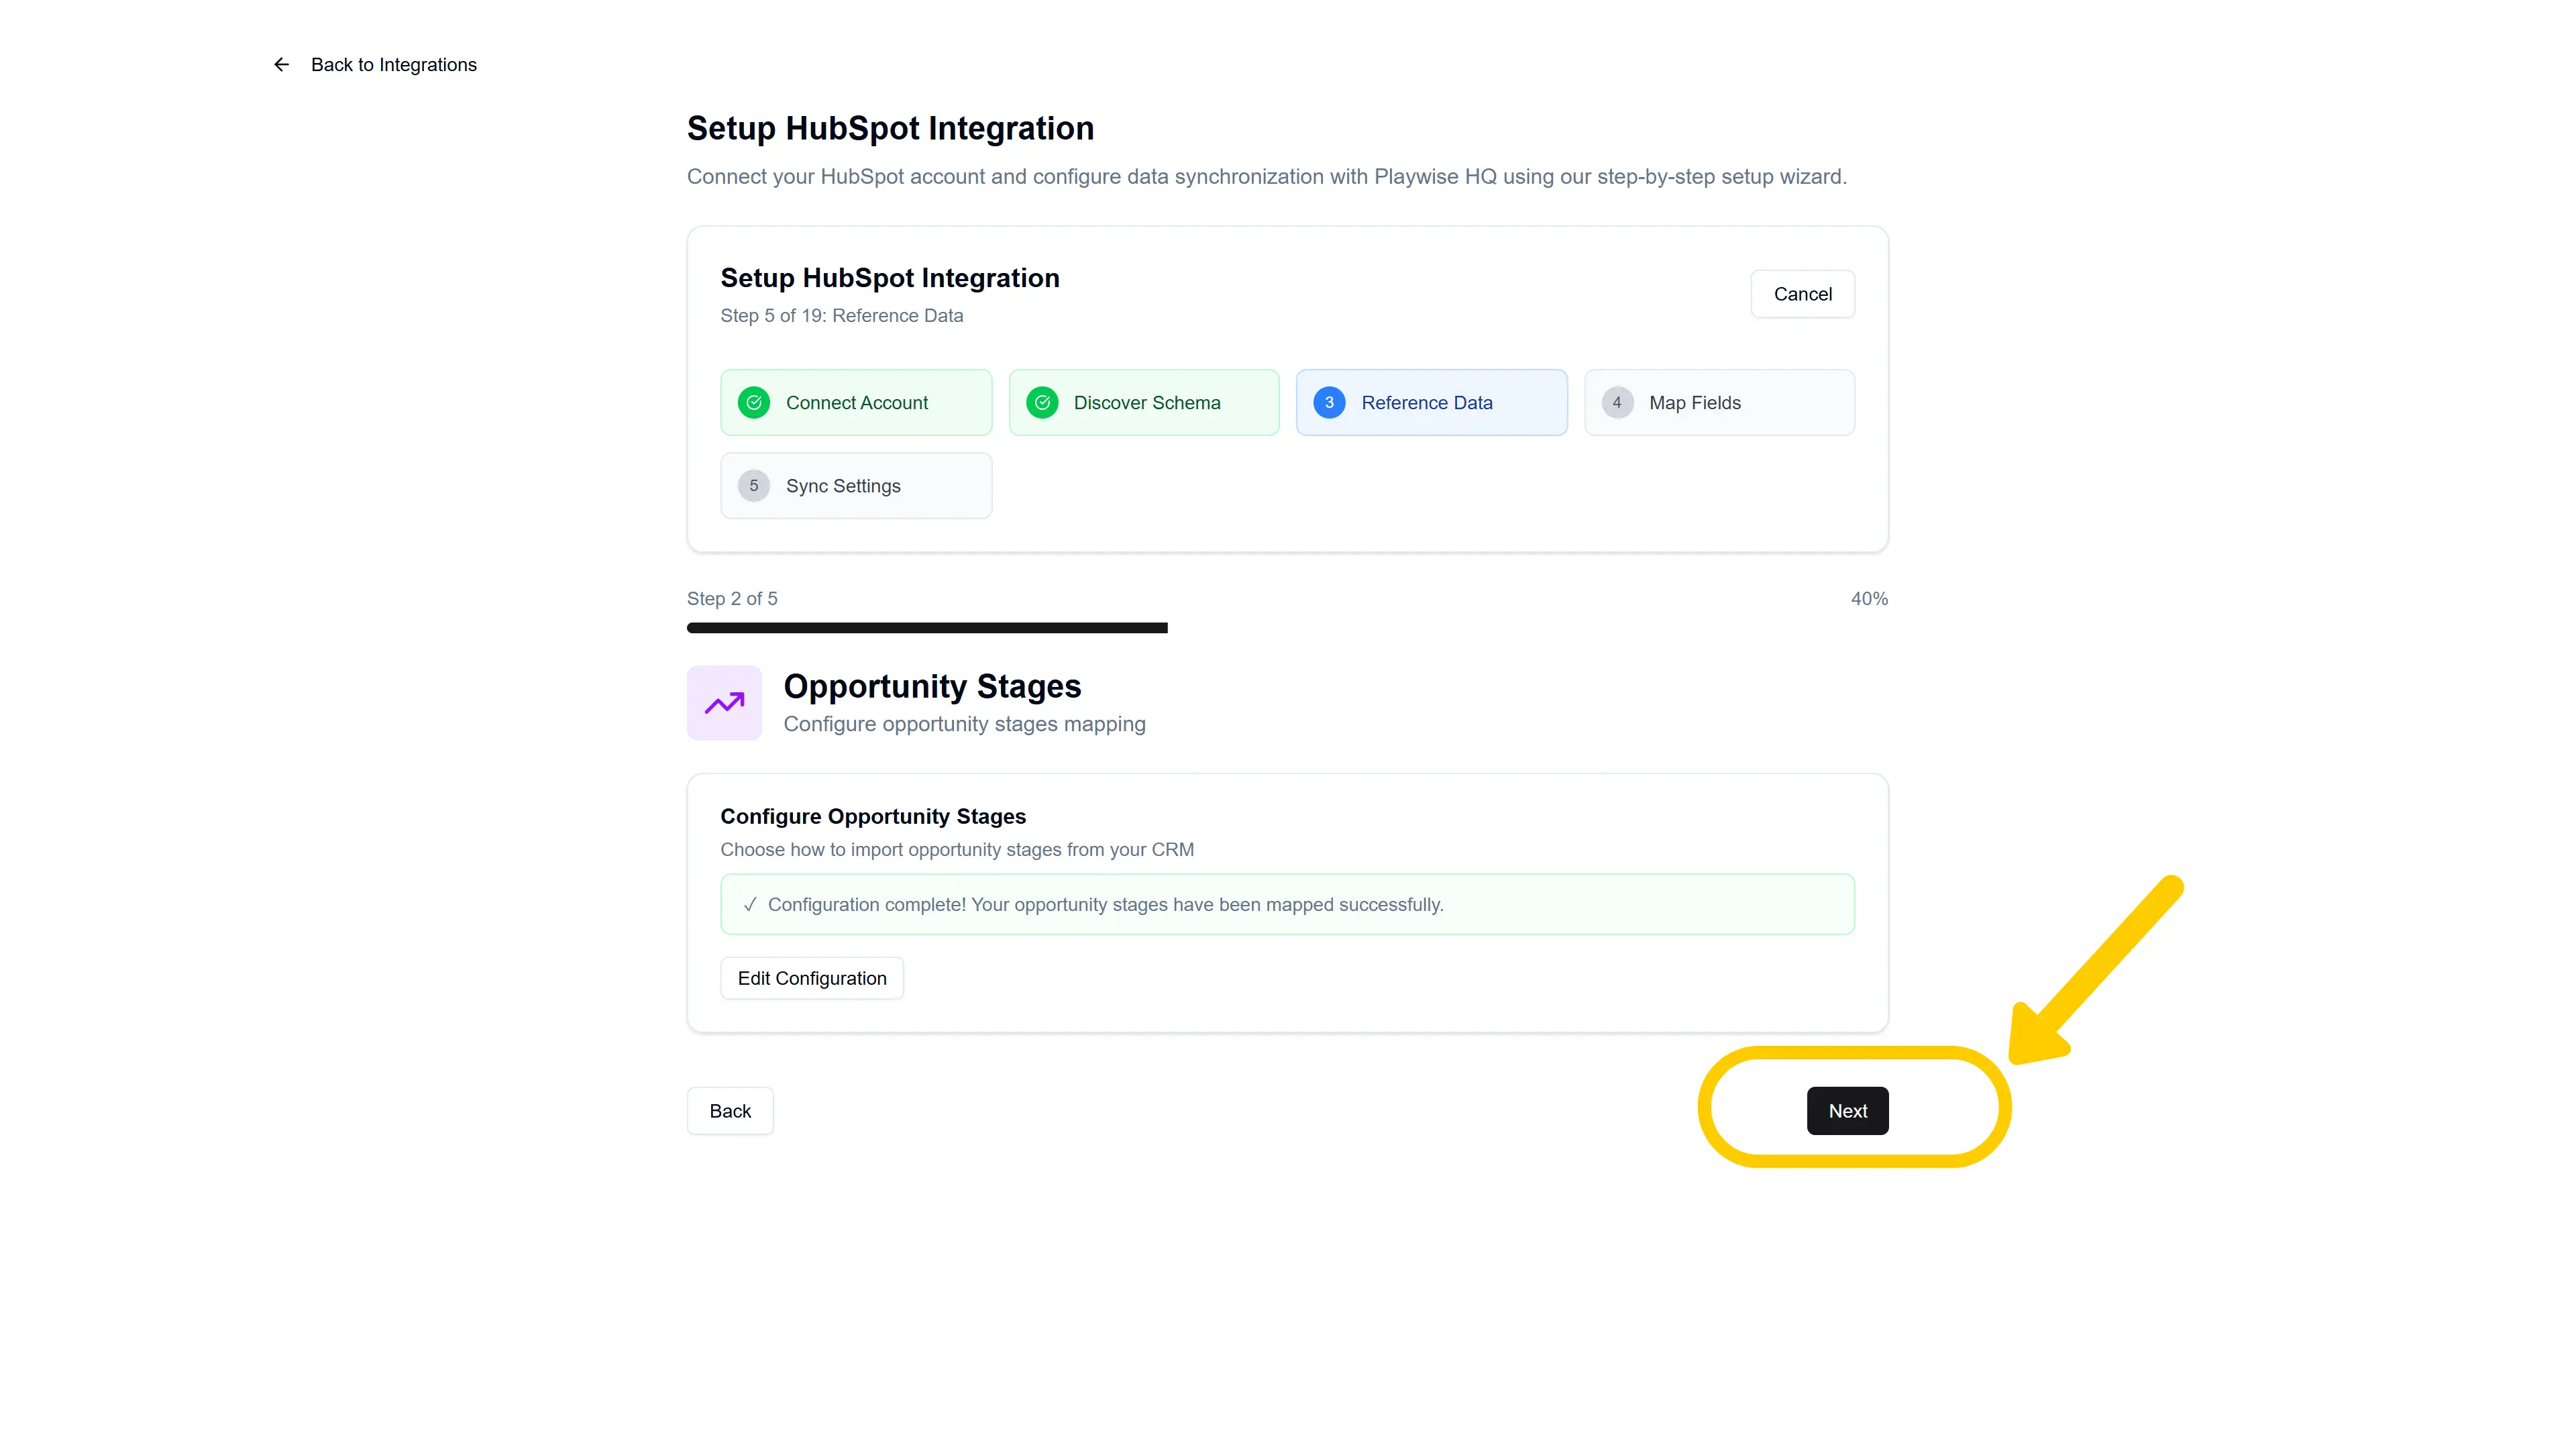
Step 6: Configure Reference Data — Opportunity Stages
Next, you will map your HubSpot deal pipeline stages to Playwise HQ opportunity stages. This step ensures that when deals sync from HubSpot, their pipeline stage is correctly represented in Playwise HQ.
You will see a card titled “Configure Opportunity Stages” with a description: “Choose how to import opportunity stages from your CRM.” Click “Import & Configure Mapping” to open the mapping modal.
Choosing a Mapping Mode
A mode selector appears with two options:
Import & Update Mode (Recommended) — Keep your existing Playwise HQ opportunity stages and map them to their HubSpot equivalents. Playwise HQ stage values will be updated to use the new HubSpot values after the merge, and you choose which items map to which. Any HubSpot stages that do not match an existing Playwise stage will be added as new entries.
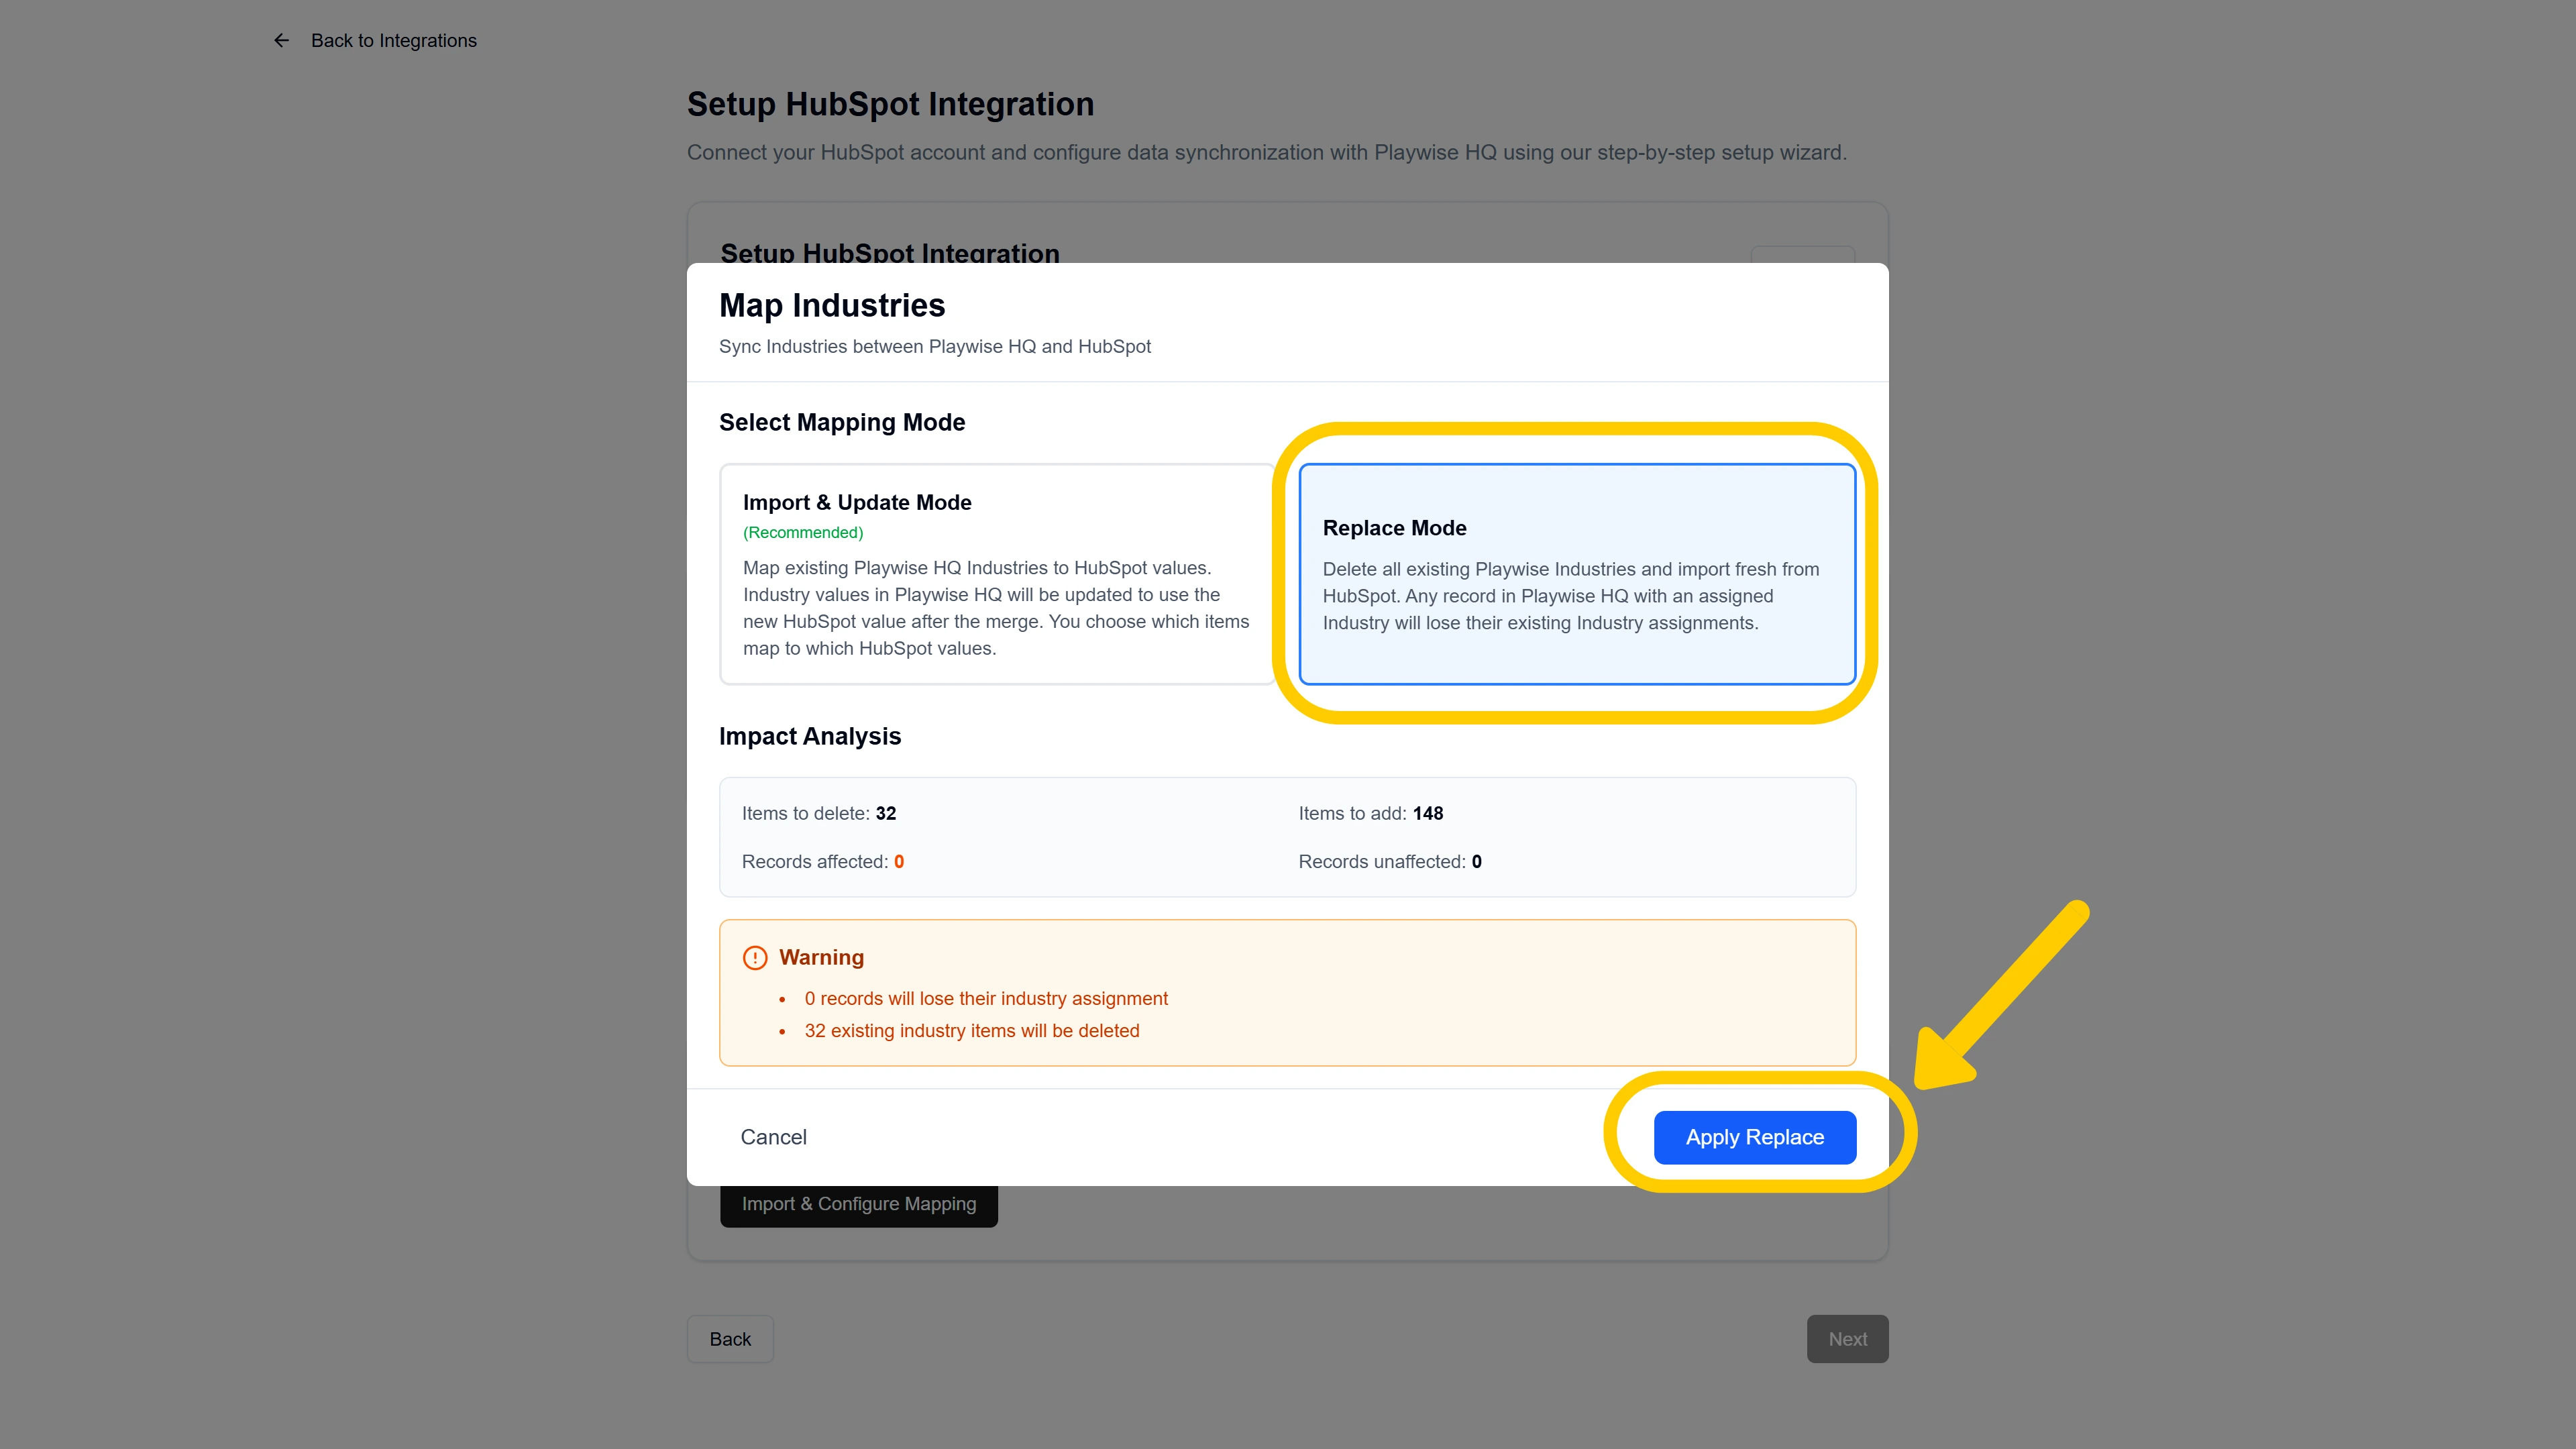
Replace Mode — Delete all existing Playwise HQ opportunity stages and import a fresh set from HubSpot. Any record in Playwise HQ with an assigned opportunity stage will lose its existing stage assignment.
Select your preferred mode to proceed.
Option A: Replace Mode
If you selected Replace Mode, no mapping table is shown. Instead, you will see an Impact Analysis summary showing exactly what will happen:
| Metric | What It Means |
|---|---|
| Items to delete | The number of existing Playwise HQ opportunity stages that will be removed |
| Items to add | The number of HubSpot stages that will be imported |
| Records affected | The number of existing records (e.g., deals) in Playwise HQ that currently have a stage assigned and will lose their assignment |
| Records unaffected | The number of records that have no stage assignment and will not be impacted |
Once you have reviewed the impact analysis and are satisfied, click “Apply Replace”. A spinner will appear while the replacement is processed. On success, the modal closes and a green confirmation message appears: “Configuration complete! Your opportunity stages have been mapped successfully.”
Option B: Import & Update Mode (Merge)
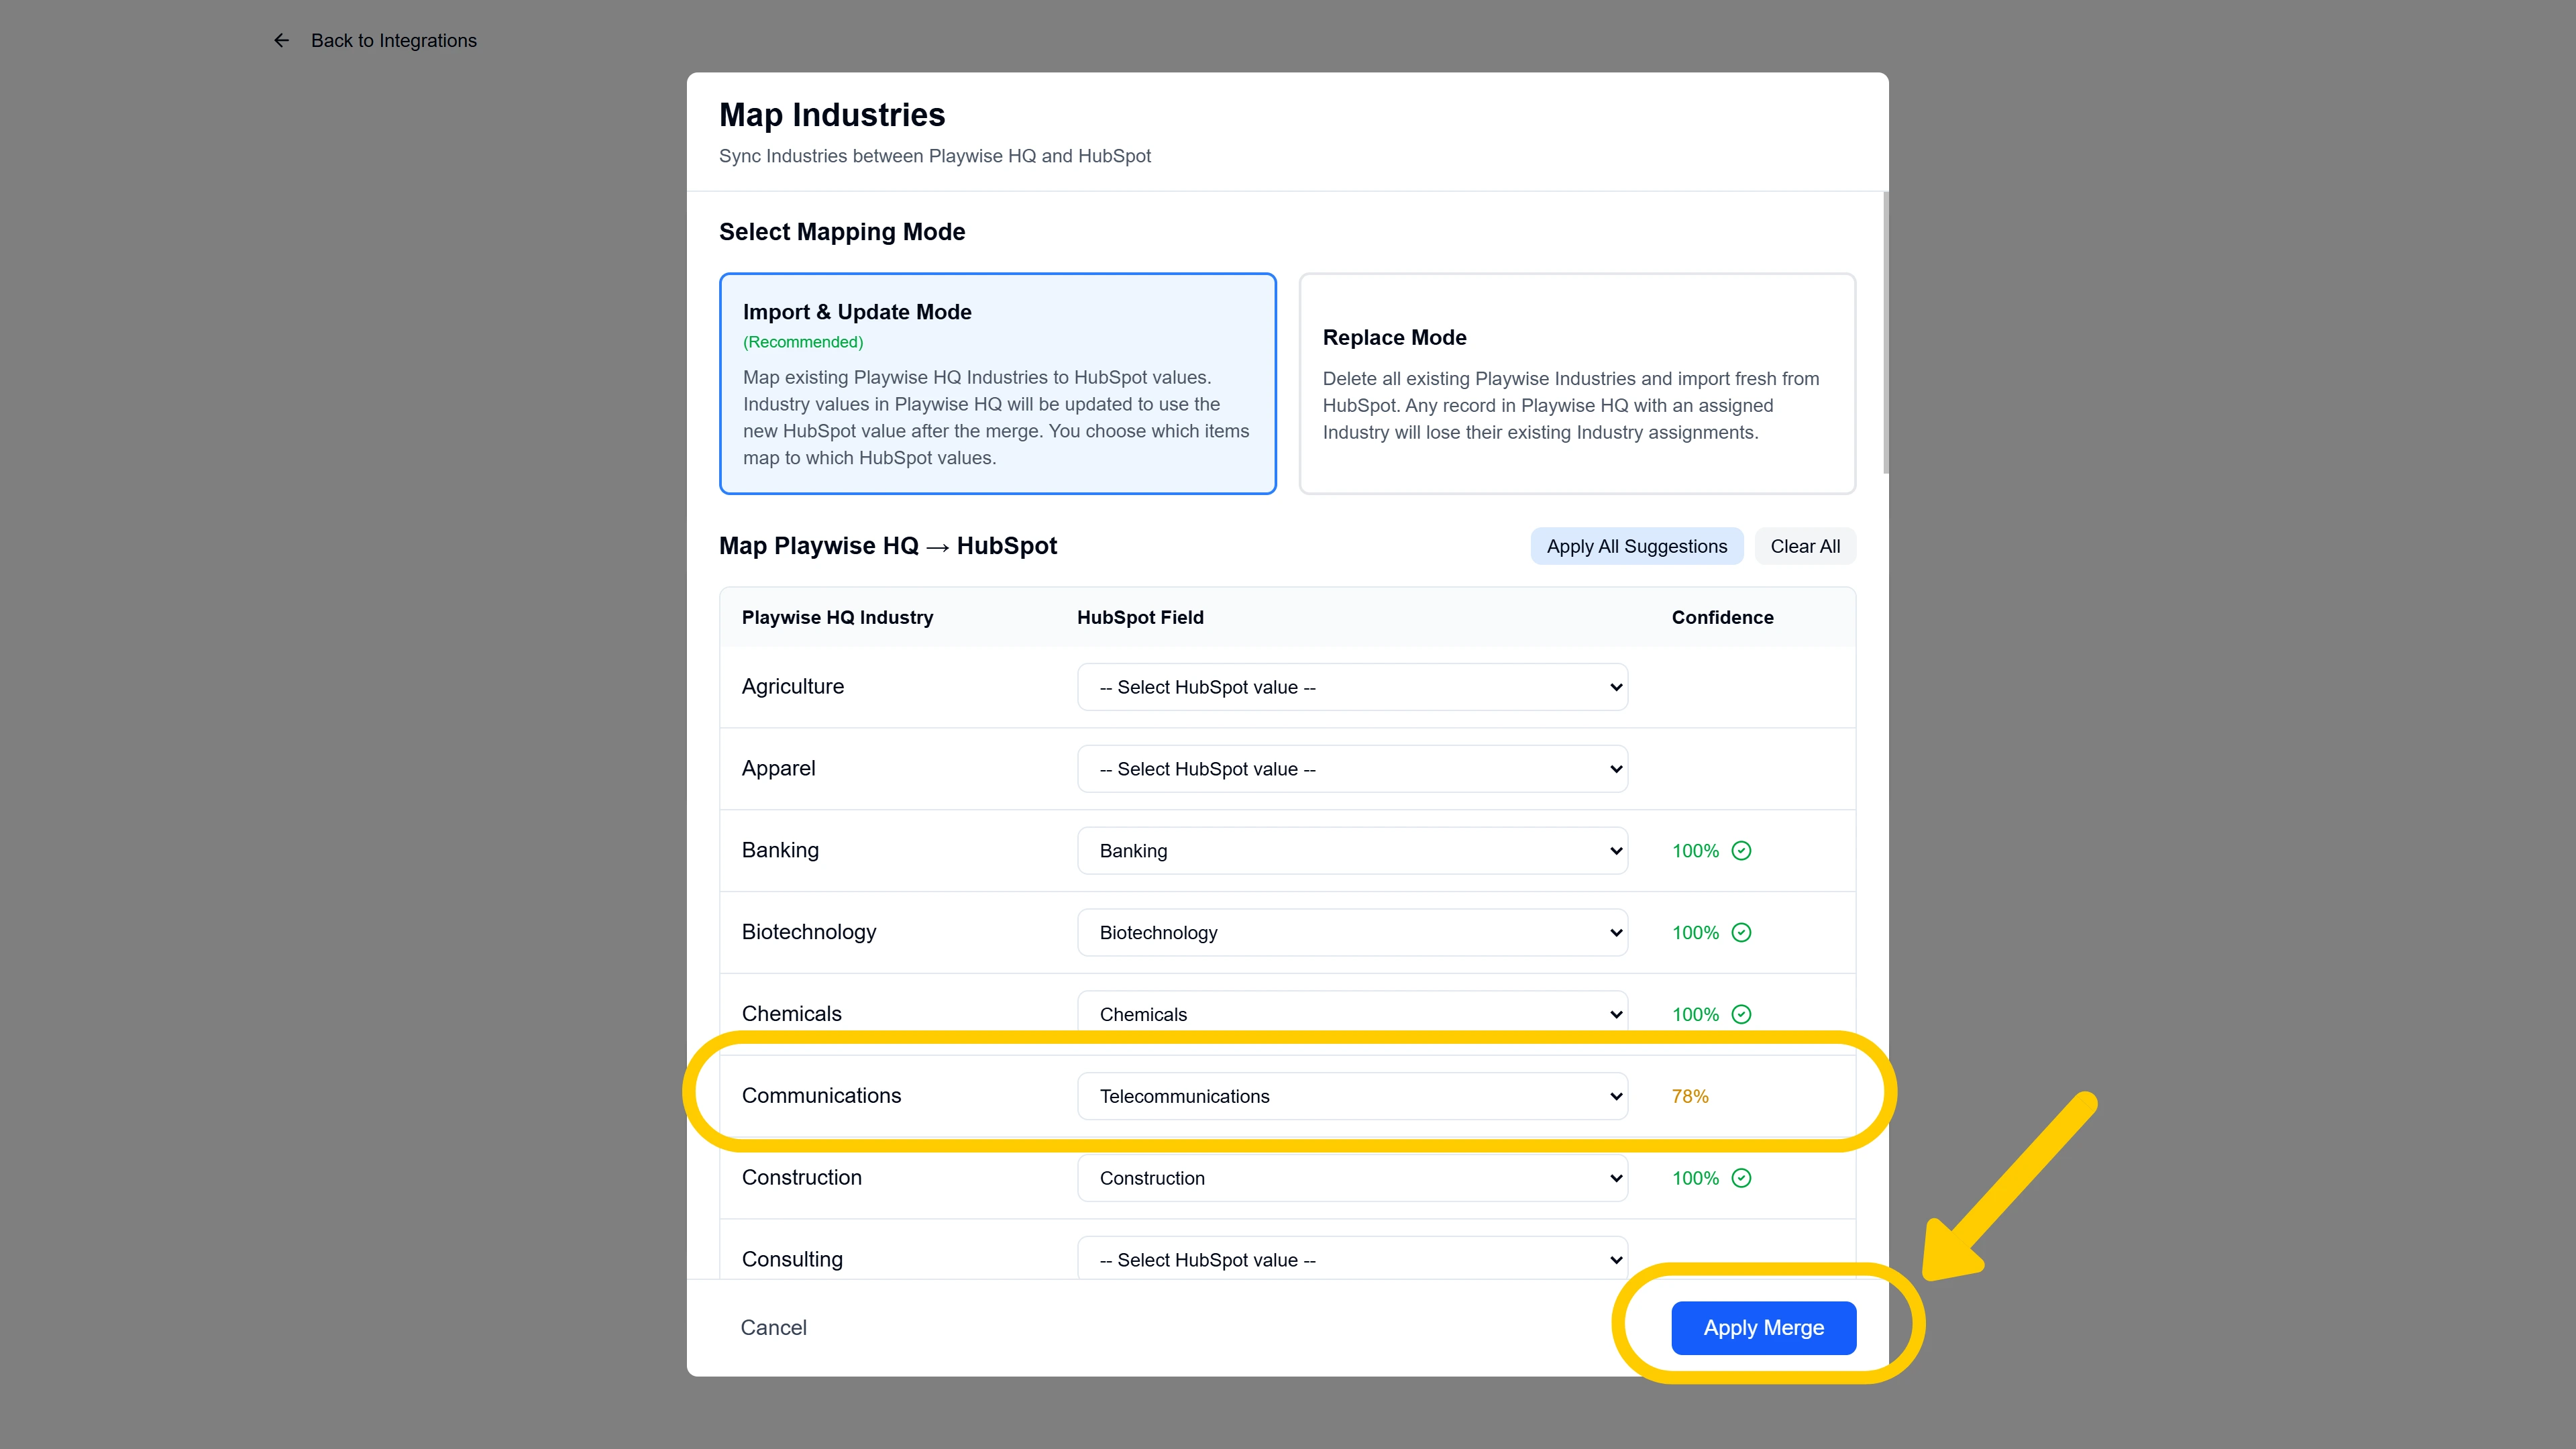
If you selected Import & Update Mode, a mapping table appears titled “Map HubSpot -> Playwise HQ”.
Unlike the Industries mapping (which maps Playwise HQ items to HubSpot values), the Opportunity Stages mapping works in the opposite direction – HubSpot stages are listed on the left, and you assign Playwise HQ stages to each one on the right. This allows you to consolidate multiple Playwise stages into a single HubSpot stage if needed.
The mapping table has two columns:
| Column | What It Shows |
|---|---|
| HubSpot Stage | The stage name from your HubSpot deal pipeline (read-only) |
| Playwise HQ Stages (Consolidate) | A multi-select dropdown where you assign one or more Playwise HQ stages to this HubSpot stage |
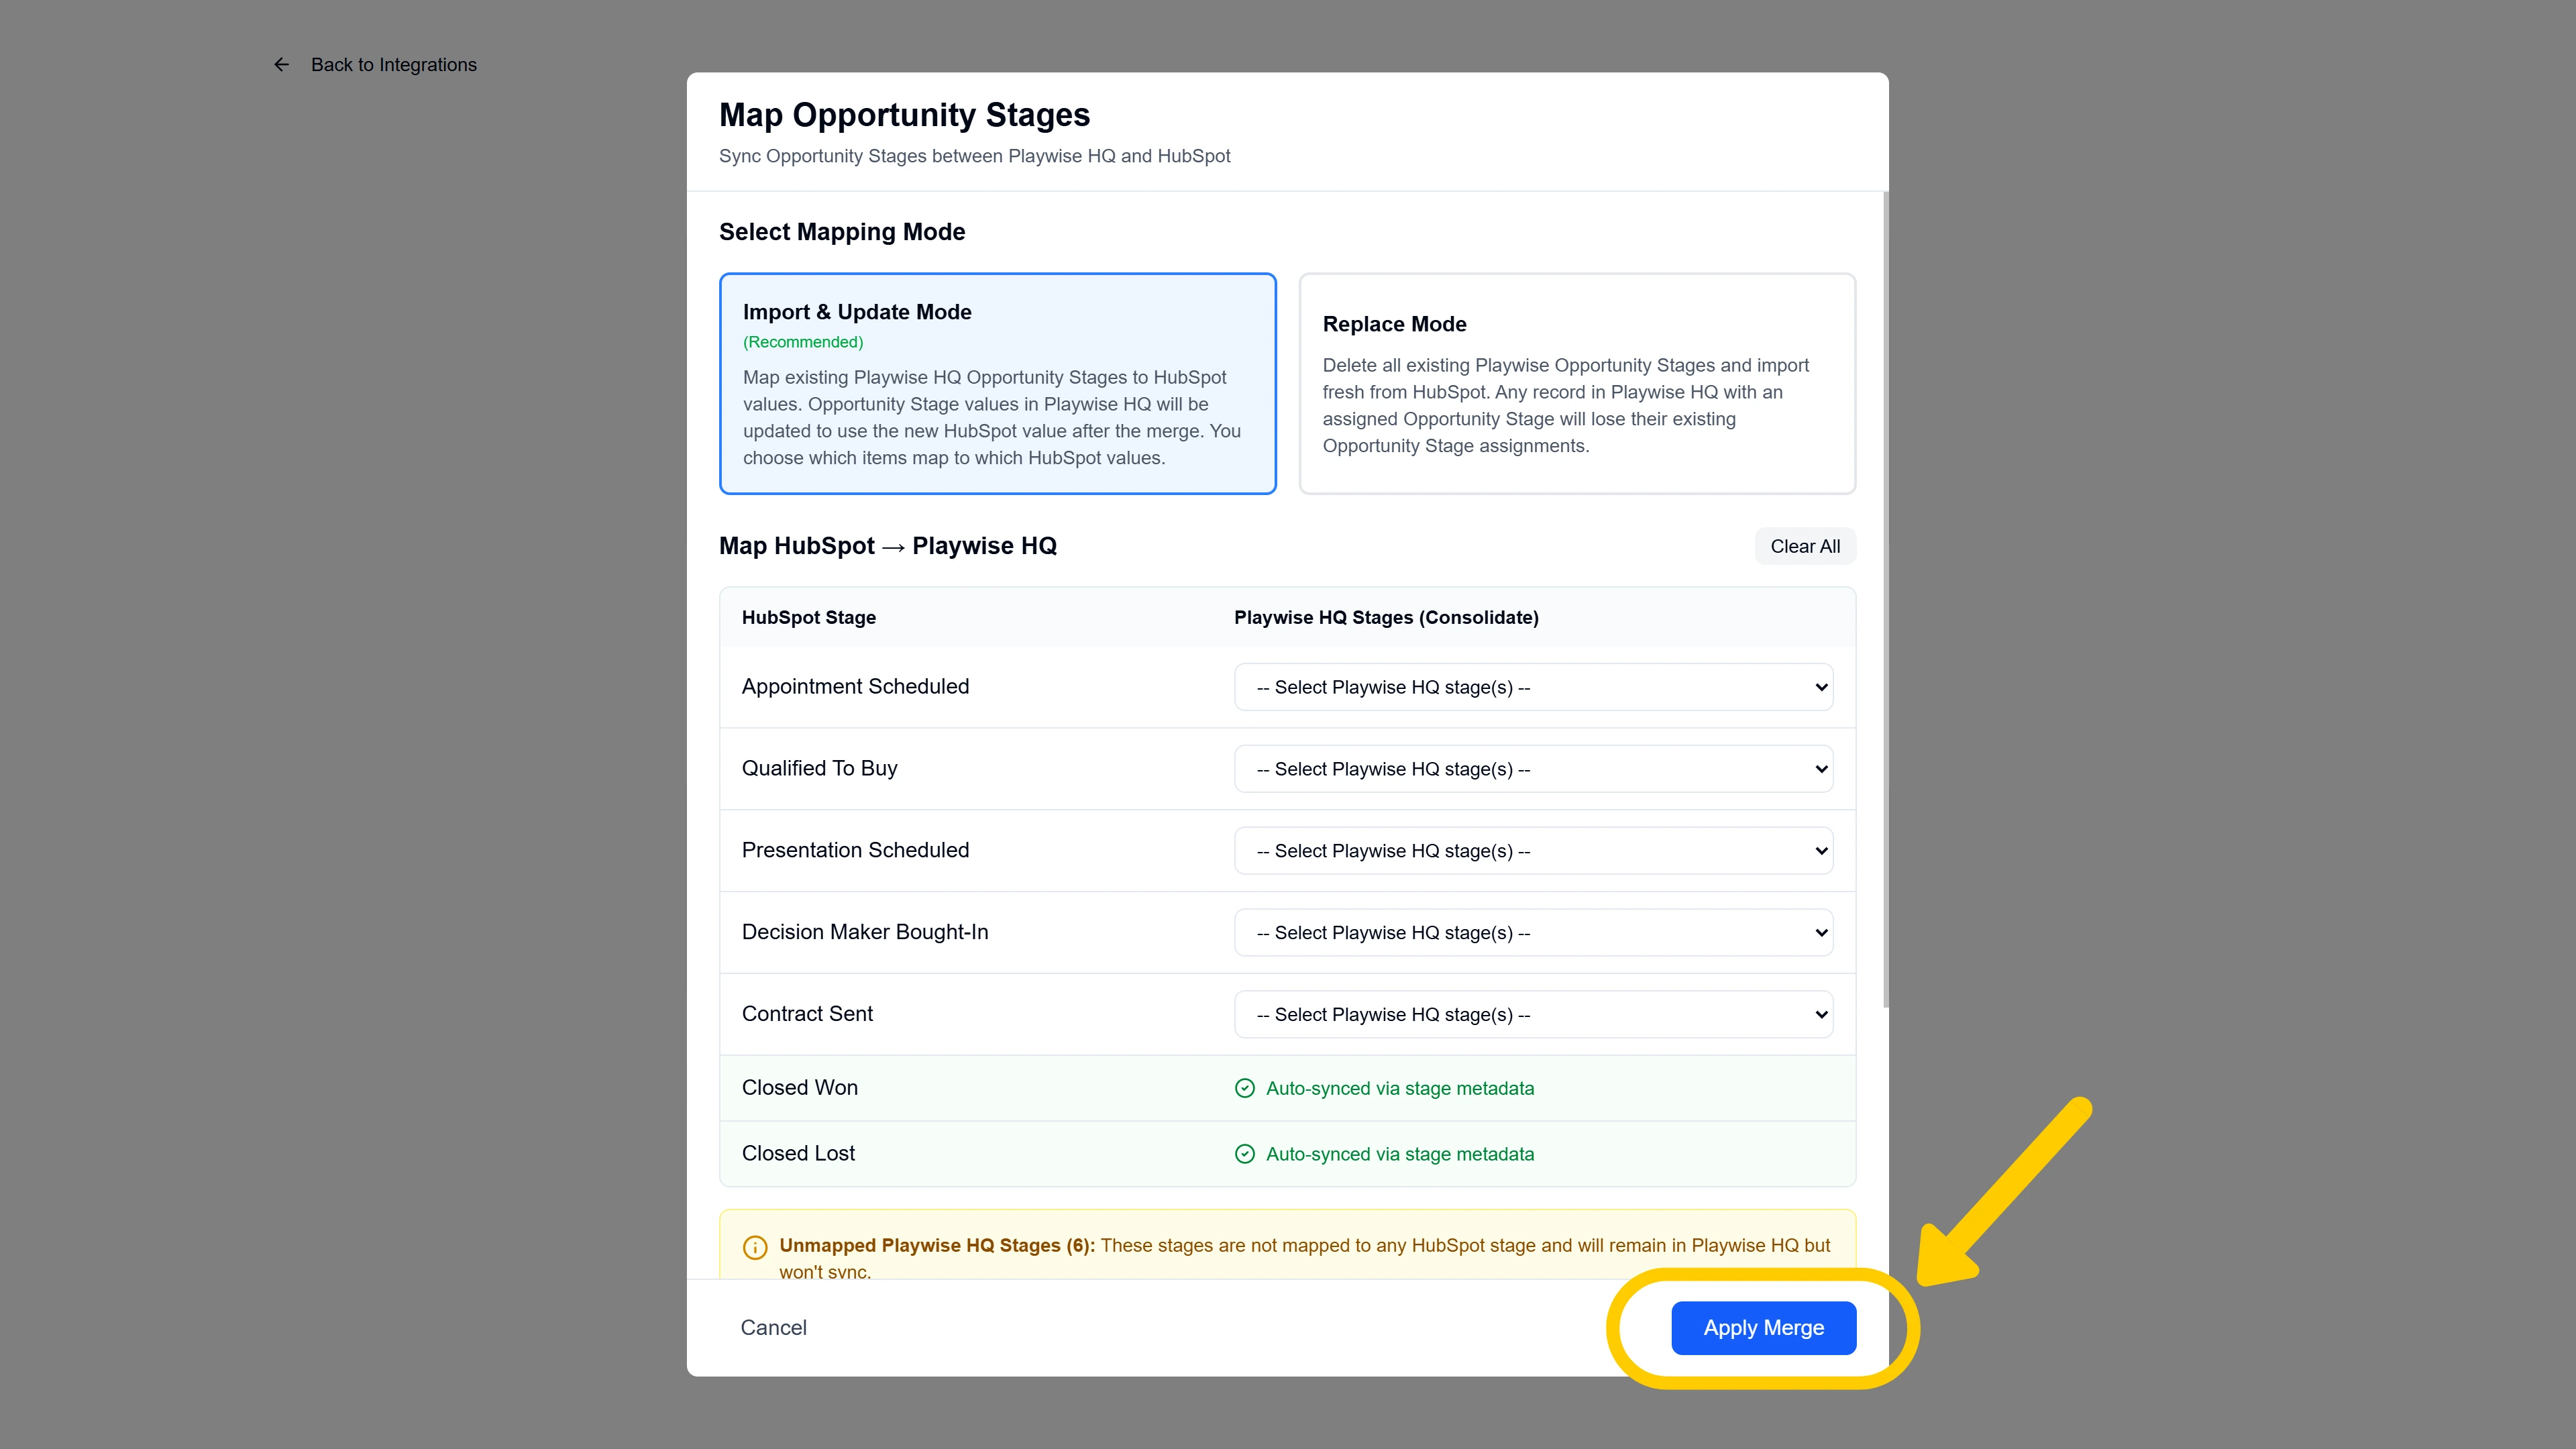
How to complete the mapping:
- For each HubSpot stage row, click the dropdown in the right column and select the Playwise HQ stage(s) that correspond to it. You can assign multiple Playwise stages to a single HubSpot stage if your Playwise pipeline is more granular than your HubSpot pipeline.
- Already-assigned Playwise stages appear as tag chips in the row. Click the X on any tag to remove that assignment.
- If Playwise HQ detects a likely match based on AI analysis, it may pre-populate some mappings for you. Review these suggestions and adjust as needed.
- To clear all mappings and start fresh, click the “Clear All” button above the table.
Terminal stages (auto-synced):
At the bottom of the mapping table, you will see terminal stages such as “Closed Won” and “Closed Lost” highlighted in green. These stages are auto-synced via stage metadata — Playwise HQ automatically maps these based on HubSpot’s built-in stage properties. You do not need to configure them manually.
Unmapped Playwise HQ stages:
If any of your existing Playwise HQ opportunity stages are not assigned to any HubSpot stage, an informational box will appear below the table:
- “Unmapped Playwise HQ Stages ({count}):” — Lists each unassigned stage as a yellow tag. These stages will remain in Playwise HQ but will not sync with HubSpot.
Impact Analysis:
Below the mapping table, an Impact Analysis summary shows:
| Metric | What It Means |
|---|---|
| Items to map | The number of stage mappings that will be created or updated |
| Items to add | The number of new stages that will be created in Playwise HQ (HubSpot stages with no existing Playwise equivalent) |
| Items unchanged | The number of existing Playwise stages that will remain as they are |
| Items unmapped | The number of items not included in any mapping (shown in orange if greater than zero) |
Once you have completed your mappings and reviewed the impact analysis, click “Apply Merge”. A spinner will appear while the merge is processed. On success, the modal closes and a green confirmation message appears: “Configuration complete! Your opportunity stages have been mapped successfully.”
After completing either Replace or Merge, click “Next” to proceed to the next step in the wizard.
Step 7: Map Playwise HQ Users to HubSpot Users
After configuring reference data for Industries and Opportunity Stages, the wizard asks whether you want to map your Playwise HQ users to their corresponding HubSpot users. This step is recommended but not required..
Step 7a: Answer the User Mapping Question
You will see a question card with a users icon and a “Recommended” badge: “Do you want to map Playwise HQ users to HubSpot users?”
The description explains: “This ensures opportunity owners are correctly set when syncing data between systems. Recommended for teams with multiple users.”
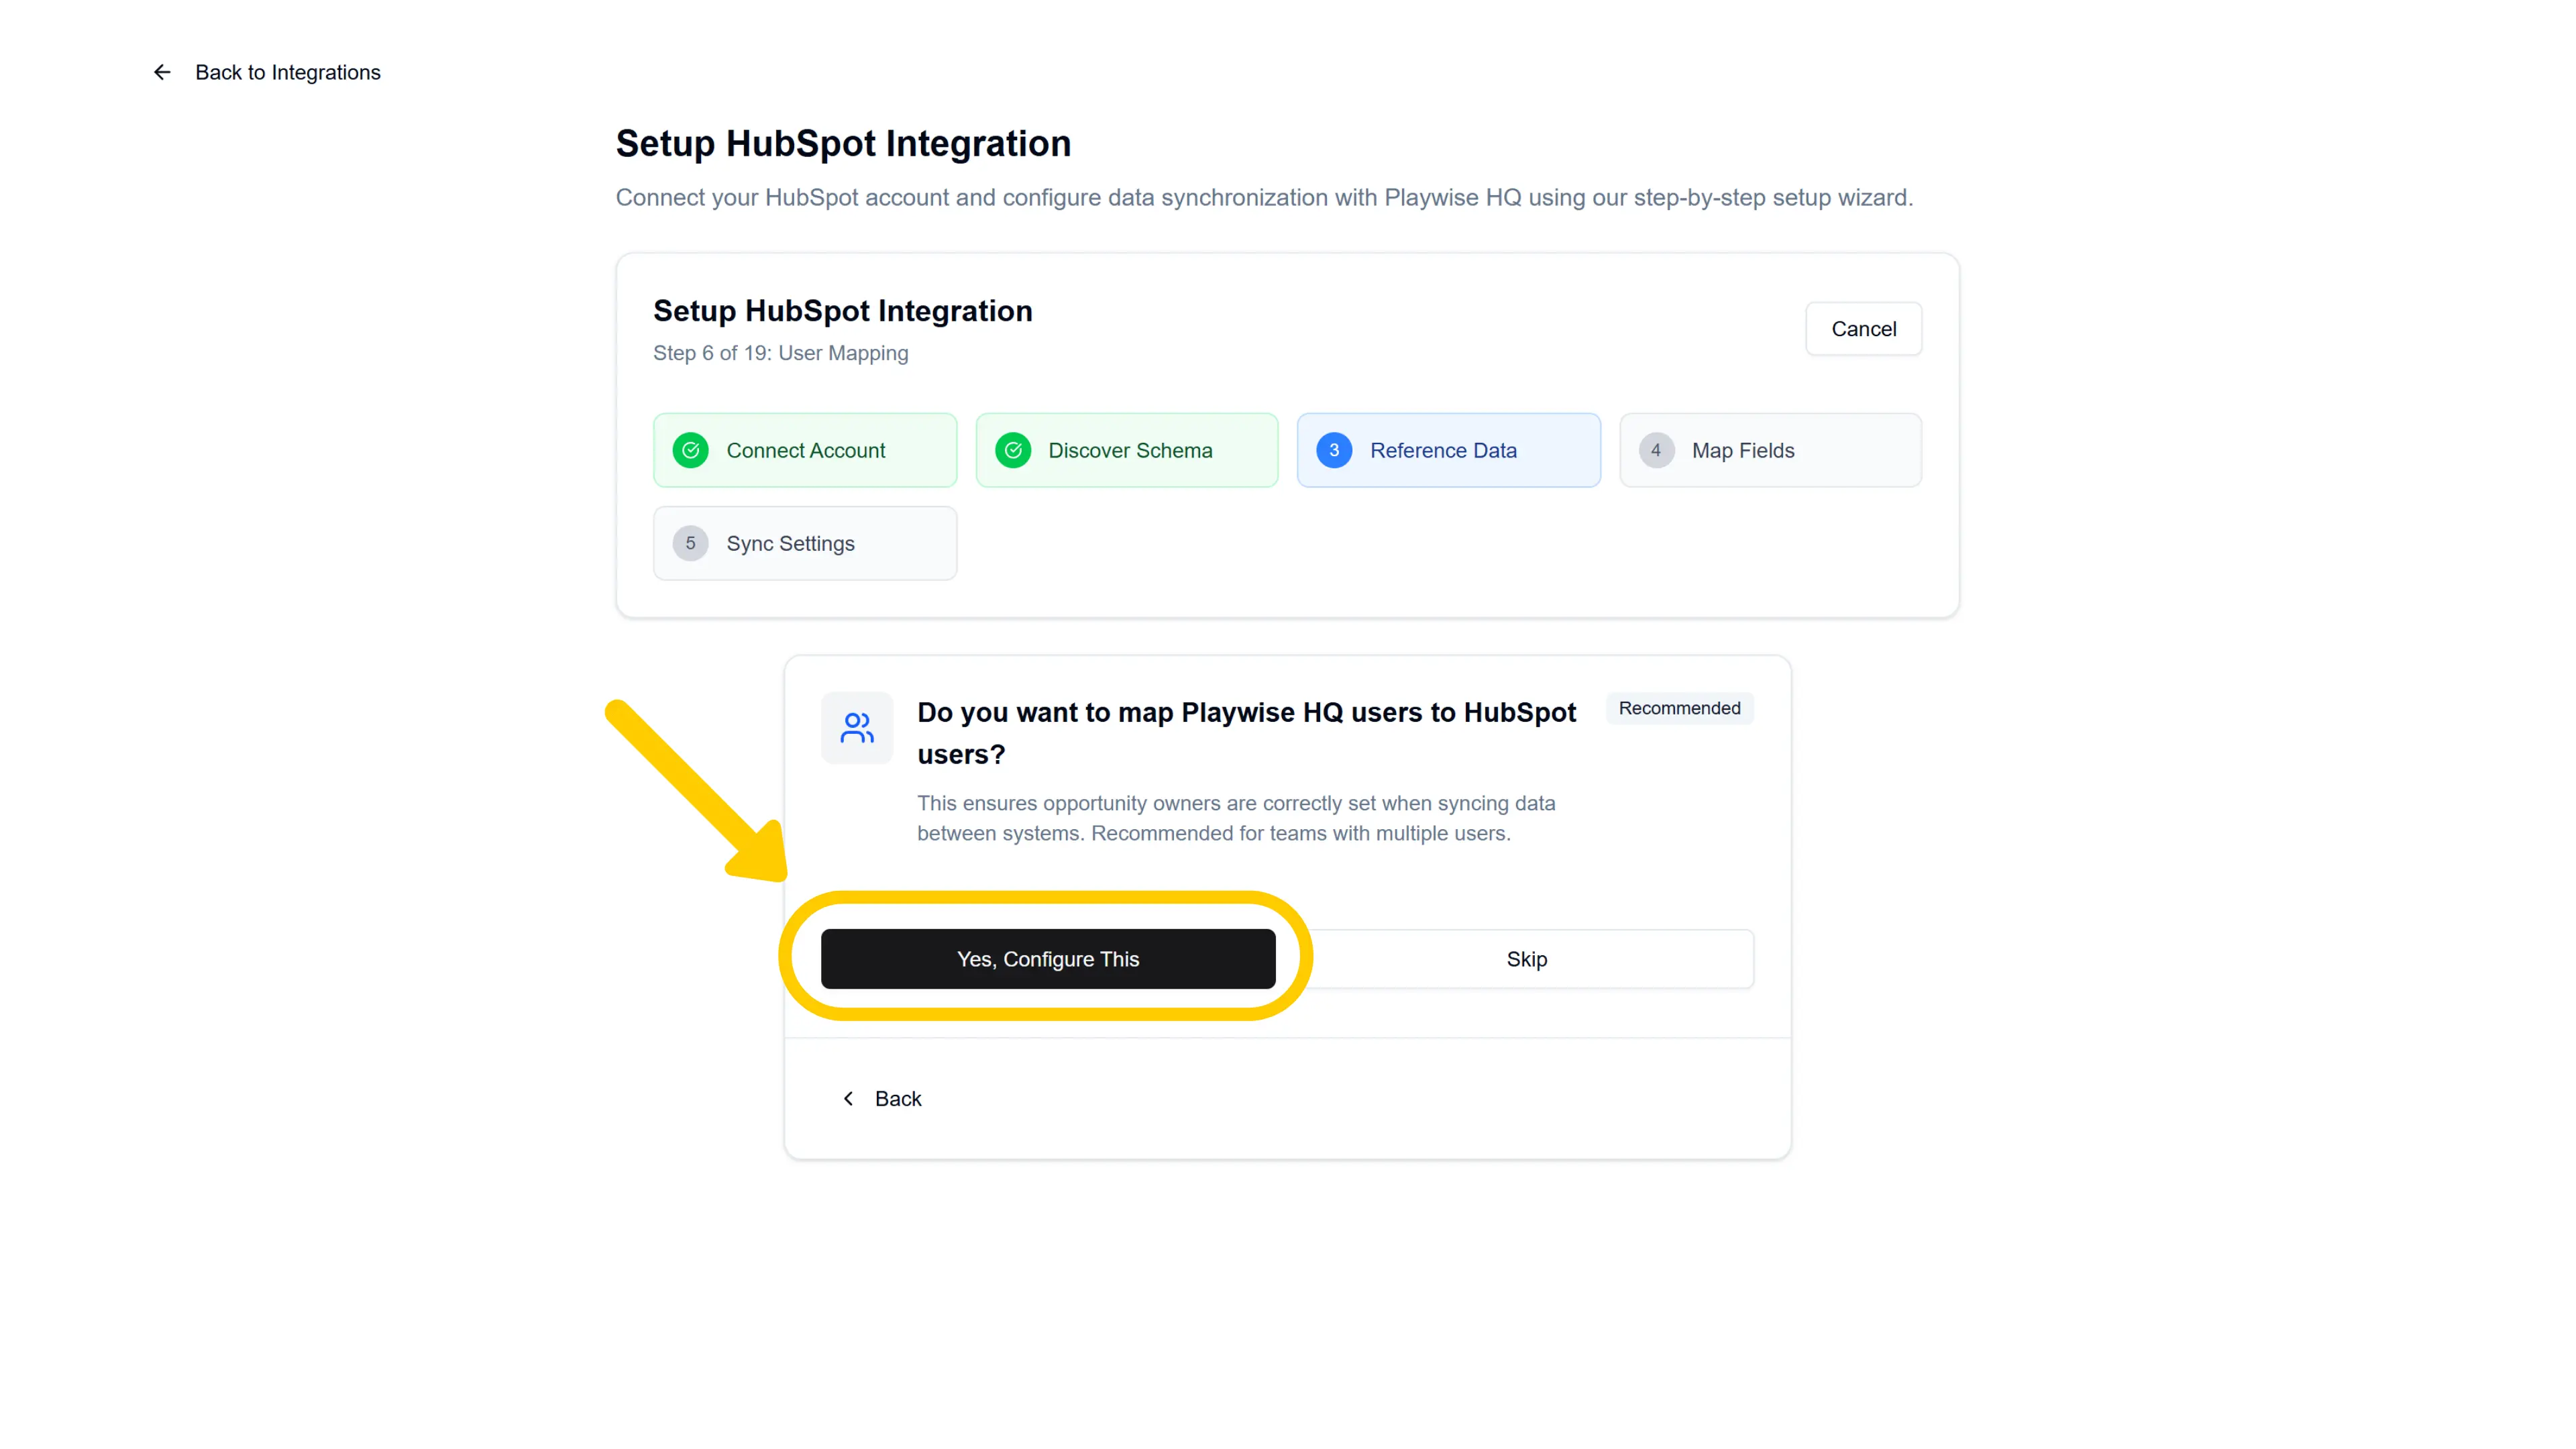
- Click “Yes, Configure This” to proceed with user mapping.
- Click “Skip” if you want to skip this step. The wizard will move on and you can always configure user mapping later from the management page.
Step 7b: Map Your Users
If you clicked “Yes, Configure This”, you will see the User Mapping configuration page with a “Recommended” badge.
The mapping interface shows a list of all active Playwise HQ users, each displayed as a card with the user’s name and email address on the left, an arrow in the middle, and a dropdown selector on the right.
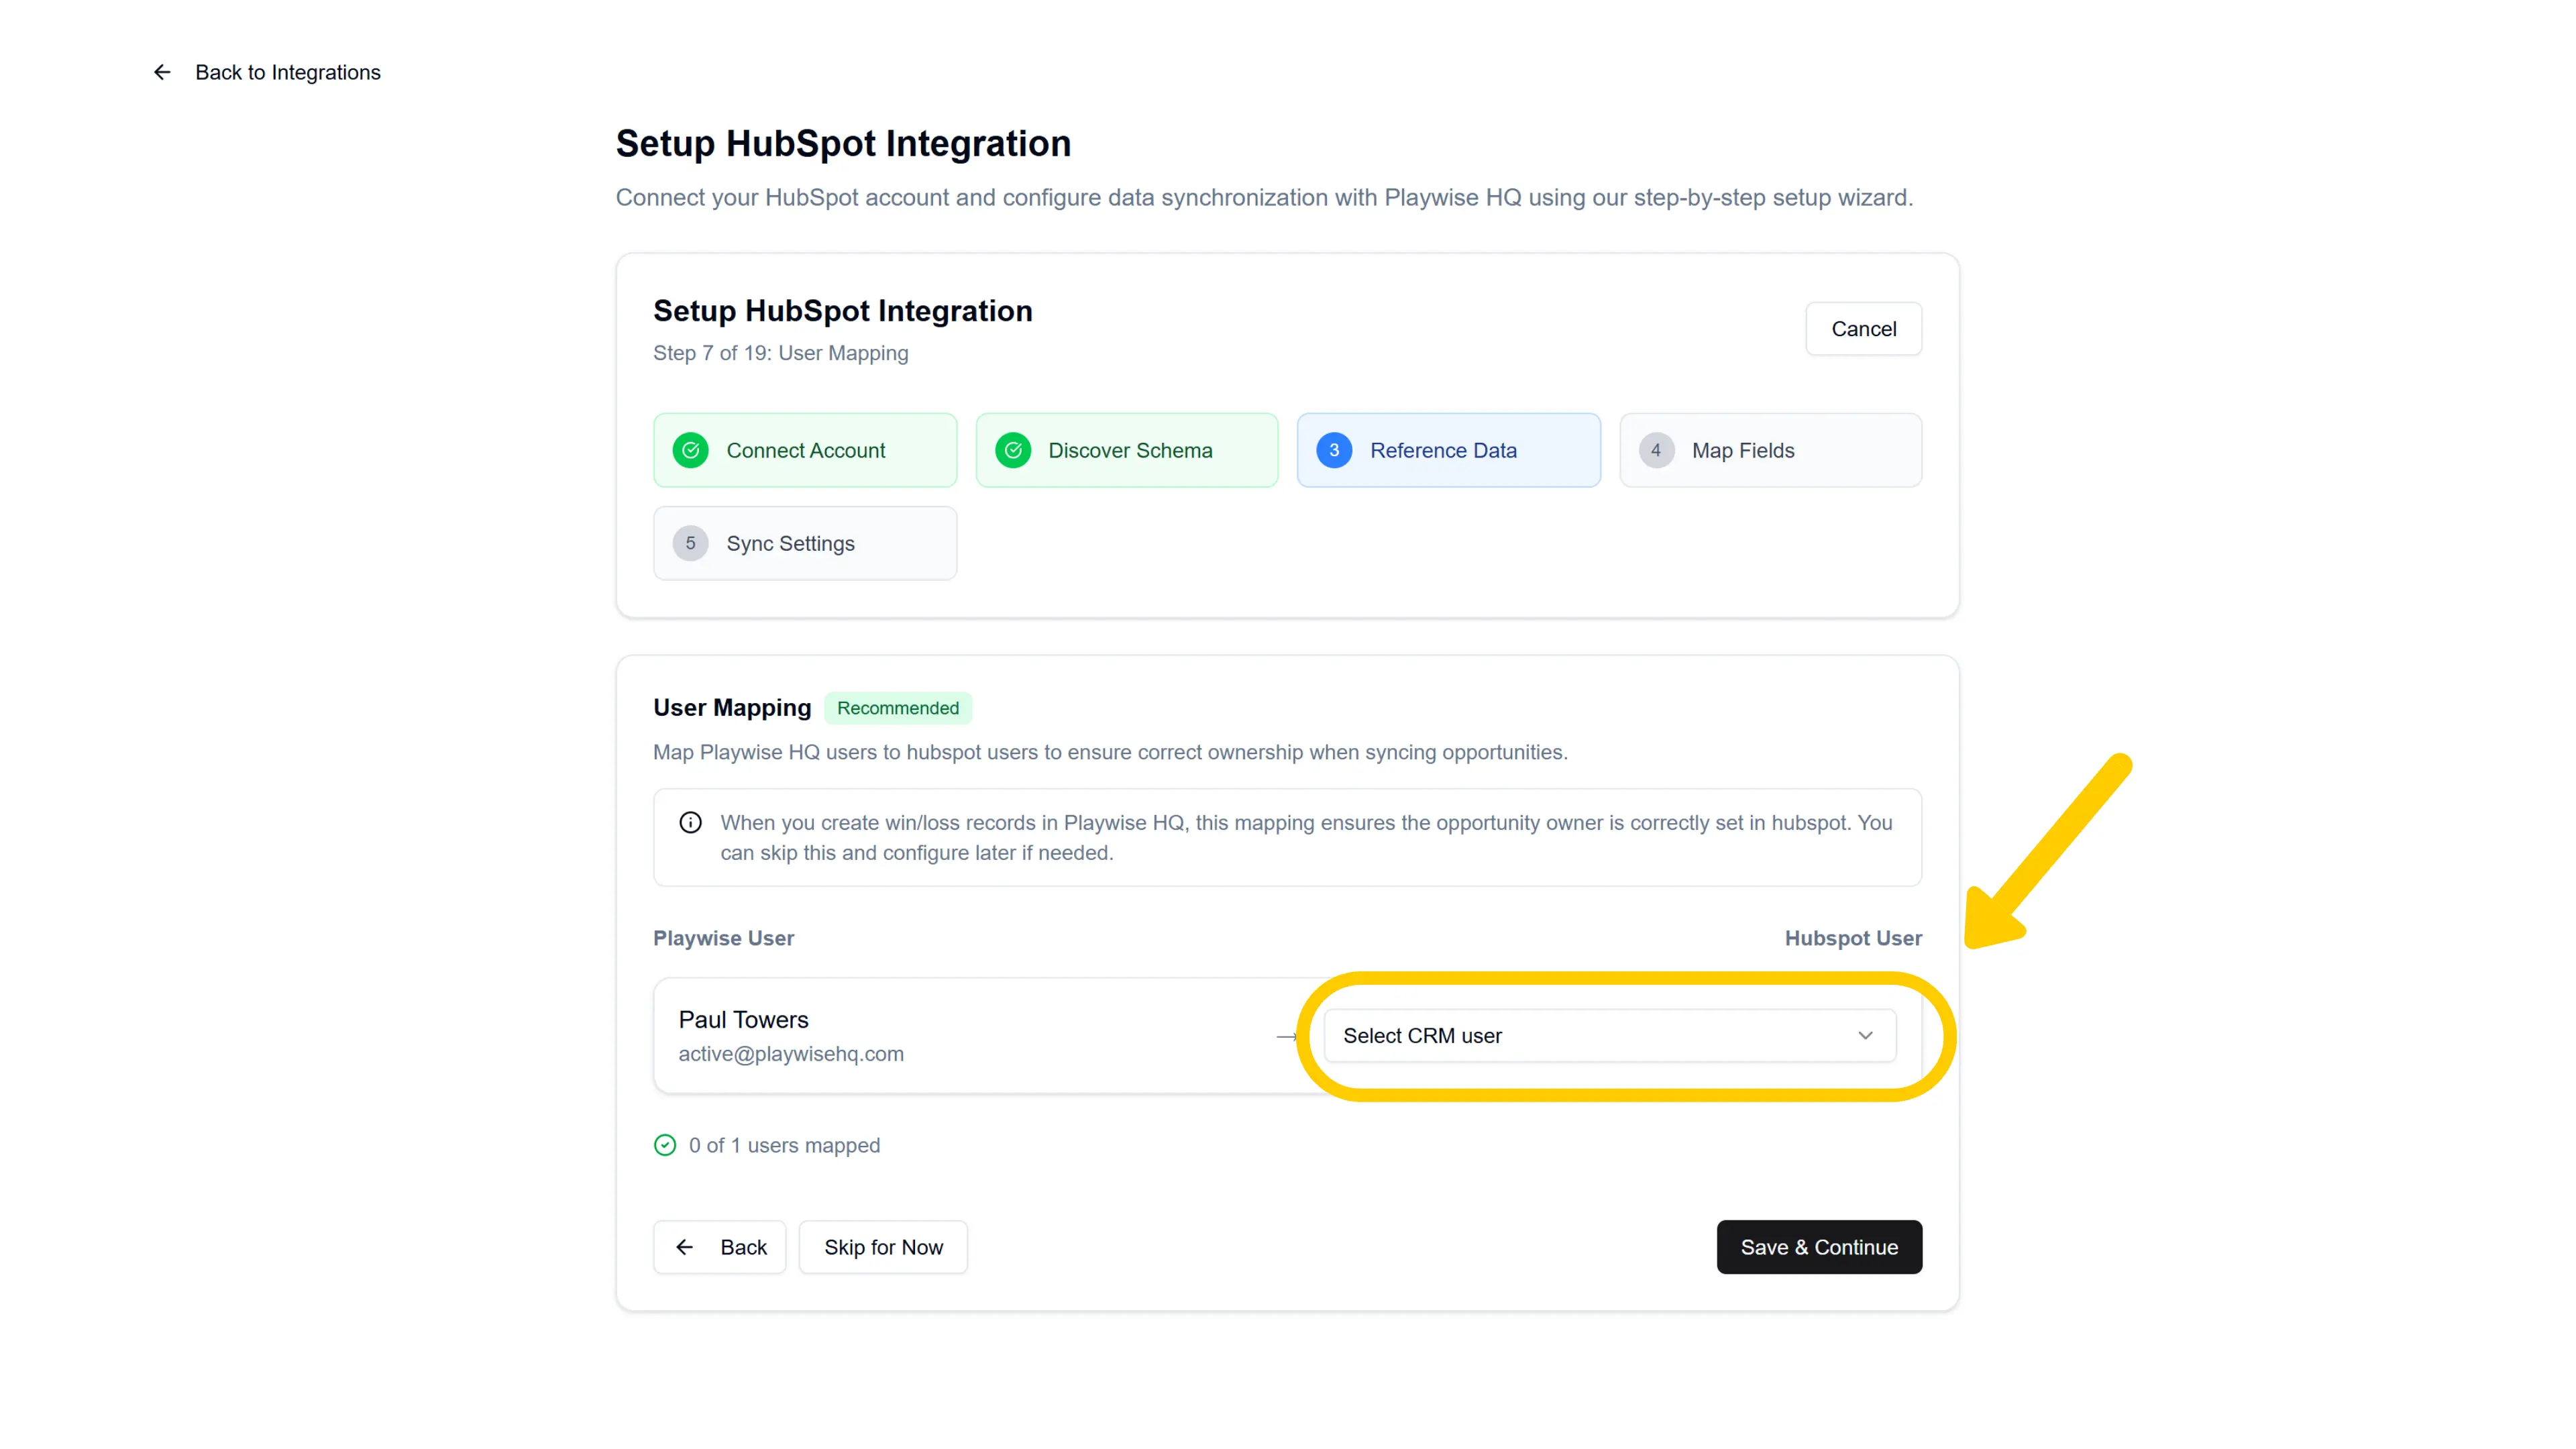
How to complete the mapping:
- For each Playwise HQ user, click the “Select CRM user” dropdown on the right side of their row.
- From the dropdown, select the corresponding HubSpot user. Each option shows the HubSpot user’s name and email address to help you identify the correct match.
- To remove a mapping, click the X button that appears to the right of a mapped user.
- Repeat for each Playwise HQ user you want to map.
Note: You do not need to map every user. Only map the users whose deal ownership needs to sync between systems. Unmapped users will not have their ownership automatically set during sync.
Saving your mappings:
- Click “Save & Continue” to save your user mappings and proceed to the next step. A confirmation toast will appear: “User mappings saved” with a count of how many users were mapped.
Step 8: Configure Optional Fields — Opportunity Types
After the mandatory reference data (Industries and Opportunity Stages), the wizard asks about optional fields.
You will see a question card with a tag icon: “Do you have a custom opportunity types field in HubSpot?” — for distinguishing between new business, renewals, upsells, cross-sells, and other deal types. This helps segment your opportunities for better reporting.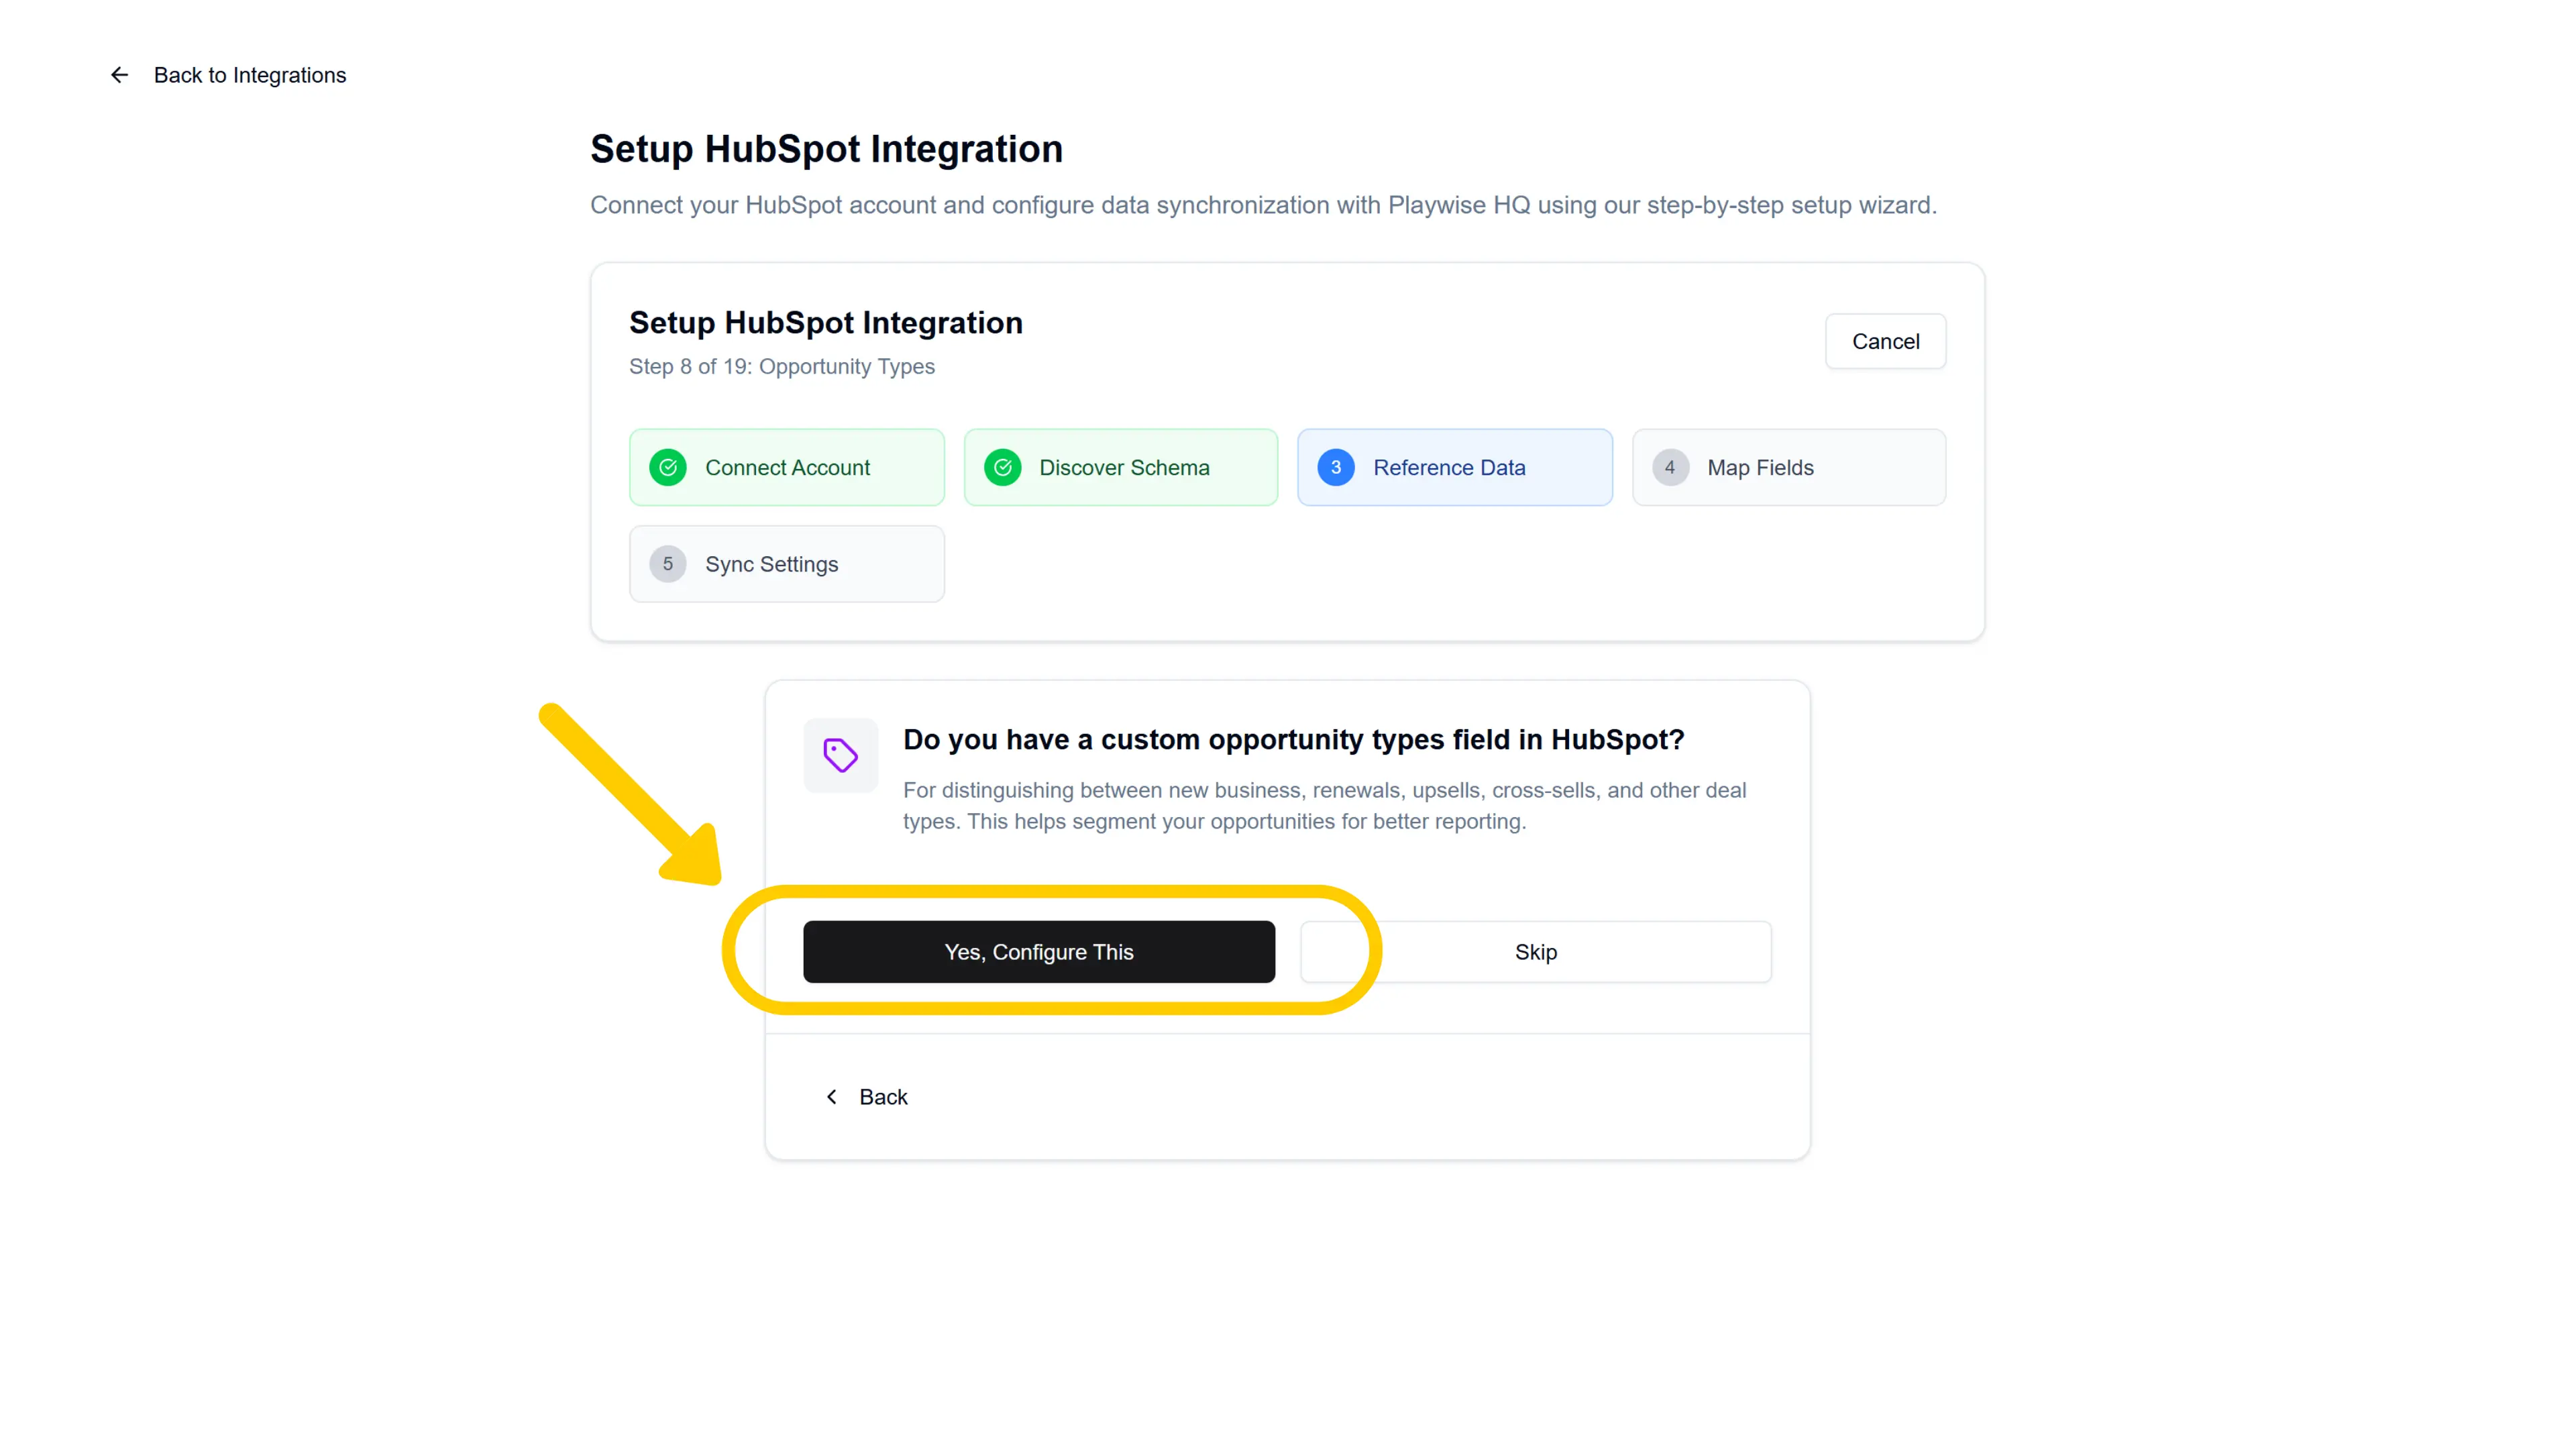
- Click “Yes, Configure This” to proceed with opportunity type mapping.
- Click “Skip” if you do not track opportunity types in HubSpot. The wizard will move on to the next step and you can always configure this later from the management page.
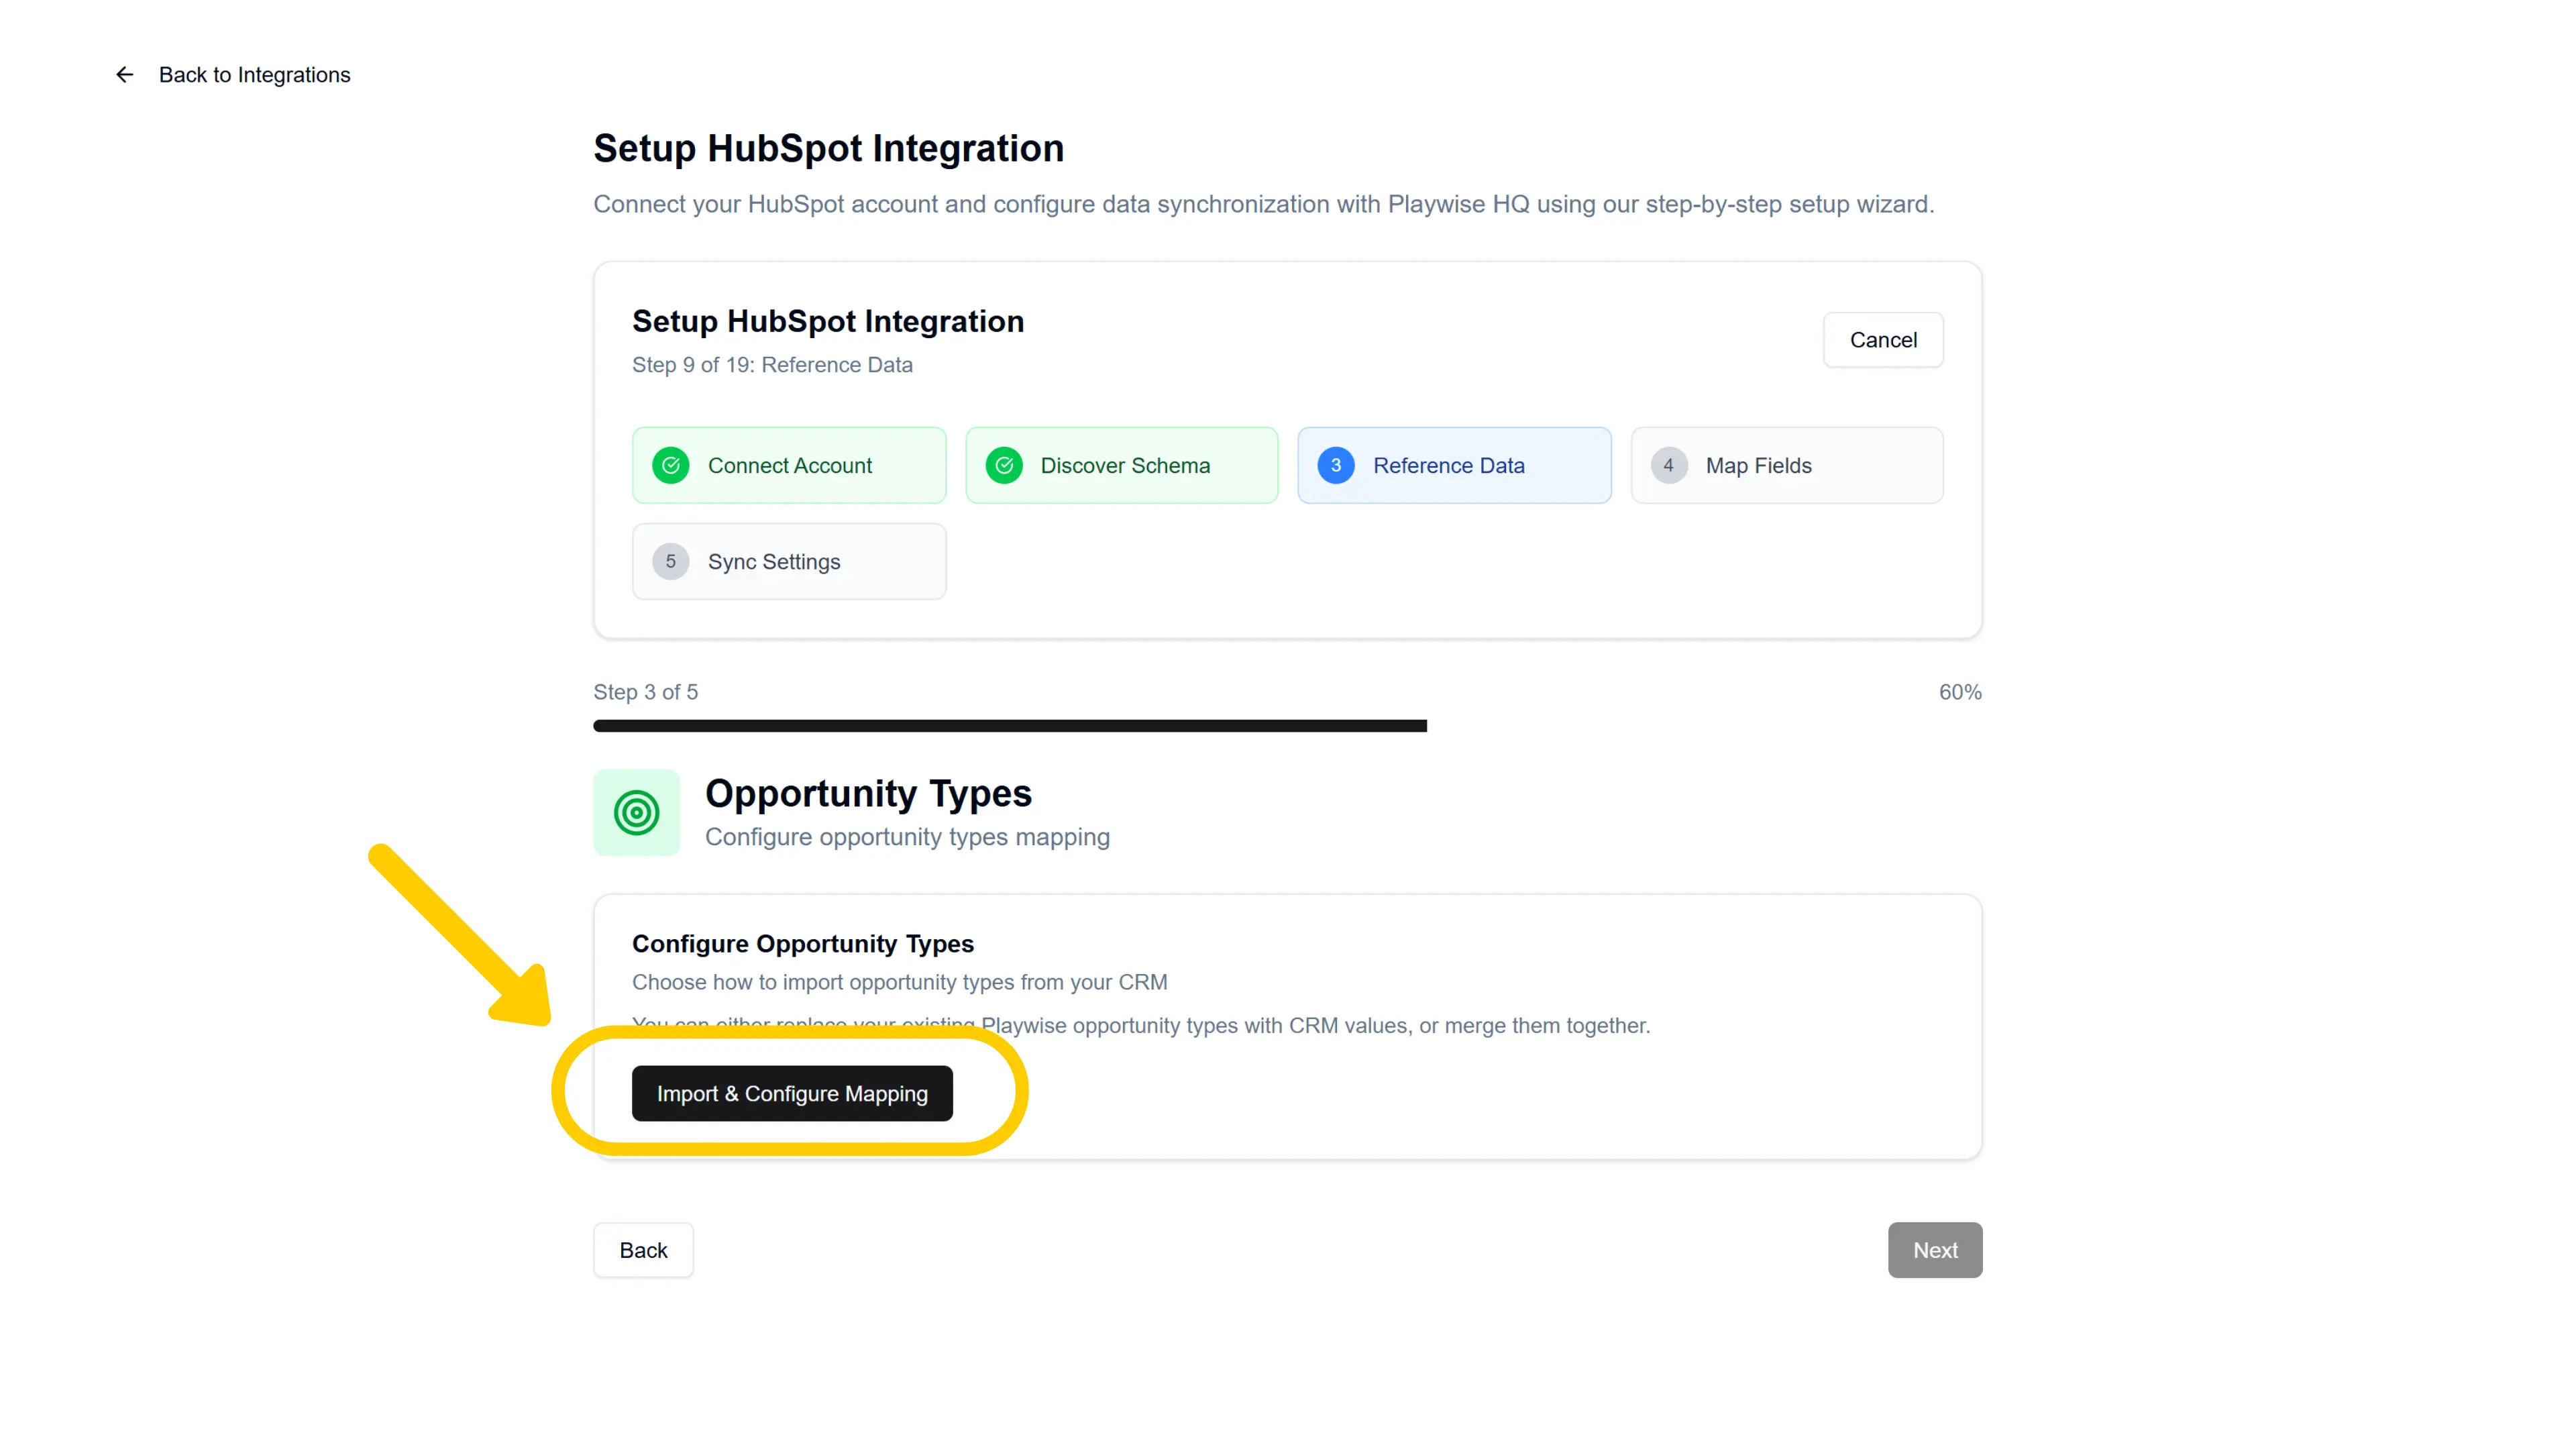
If you clicked “Yes, Configure This”, you will see a card titled “Configure Opportunity Types” with a description: “Choose how to import opportunity types from your CRM.” Click “Import & Configure Mapping” to open the mapping modal.
Choosing a Mapping Mode
A mode selector appears with two options:
Import & Update Mode (Recommended) — Keep your existing Playwise HQ opportunity types and map them to their HubSpot equivalents. Playwise HQ opportunity type values will be updated to use the new HubSpot values after the merge, and you choose which items map to which. Any HubSpot opportunity types that do not match an existing Playwise type will be added as new entries.
Replace Mode — Delete all existing Playwise HQ opportunity types and import a fresh set from HubSpot. Any record in Playwise HQ with an assigned opportunity type will lose its existing type assignment.
Select your preferred mode to proceed.
Option A: Replace Mode
If you selected Replace Mode, no mapping table is shown. Instead, you will see an Impact Analysis summary showing exactly what will happen:
| Metric | What It Means |
|---|---|
| Items to delete | The number of existing Playwise HQ opportunity types that will be removed |
| Items to add | The number of HubSpot opportunity types that will be imported |
| Records affected | The number of existing records in Playwise HQ that currently have a type assigned and will lose their assignment |
| Records unaffected | The number of records that have no type assignment and will not be impacted |
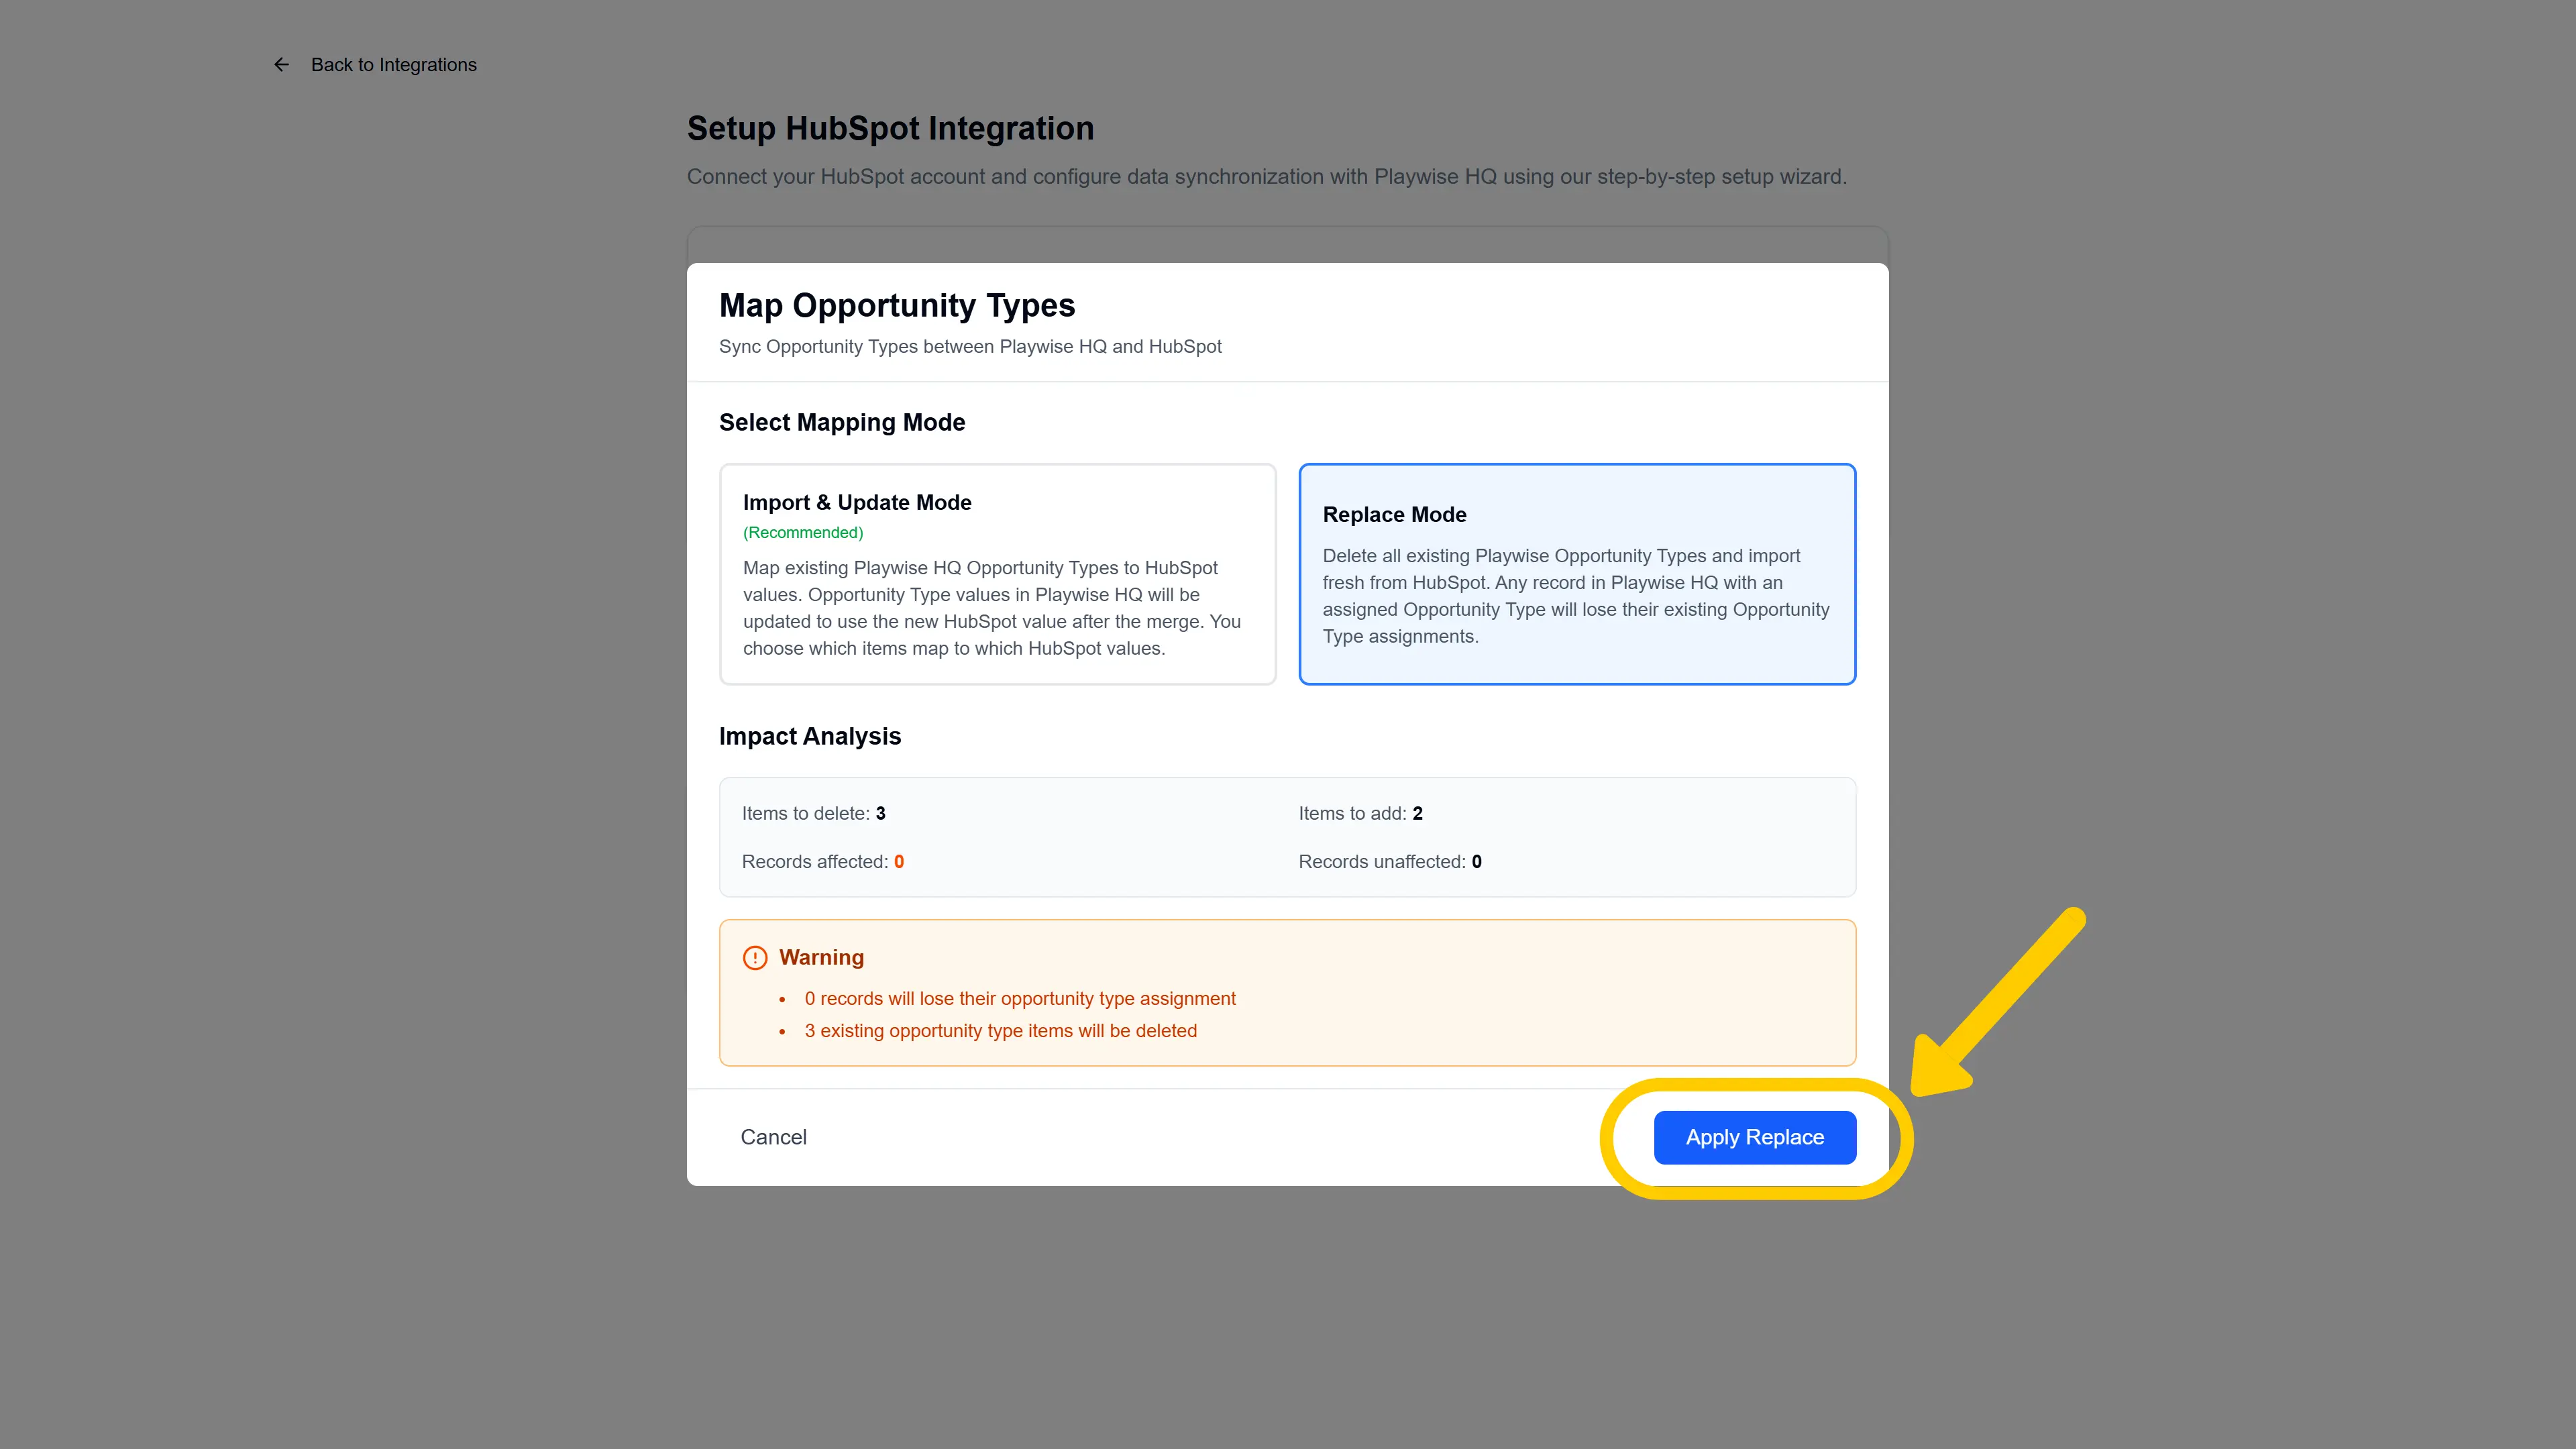
Once you have reviewed the impact analysis, click “Apply Replace”.
Option B: Import & Update Mode (Merge)
If you selected Import & Update Mode, a mapping table appears titled “Map Playwise HQ -> HubSpot”.
The mapping table works the same way as the Industries mapping — your existing Playwise HQ opportunity types are listed on the left, and you assign each one to its HubSpot equivalent on the right.
The mapping table has three columns:
| Column | What It Shows |
|---|---|
| Playwise HQ Opportunity Type | The type name from your existing Playwise HQ data (read-only) |
| HubSpot Field | A dropdown selector where you choose the matching HubSpot opportunity type |
| Confidence | An AI confidence score indicating how likely the suggested mapping is correct. A green checkmark appears for high-confidence matches (90% or above) |
How to complete the mapping: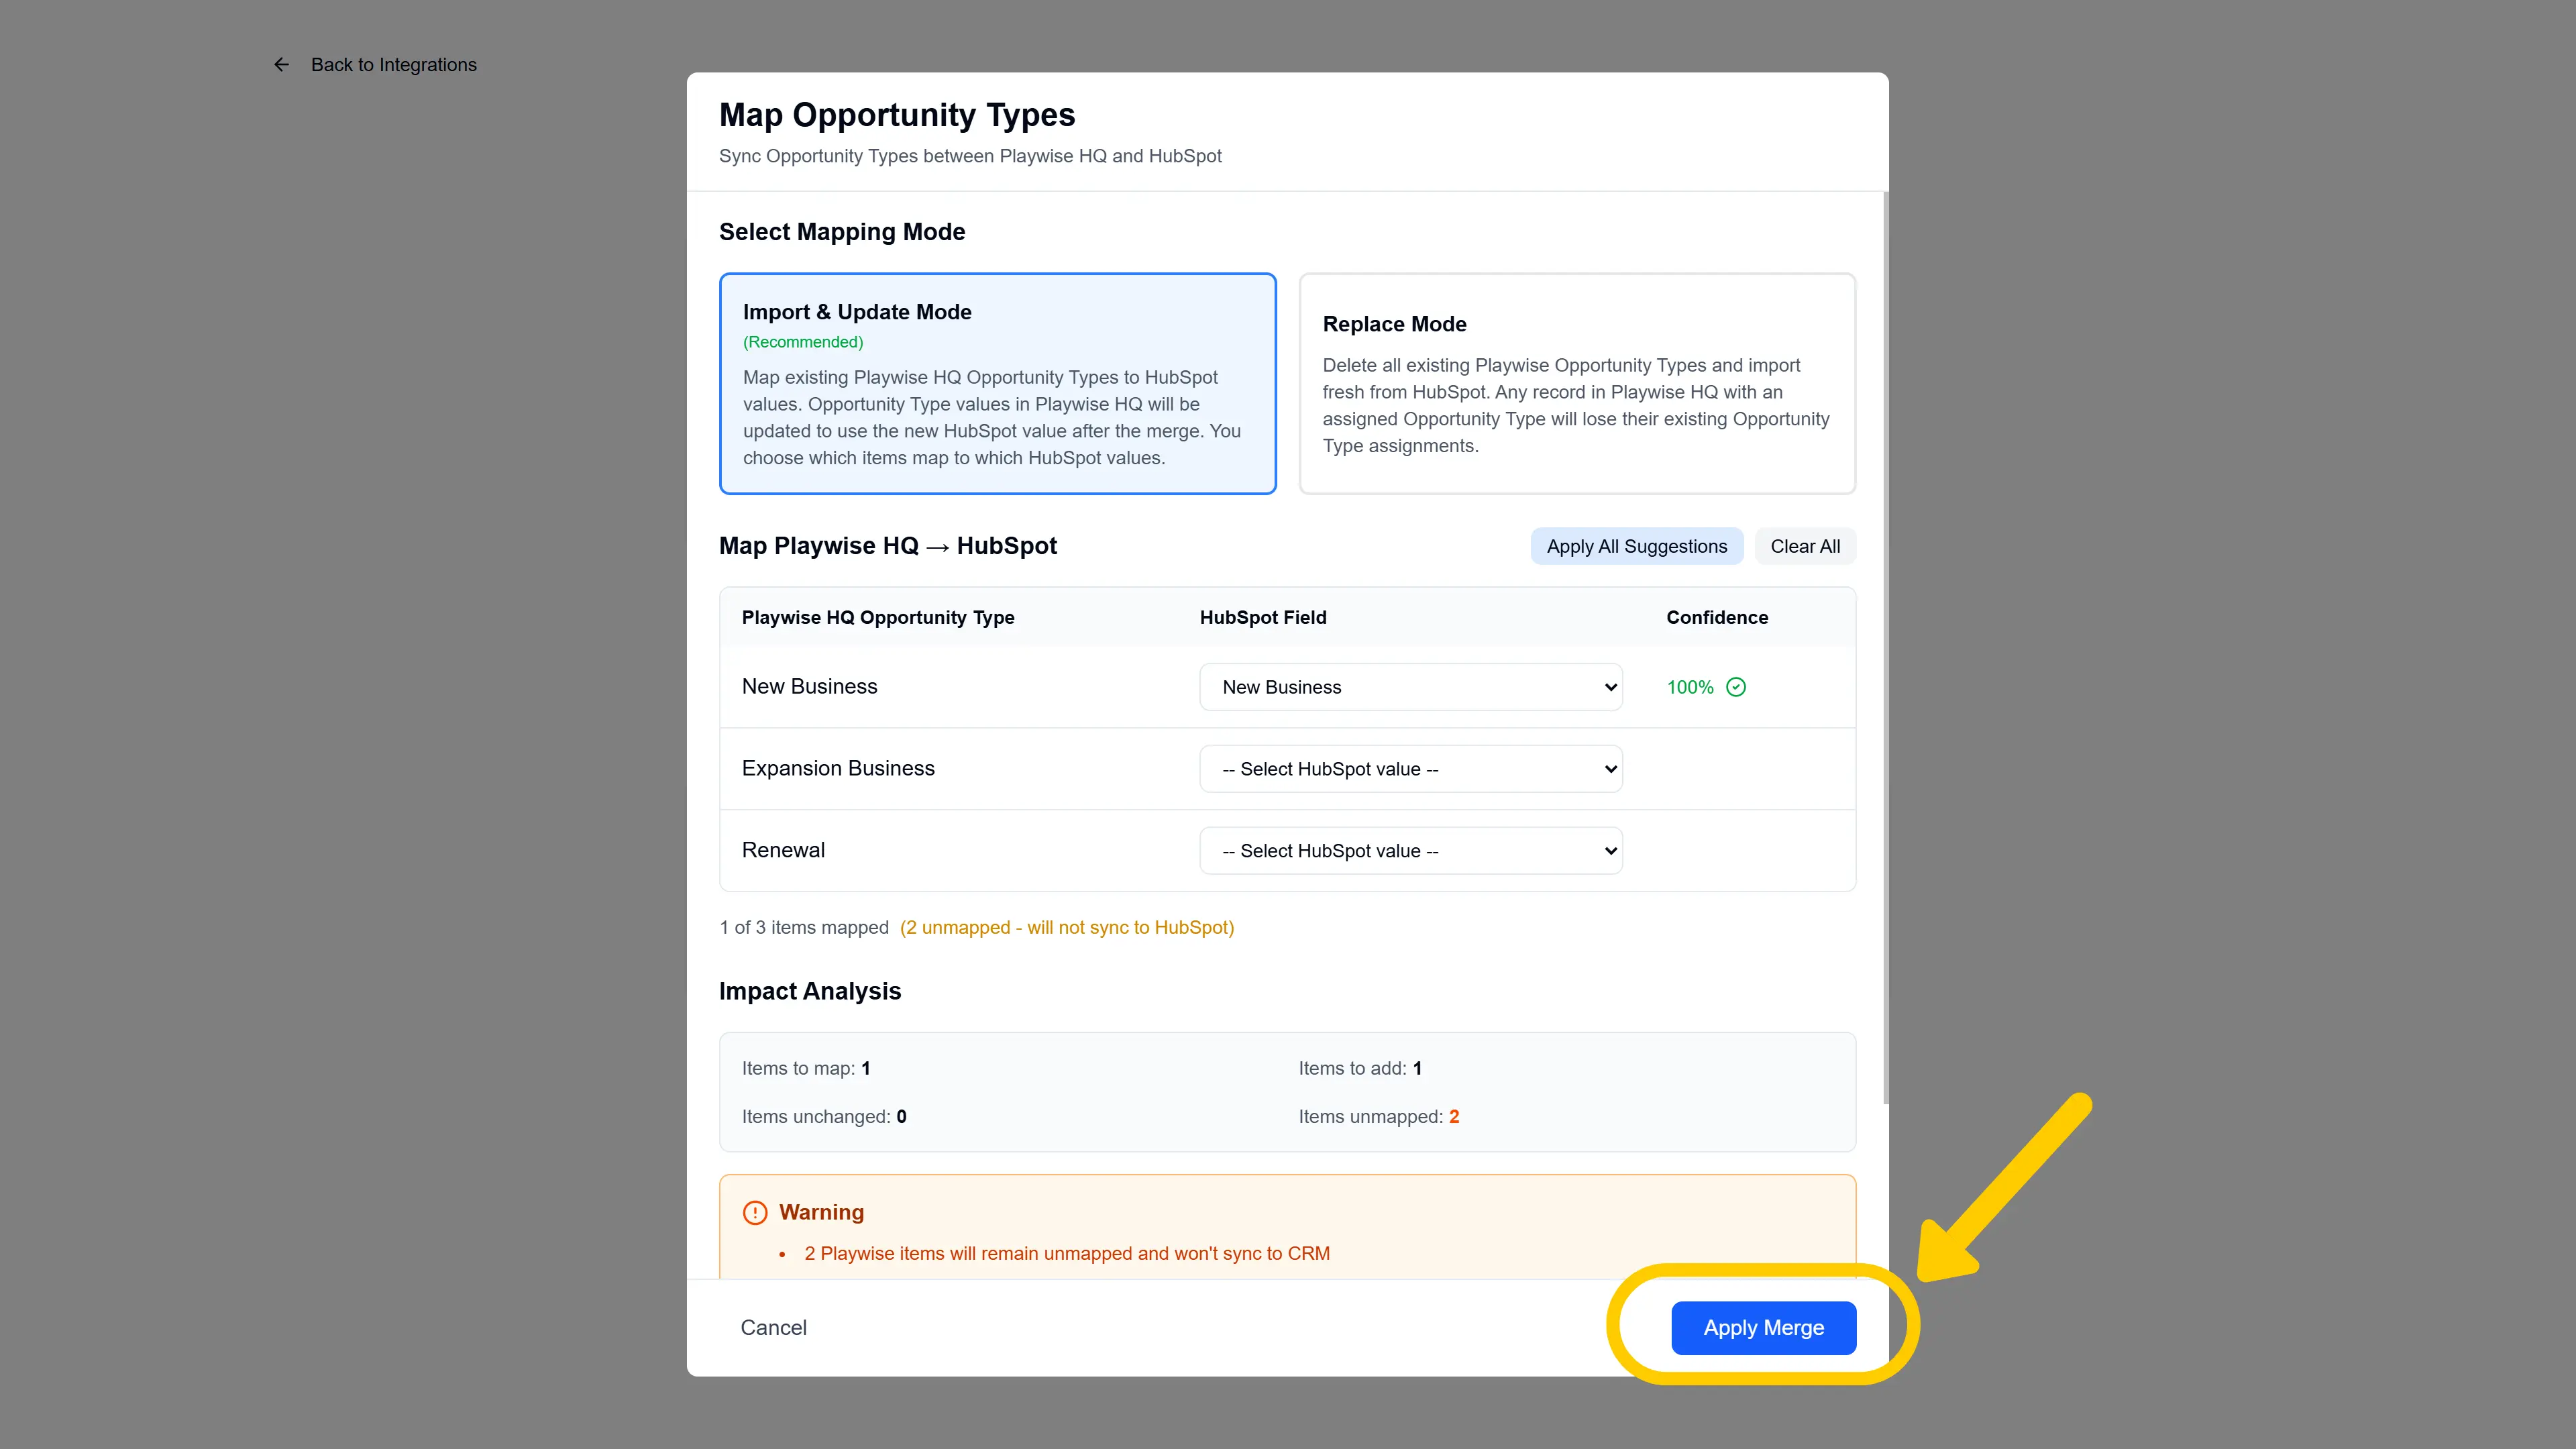
- Playwise HQ uses AI to analyse your data and pre-populate suggested mappings for each opportunity type. Review each suggestion and adjust if needed.
- For each Playwise HQ opportunity type, click the dropdown in the HubSpot Field column and select the matching HubSpot value. If no match exists, leave it set to the default placeholder “– Select HubSpot value –“.
- To accept all AI-suggested mappings at once, click the “Apply All Suggestions” button above the table. This fills in every row where the AI has a recommendation.
- To clear all mappings and start fresh, click the “Clear All” button.
Once you have completed your mappings and reviewed the impact analysis, click “Apply Merge”. 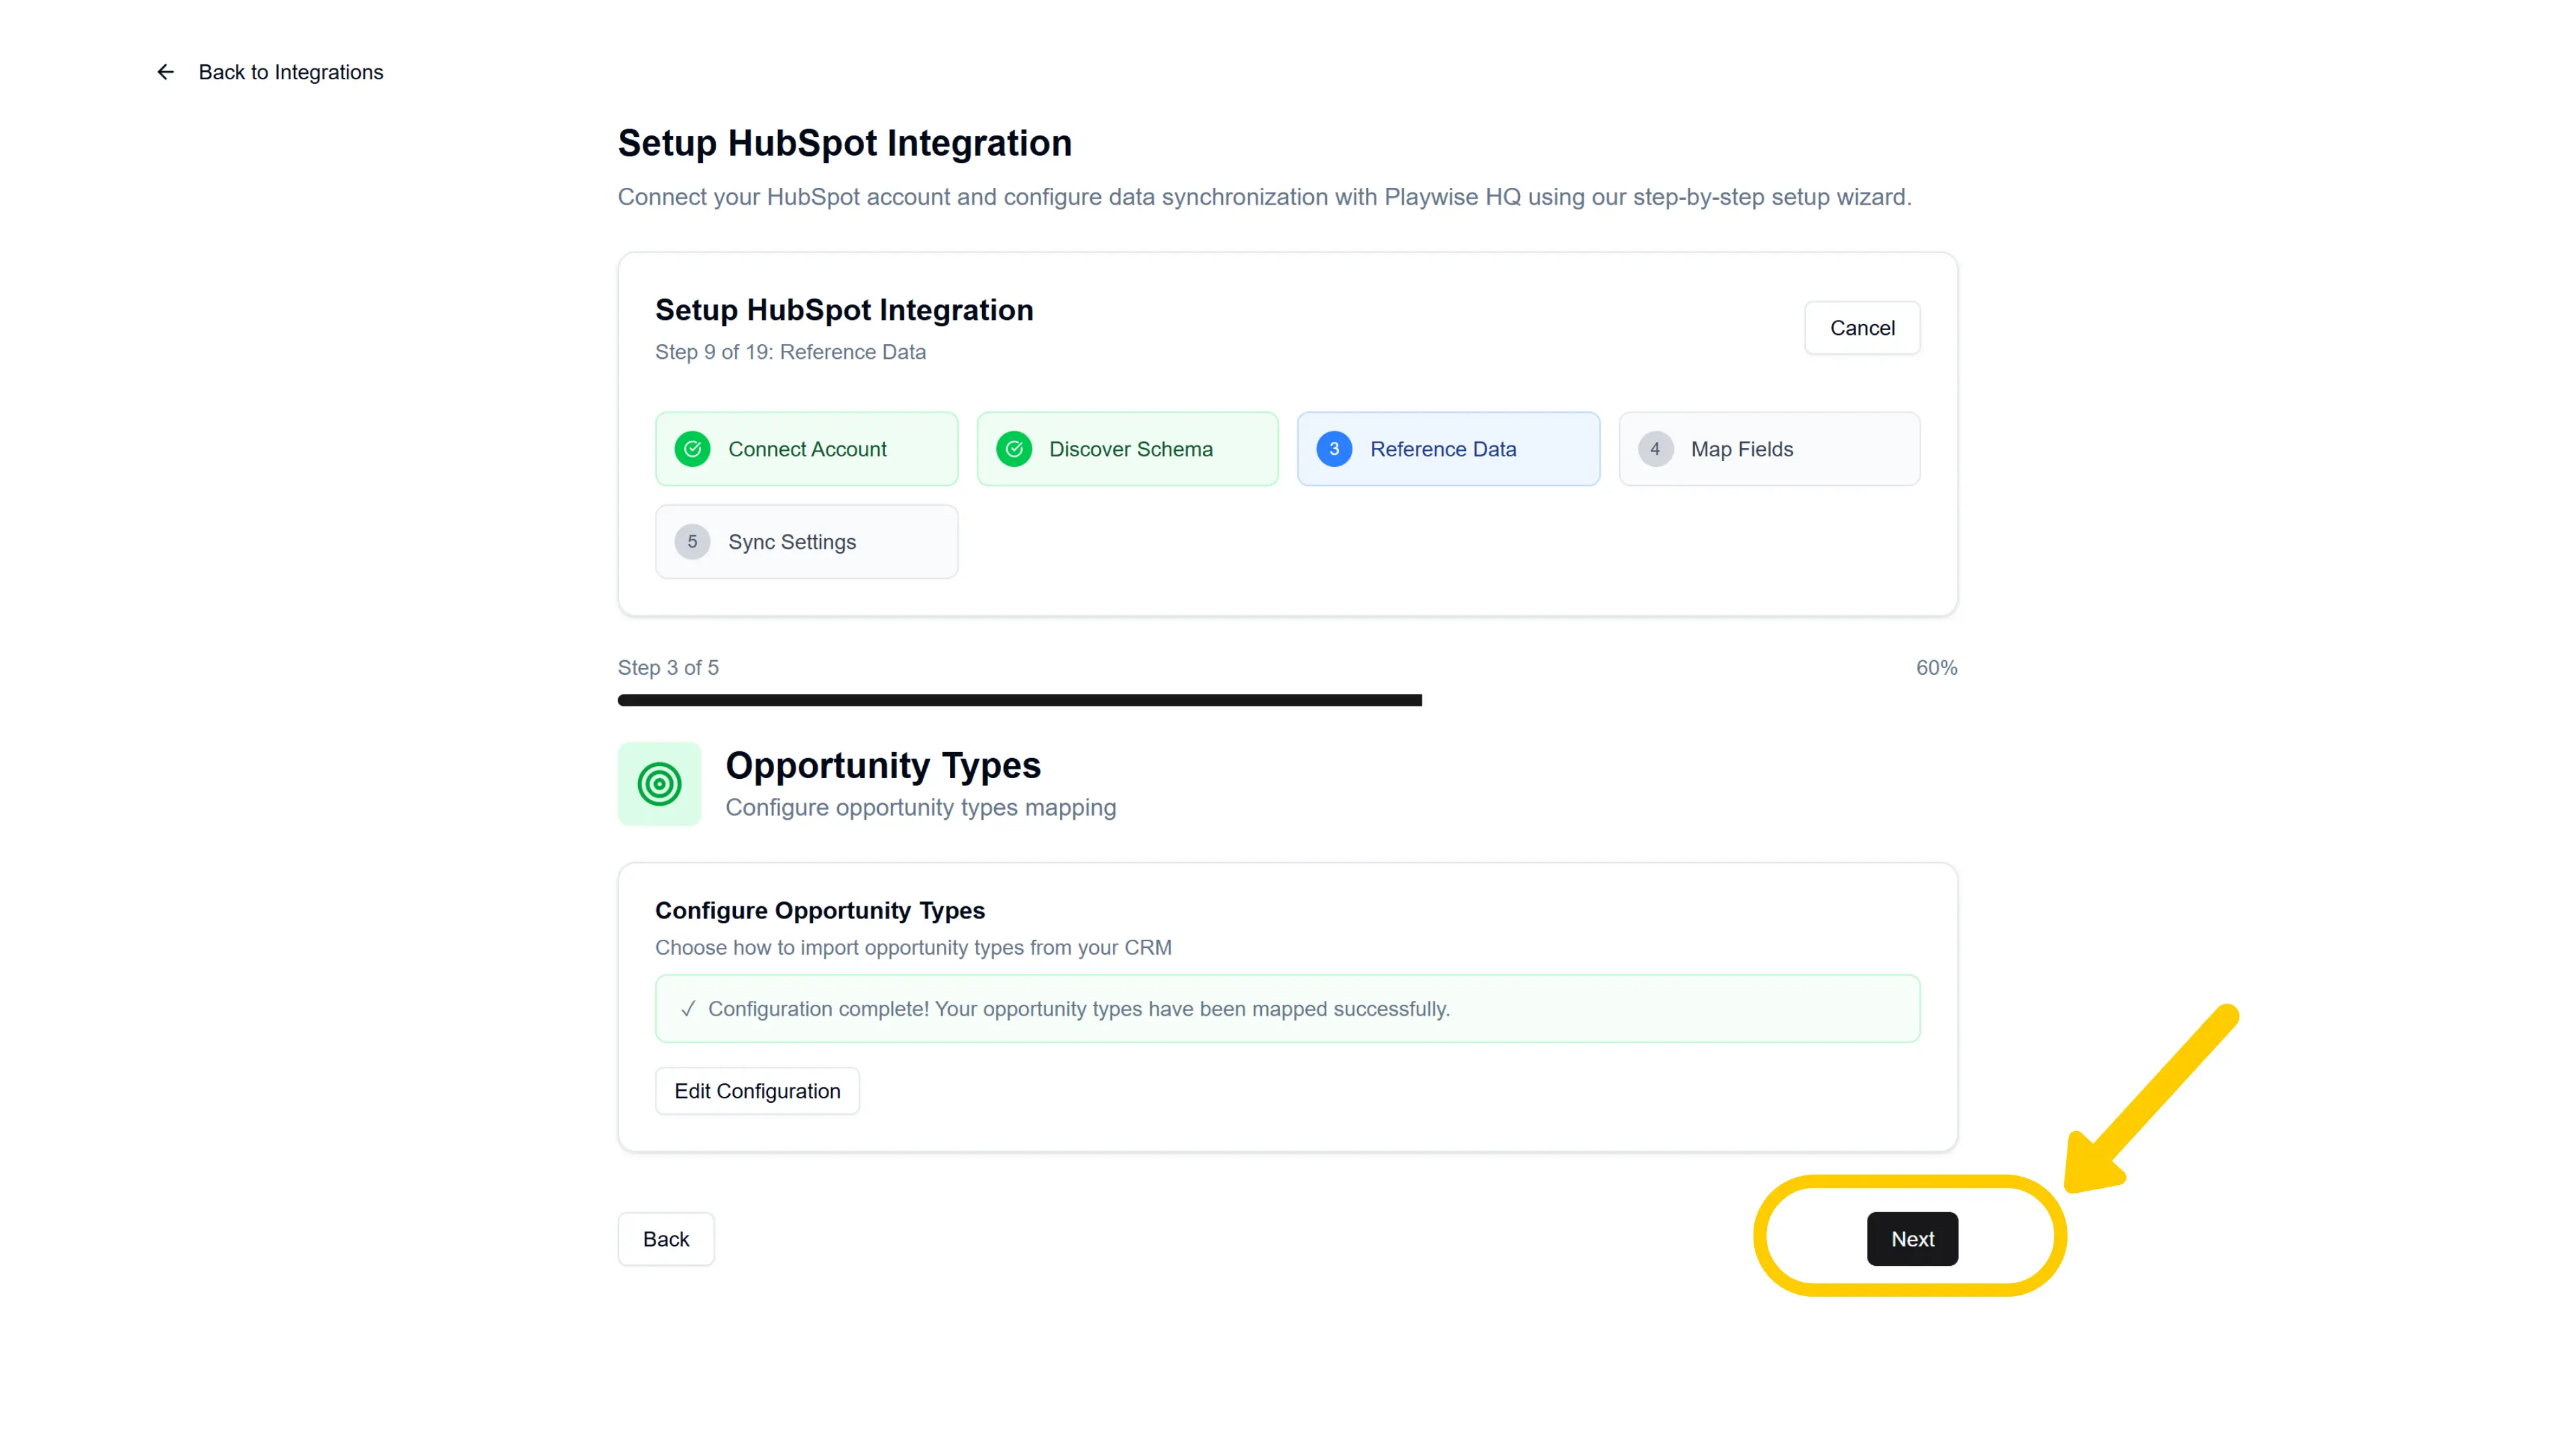
After completing or skipping this step, click “Next” to proceed to win/loss tracking configuration.
Step 9: Configure Win Tracking
The wizard now asks about win/loss tracking — this is what enables Playwise HQ to create structured win/loss records from your closed deals.
Win Reasons:
You will see a question card: “Do you track reasons why deals are WON in HubSpot?”
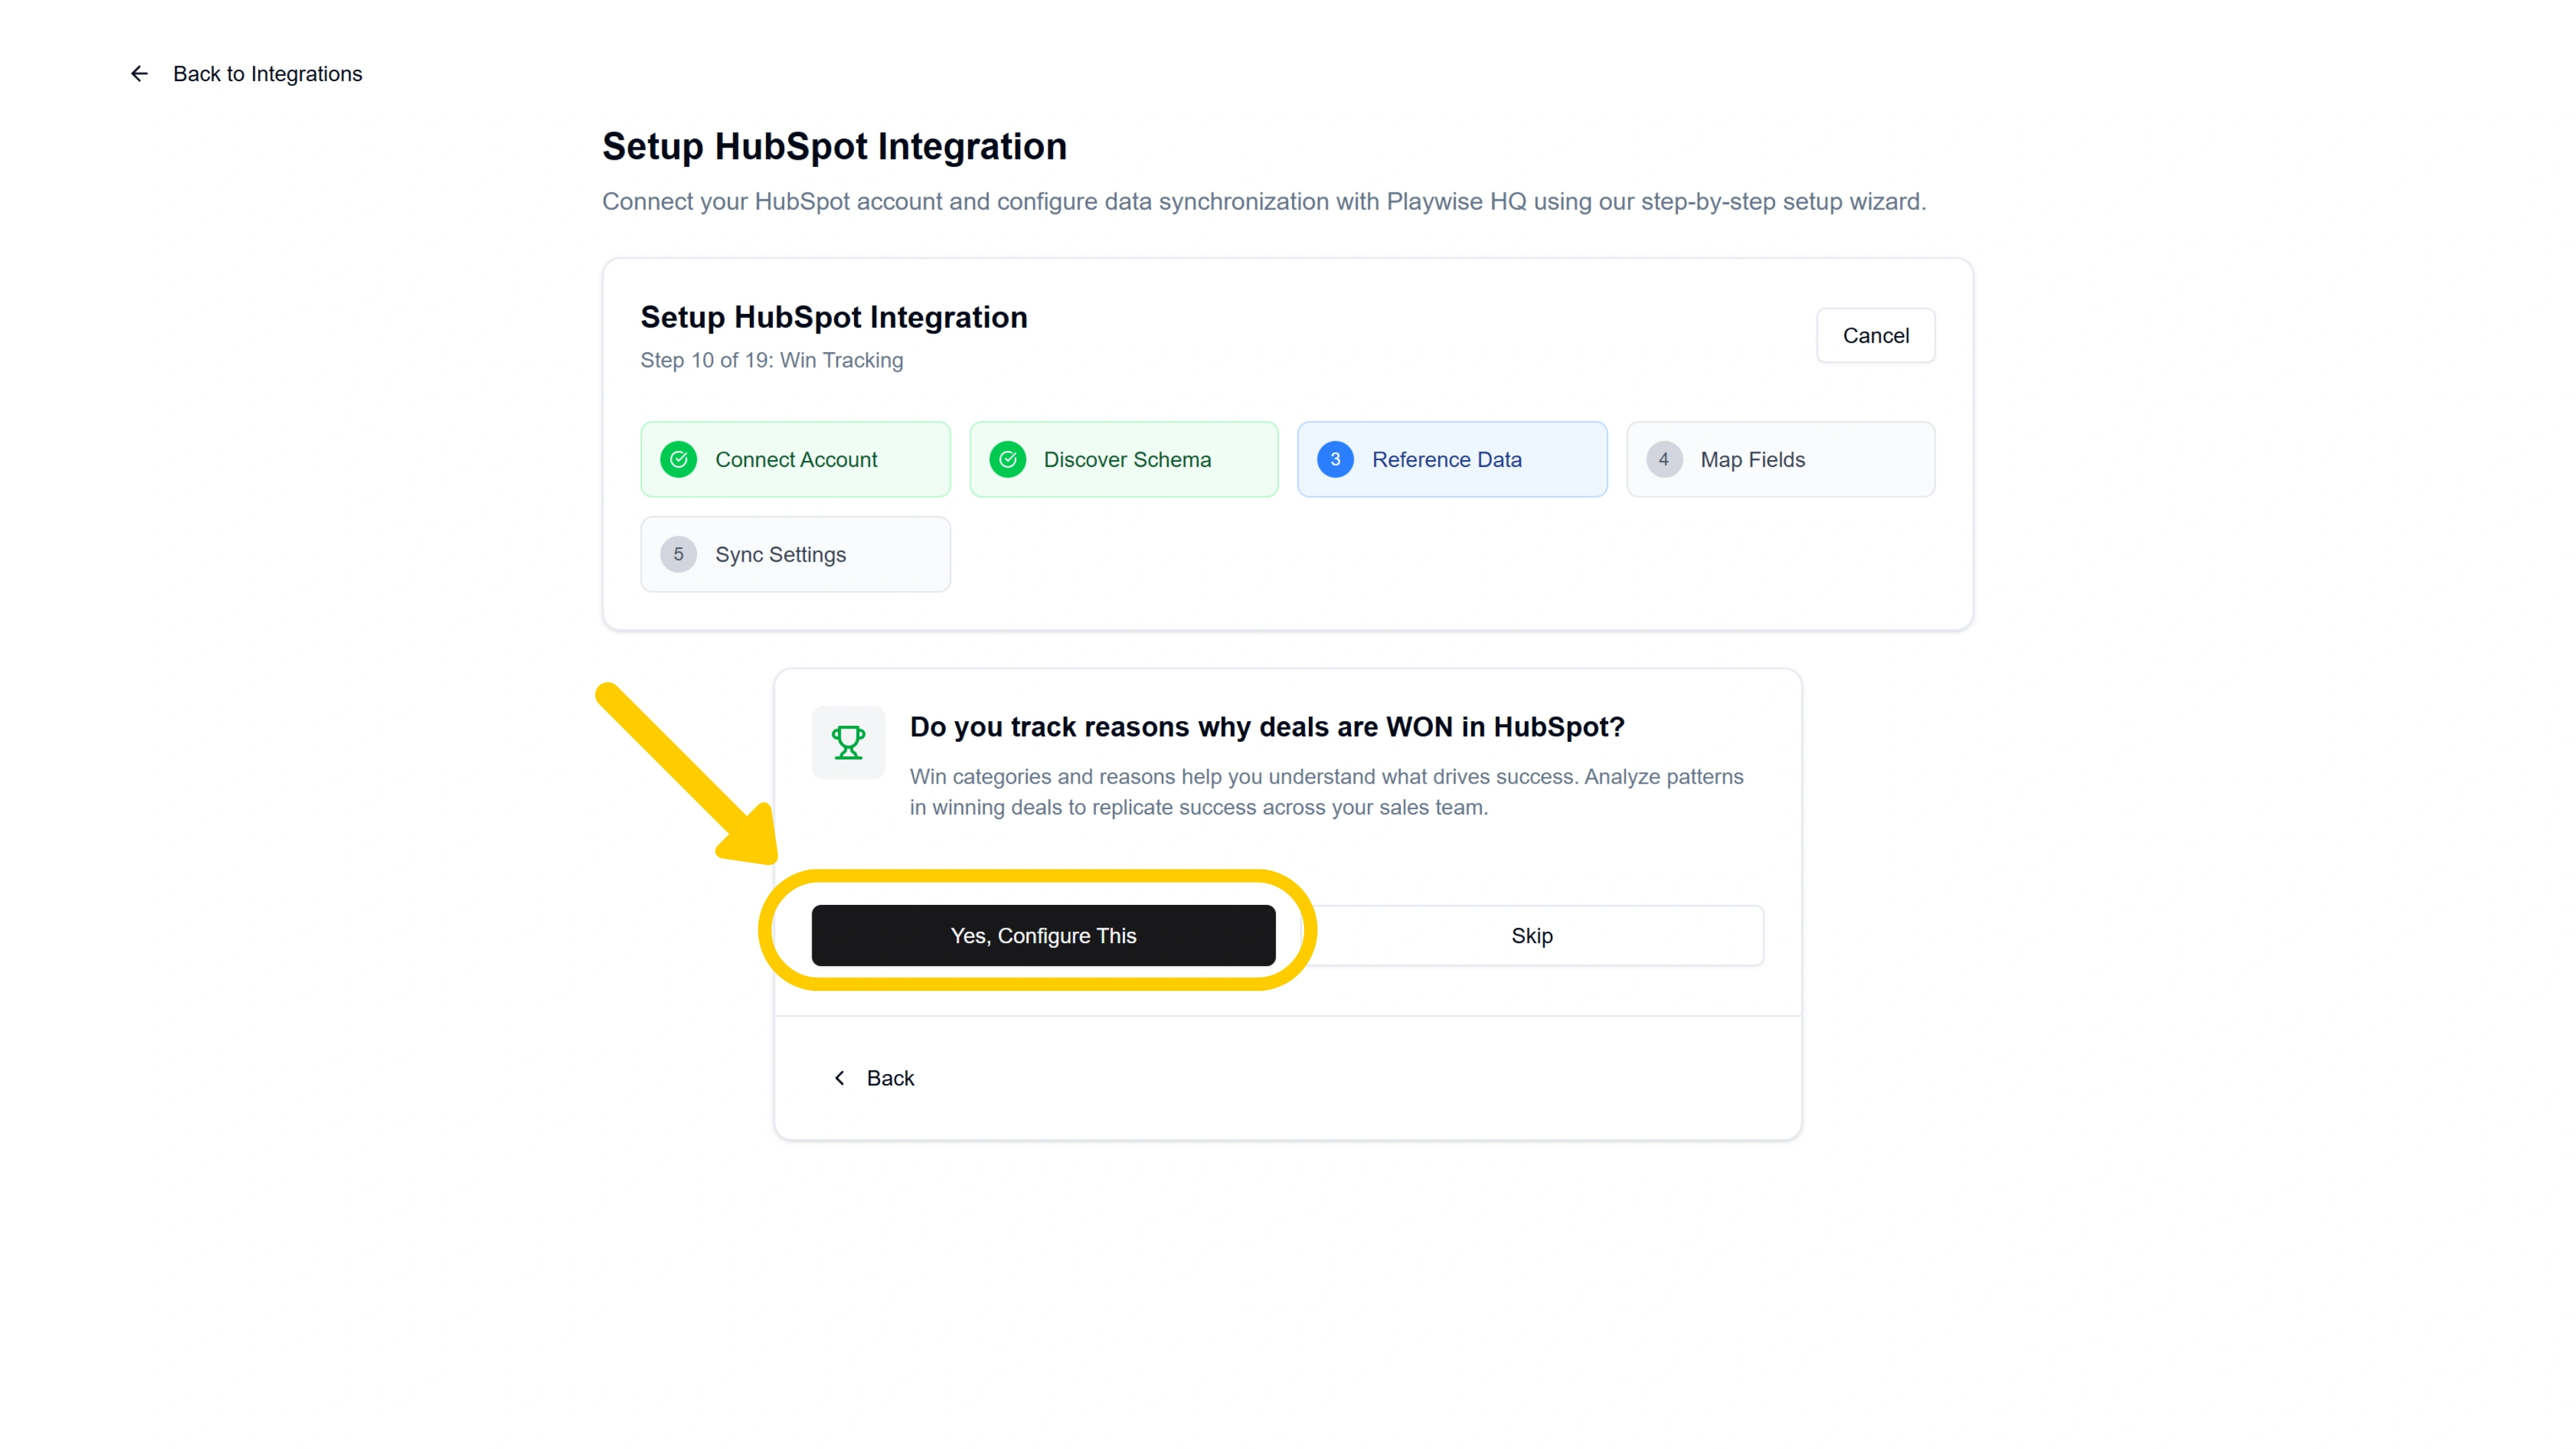
- Click “Yes, Configure This” to proceed with win tracking setup.
- Click “Skip” if you do not track win reasons in HubSpot.
If you clicked “Yes, Configure This”:
Step 9b: Select How You Track Win Reasons
If you clicked “Yes”, you will see a screen titled “How do you track Win Reasons?” with three options:
![]()
Dropdown list (structured categories) — You use predefined categories or picklist values in HubSpot (e.g., “Product Superiority”, “Better Pricing”, “Relationship”). Choose this if your reps select from a fixed list when recording why a deal was won.
Free text field (unstructured notes) — You use a HubSpot text field where reps type their win reasons in their own words. Choose this if your team writes freeform explanations.
Both dropdown and text field — You use categories for primary classification and a text field for additional detail. Choose this if your team selects a category and also writes supporting notes.
Select the option that matches your HubSpot setup and click “Continue”.
Tip: If you are not sure which option applies, you can check your HubSpot deal properties to see how win reasons are recorded. You can also change this setting later.
What happens next depends on which tracking type you selected (Scroll to your selected option):
If You Selected “Free Text Field” – Step 9c: Map the Win Reason Text Field
You will see a screen titled “Map Win Reasons Text Field” asking you to select which HubSpot text field should sync with Playwise HQ’s Win Reason Detail field.
- From the dropdown, select the HubSpot text field that your team uses to record win reasons.
- A mapping preview will appear showing the HubSpot field on the left and the Playwise HQ “Win Reason Detail” field on the right, connected by an arrow.
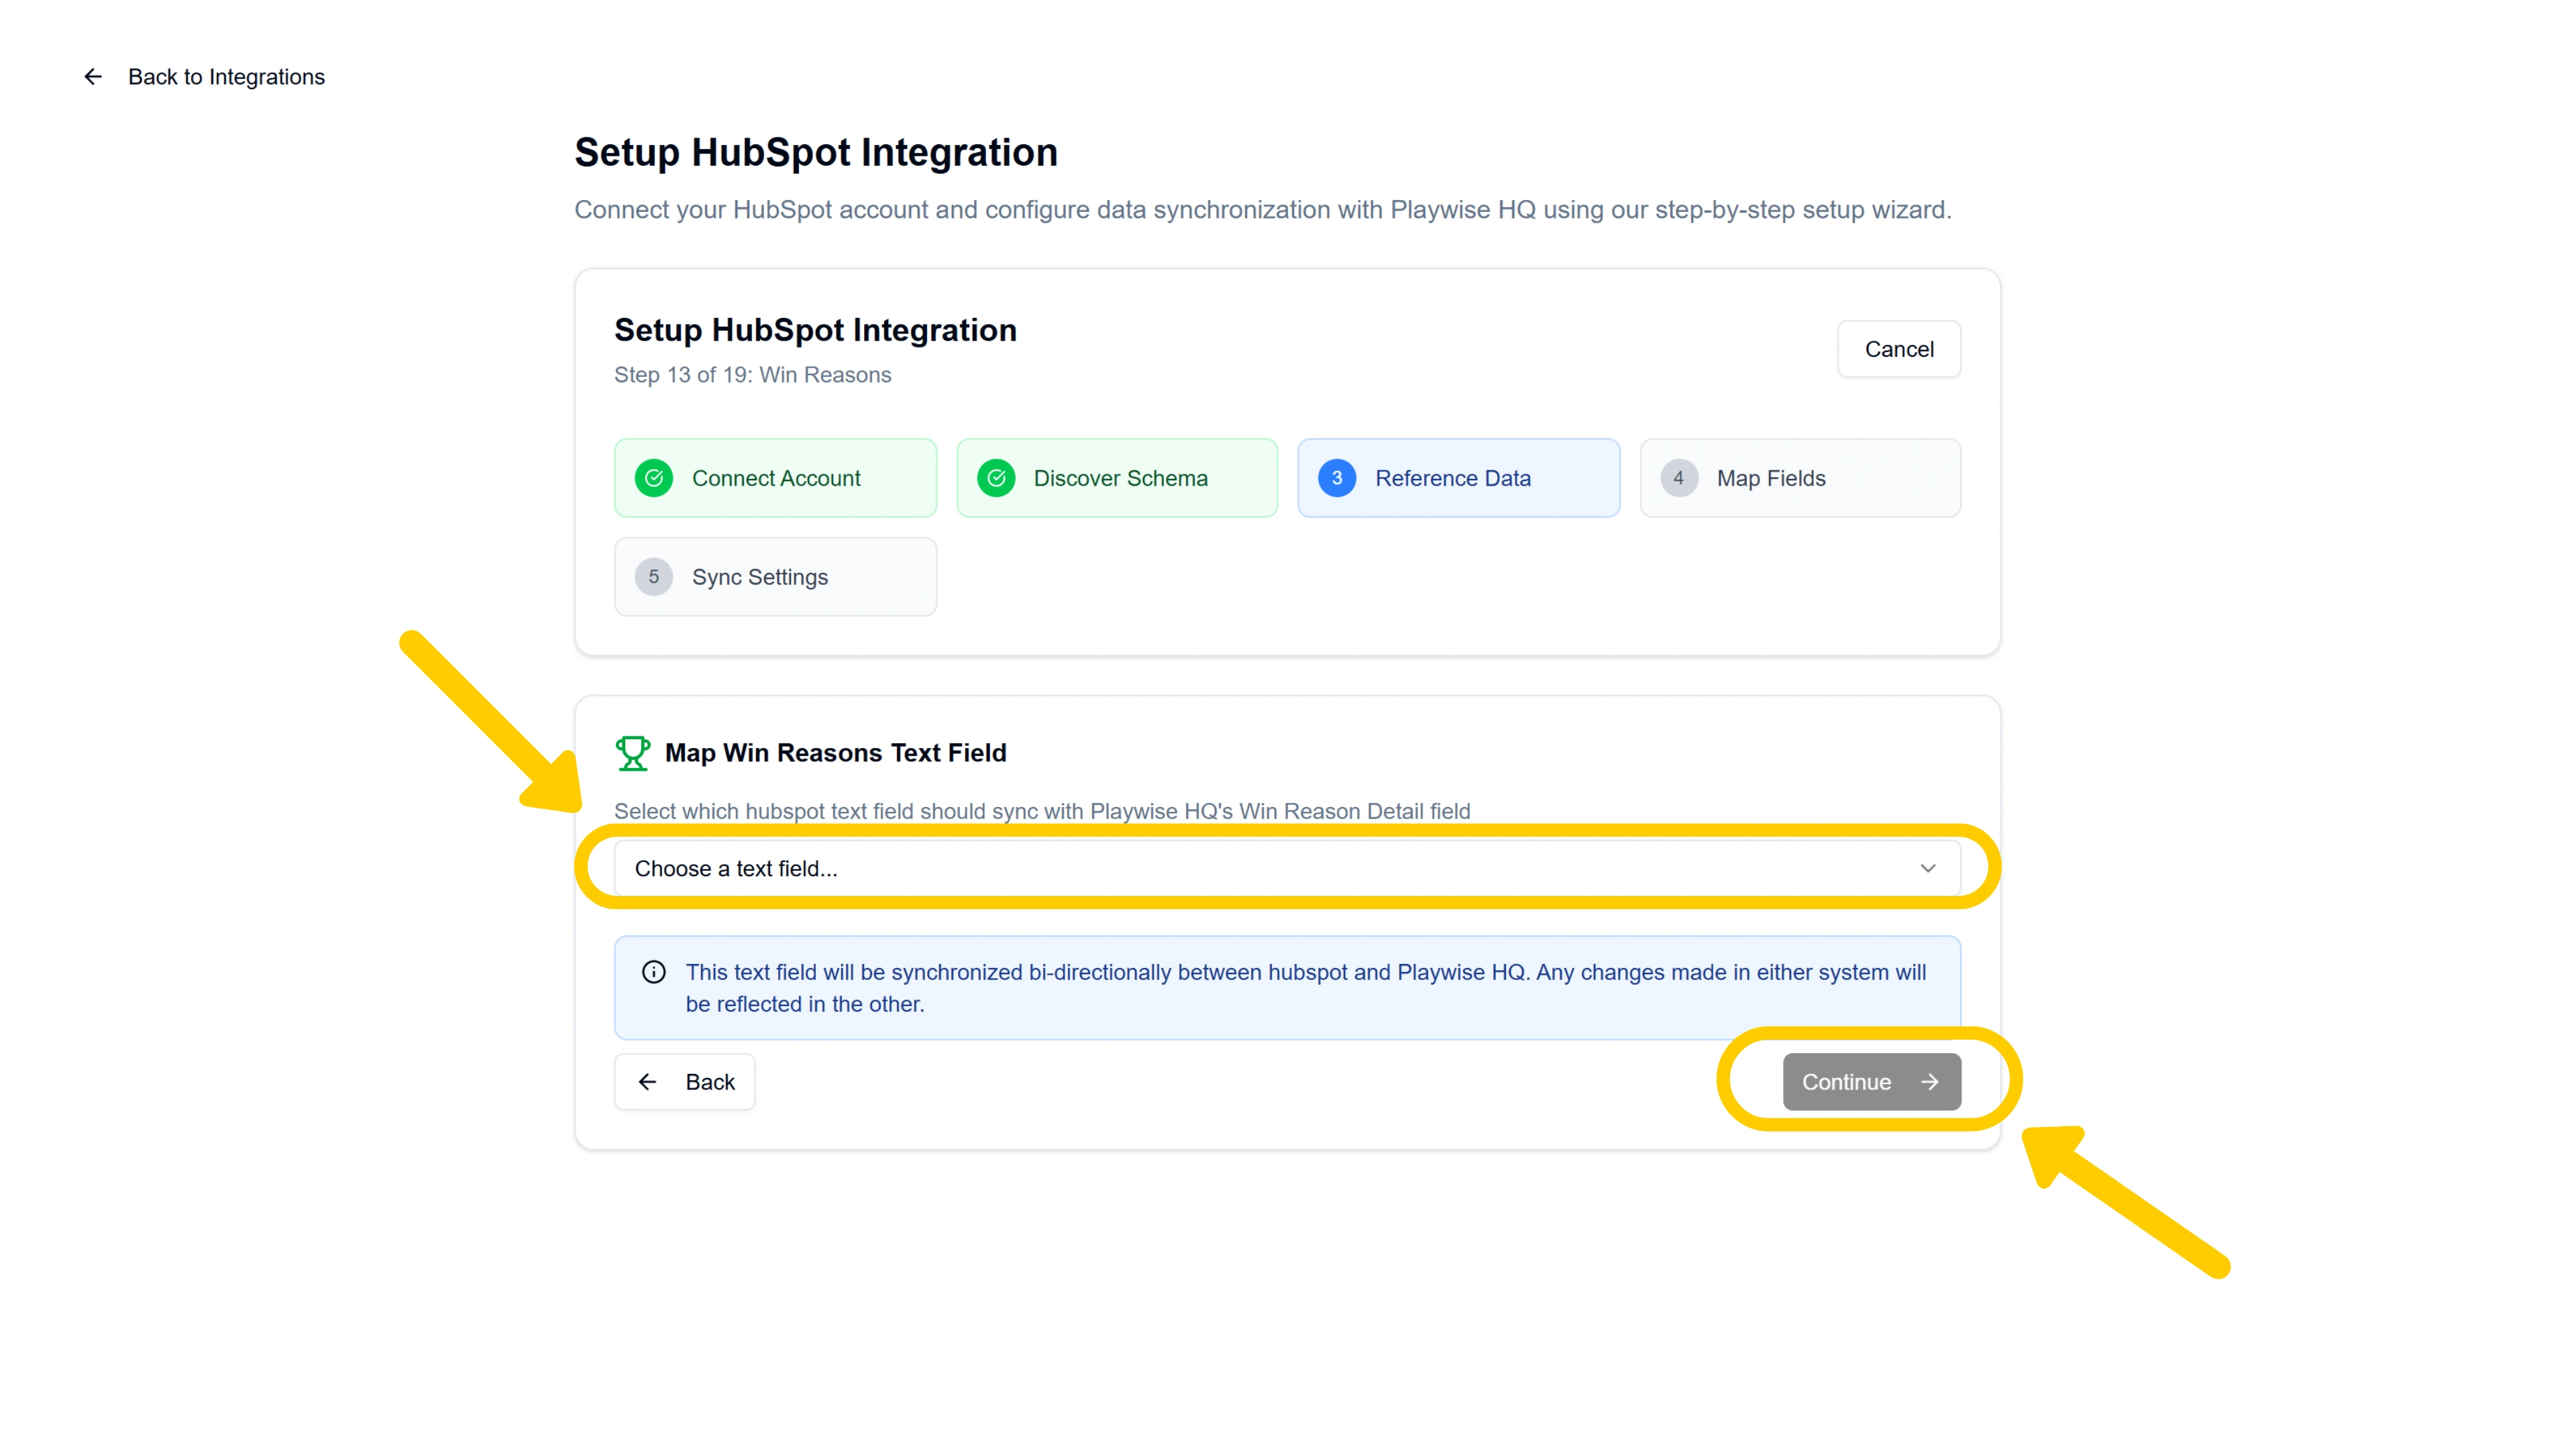
- Click “Continue”.
The text field will sync bidirectionally — changes made in either system will be reflected in the other.
After this, the wizard proceeds to Step 10: Configure Loss Tracking.
If You Selected “Dropdown List” – Step 9c: Define Your HubSpot Category Structure
You will first need to import your win categories from your Hubspot account. Click “Import & Configure Mapping”.
Then after they have been imported click “Configure Now”.
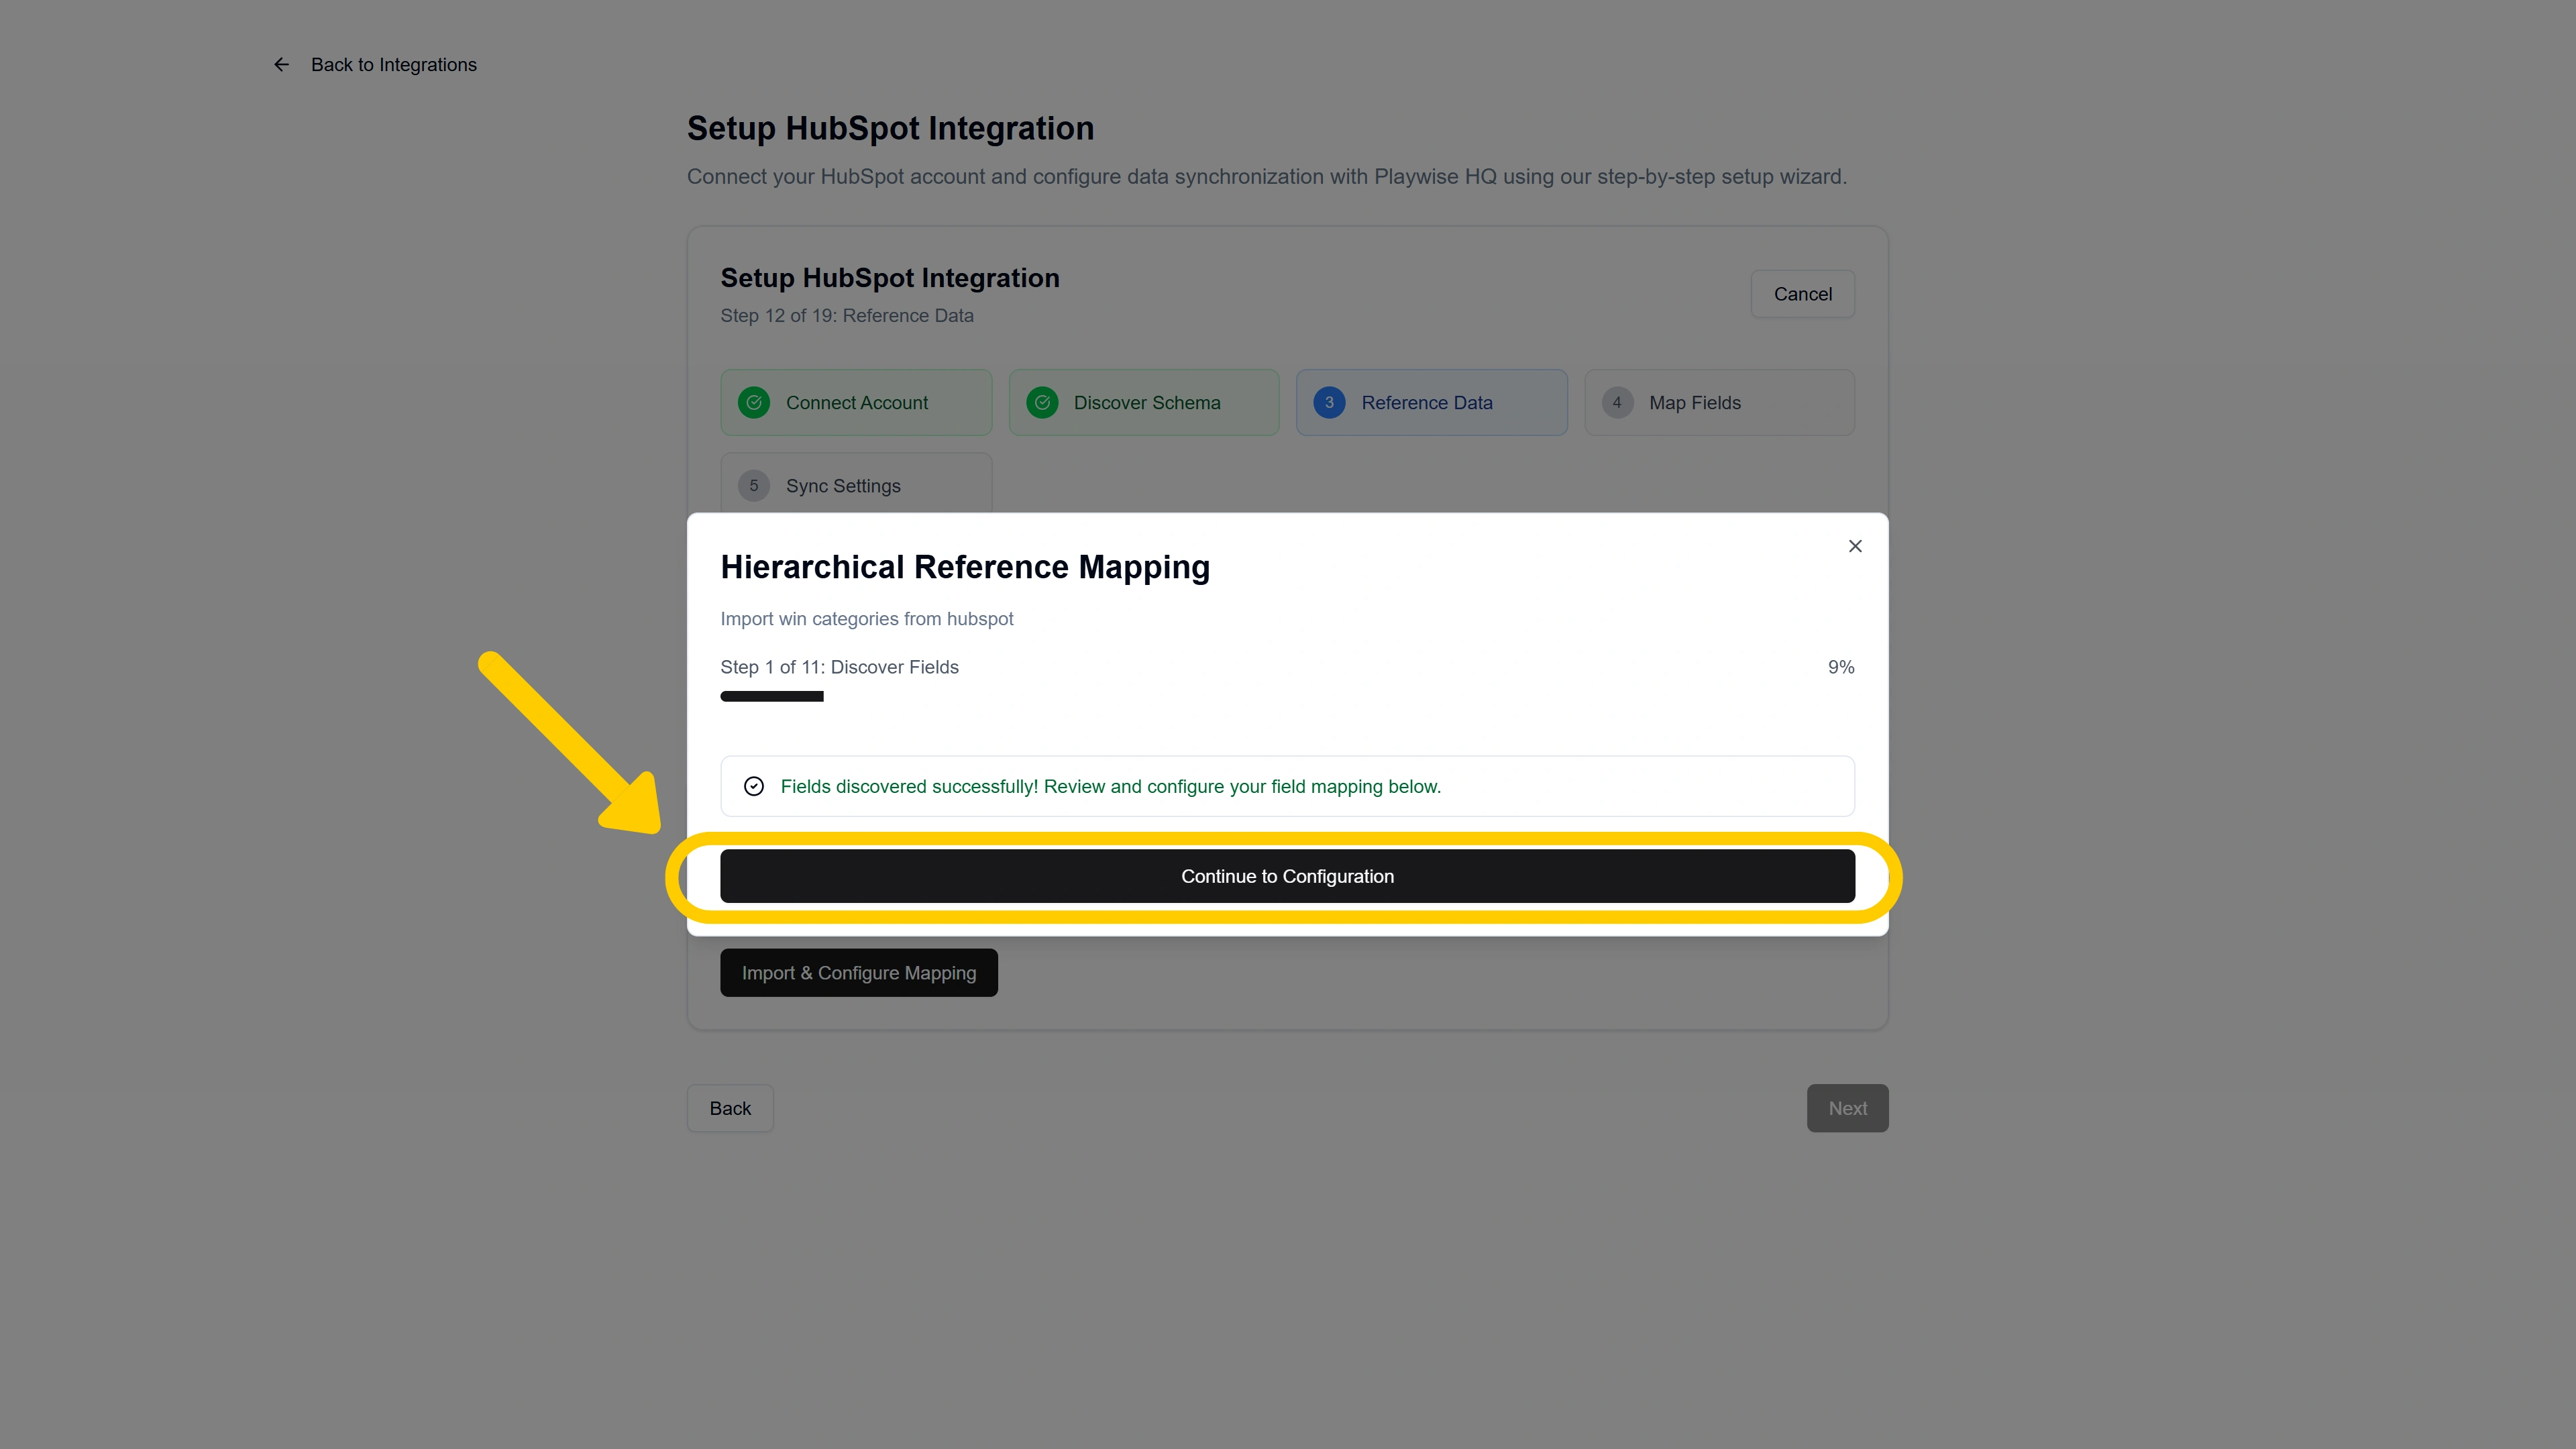
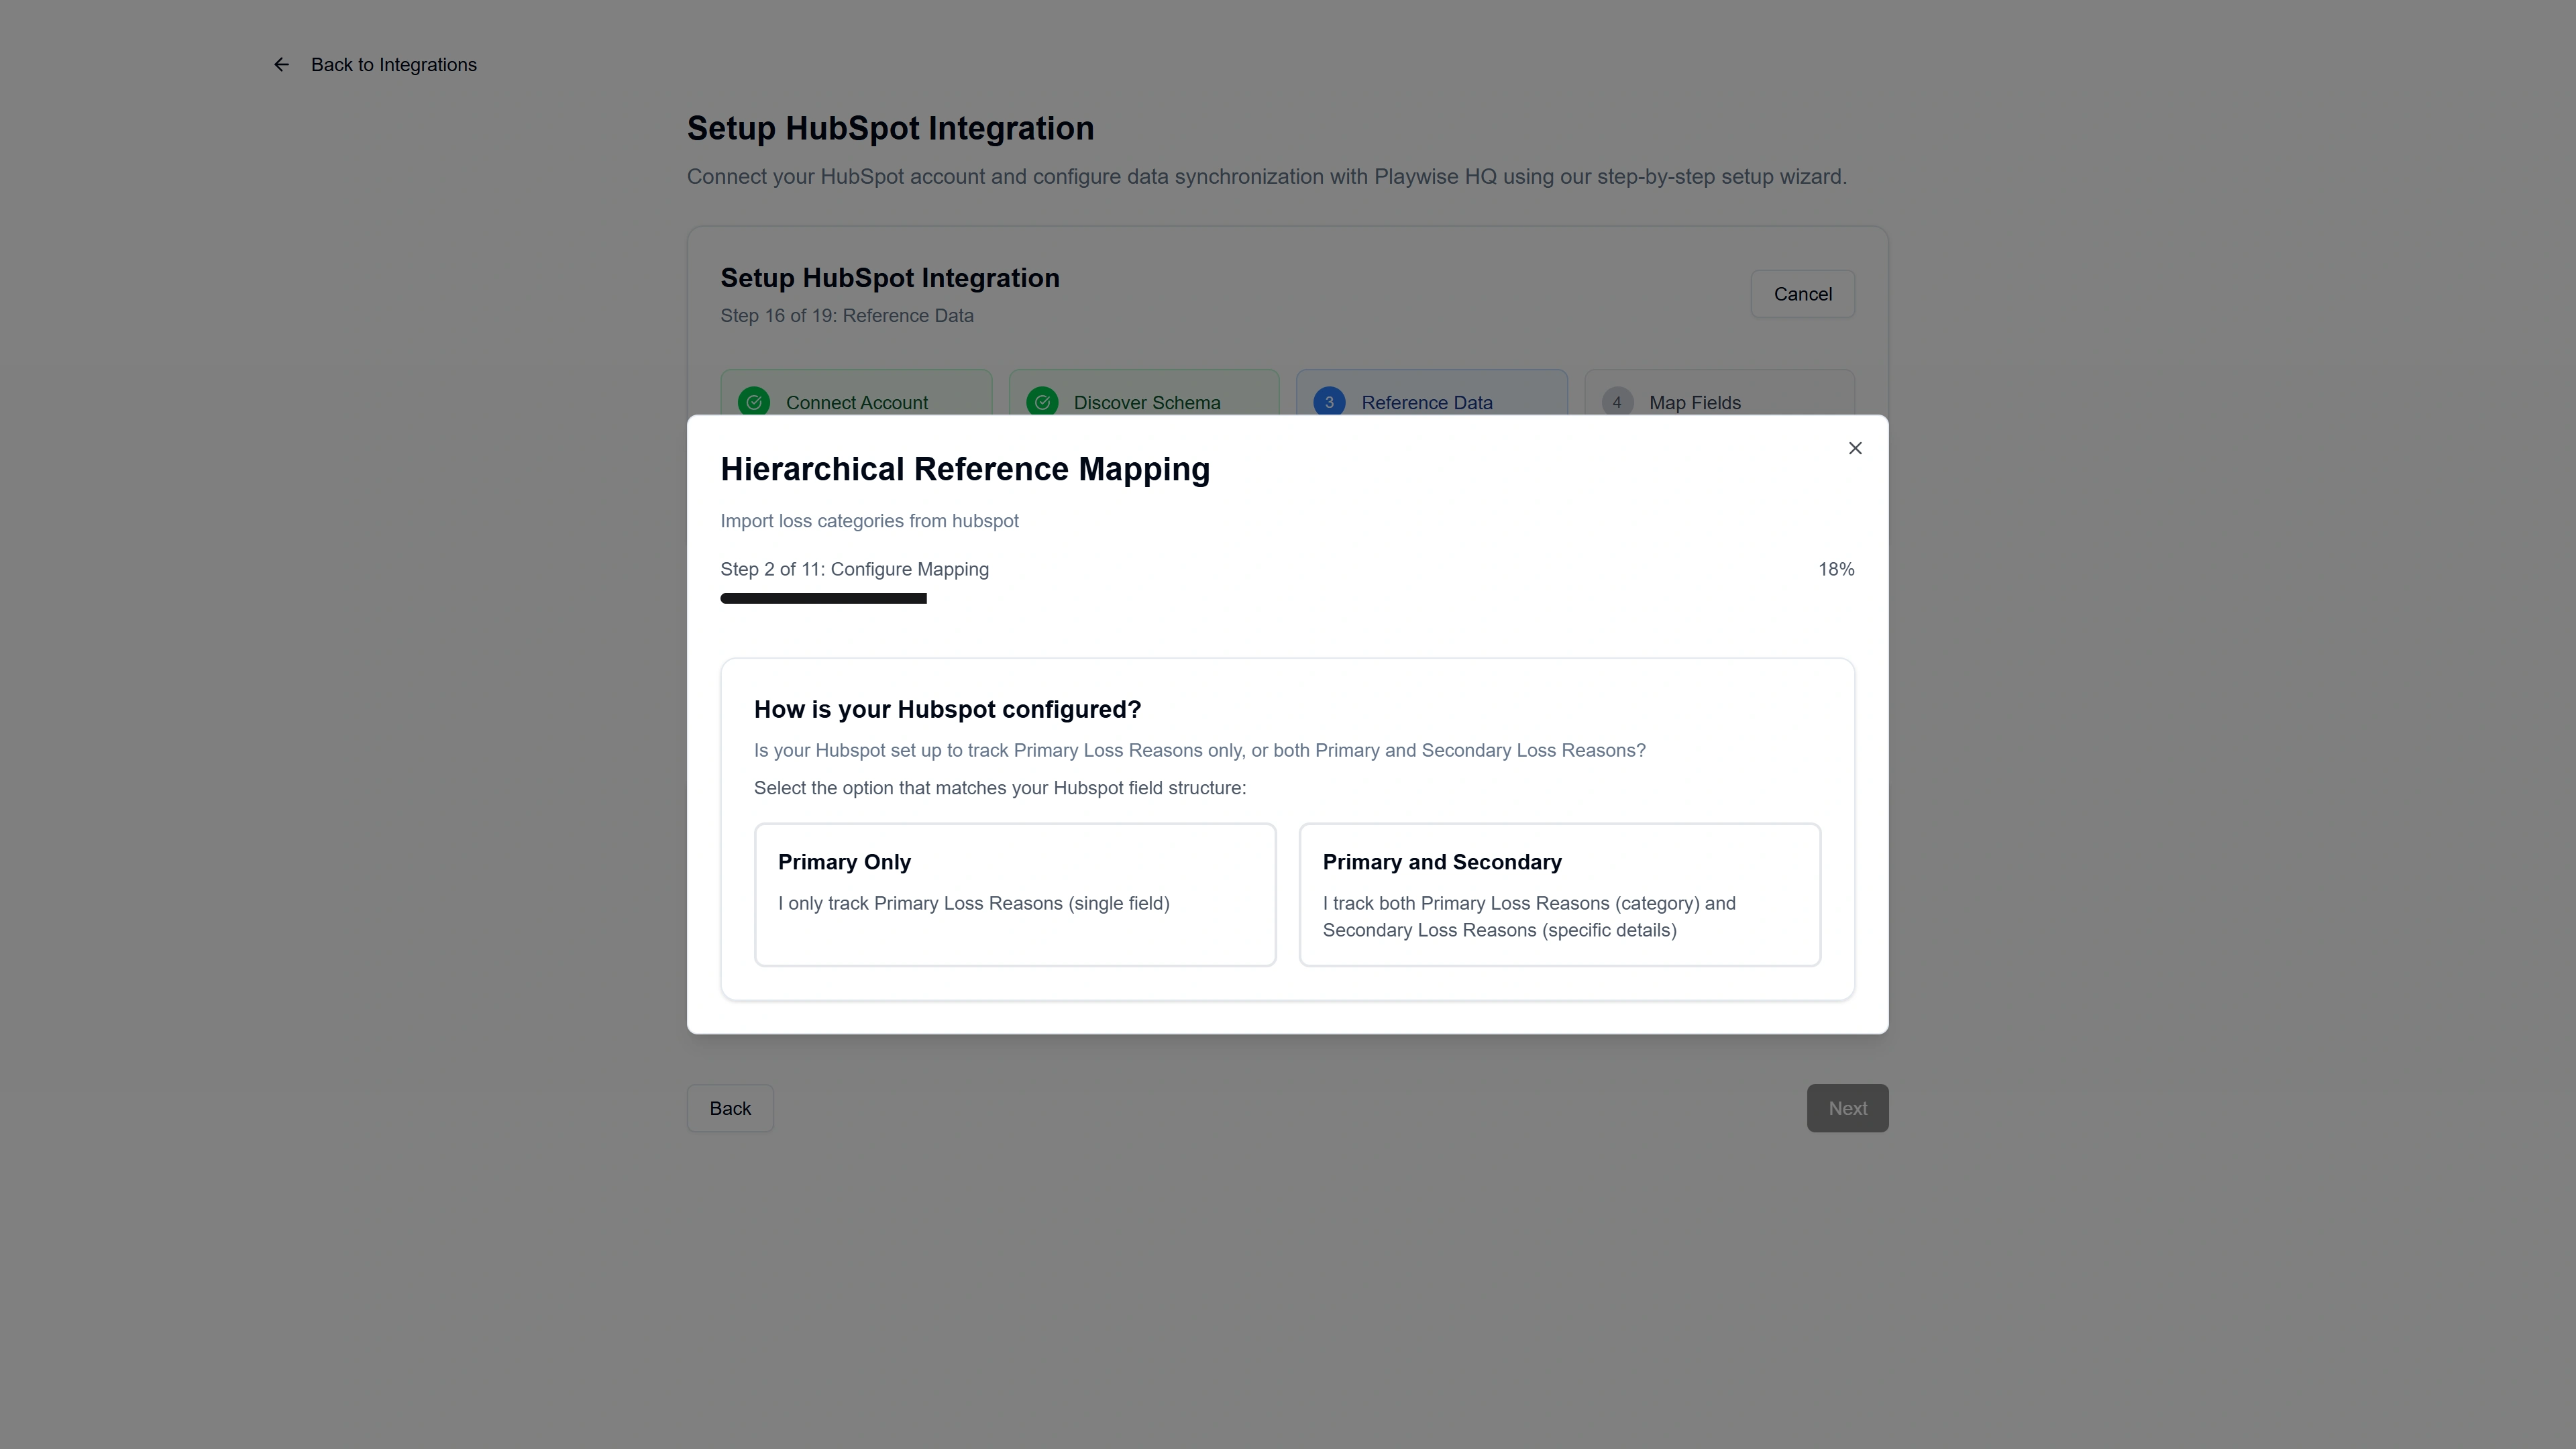
You will see a screen titled “How is your HubSpot configured?” asking whether your HubSpot tracks primary win reasons only, or both primary and secondary (specific) reasons.
- Primary Only — Your HubSpot has a single dropdown field with win reason categories (e.g., “Better Pricing”, “Stronger Features”). Choose this if you have one level of categorisation.
- Primary and Secondary — Your HubSpot has two related fields: one for the high-level category and another for specific reasons within that category (e.g., Category: “Competitive Advantage” → Specific Reason: “More Competitive Pricing”). Choose this if you have a two-level hierarchy.
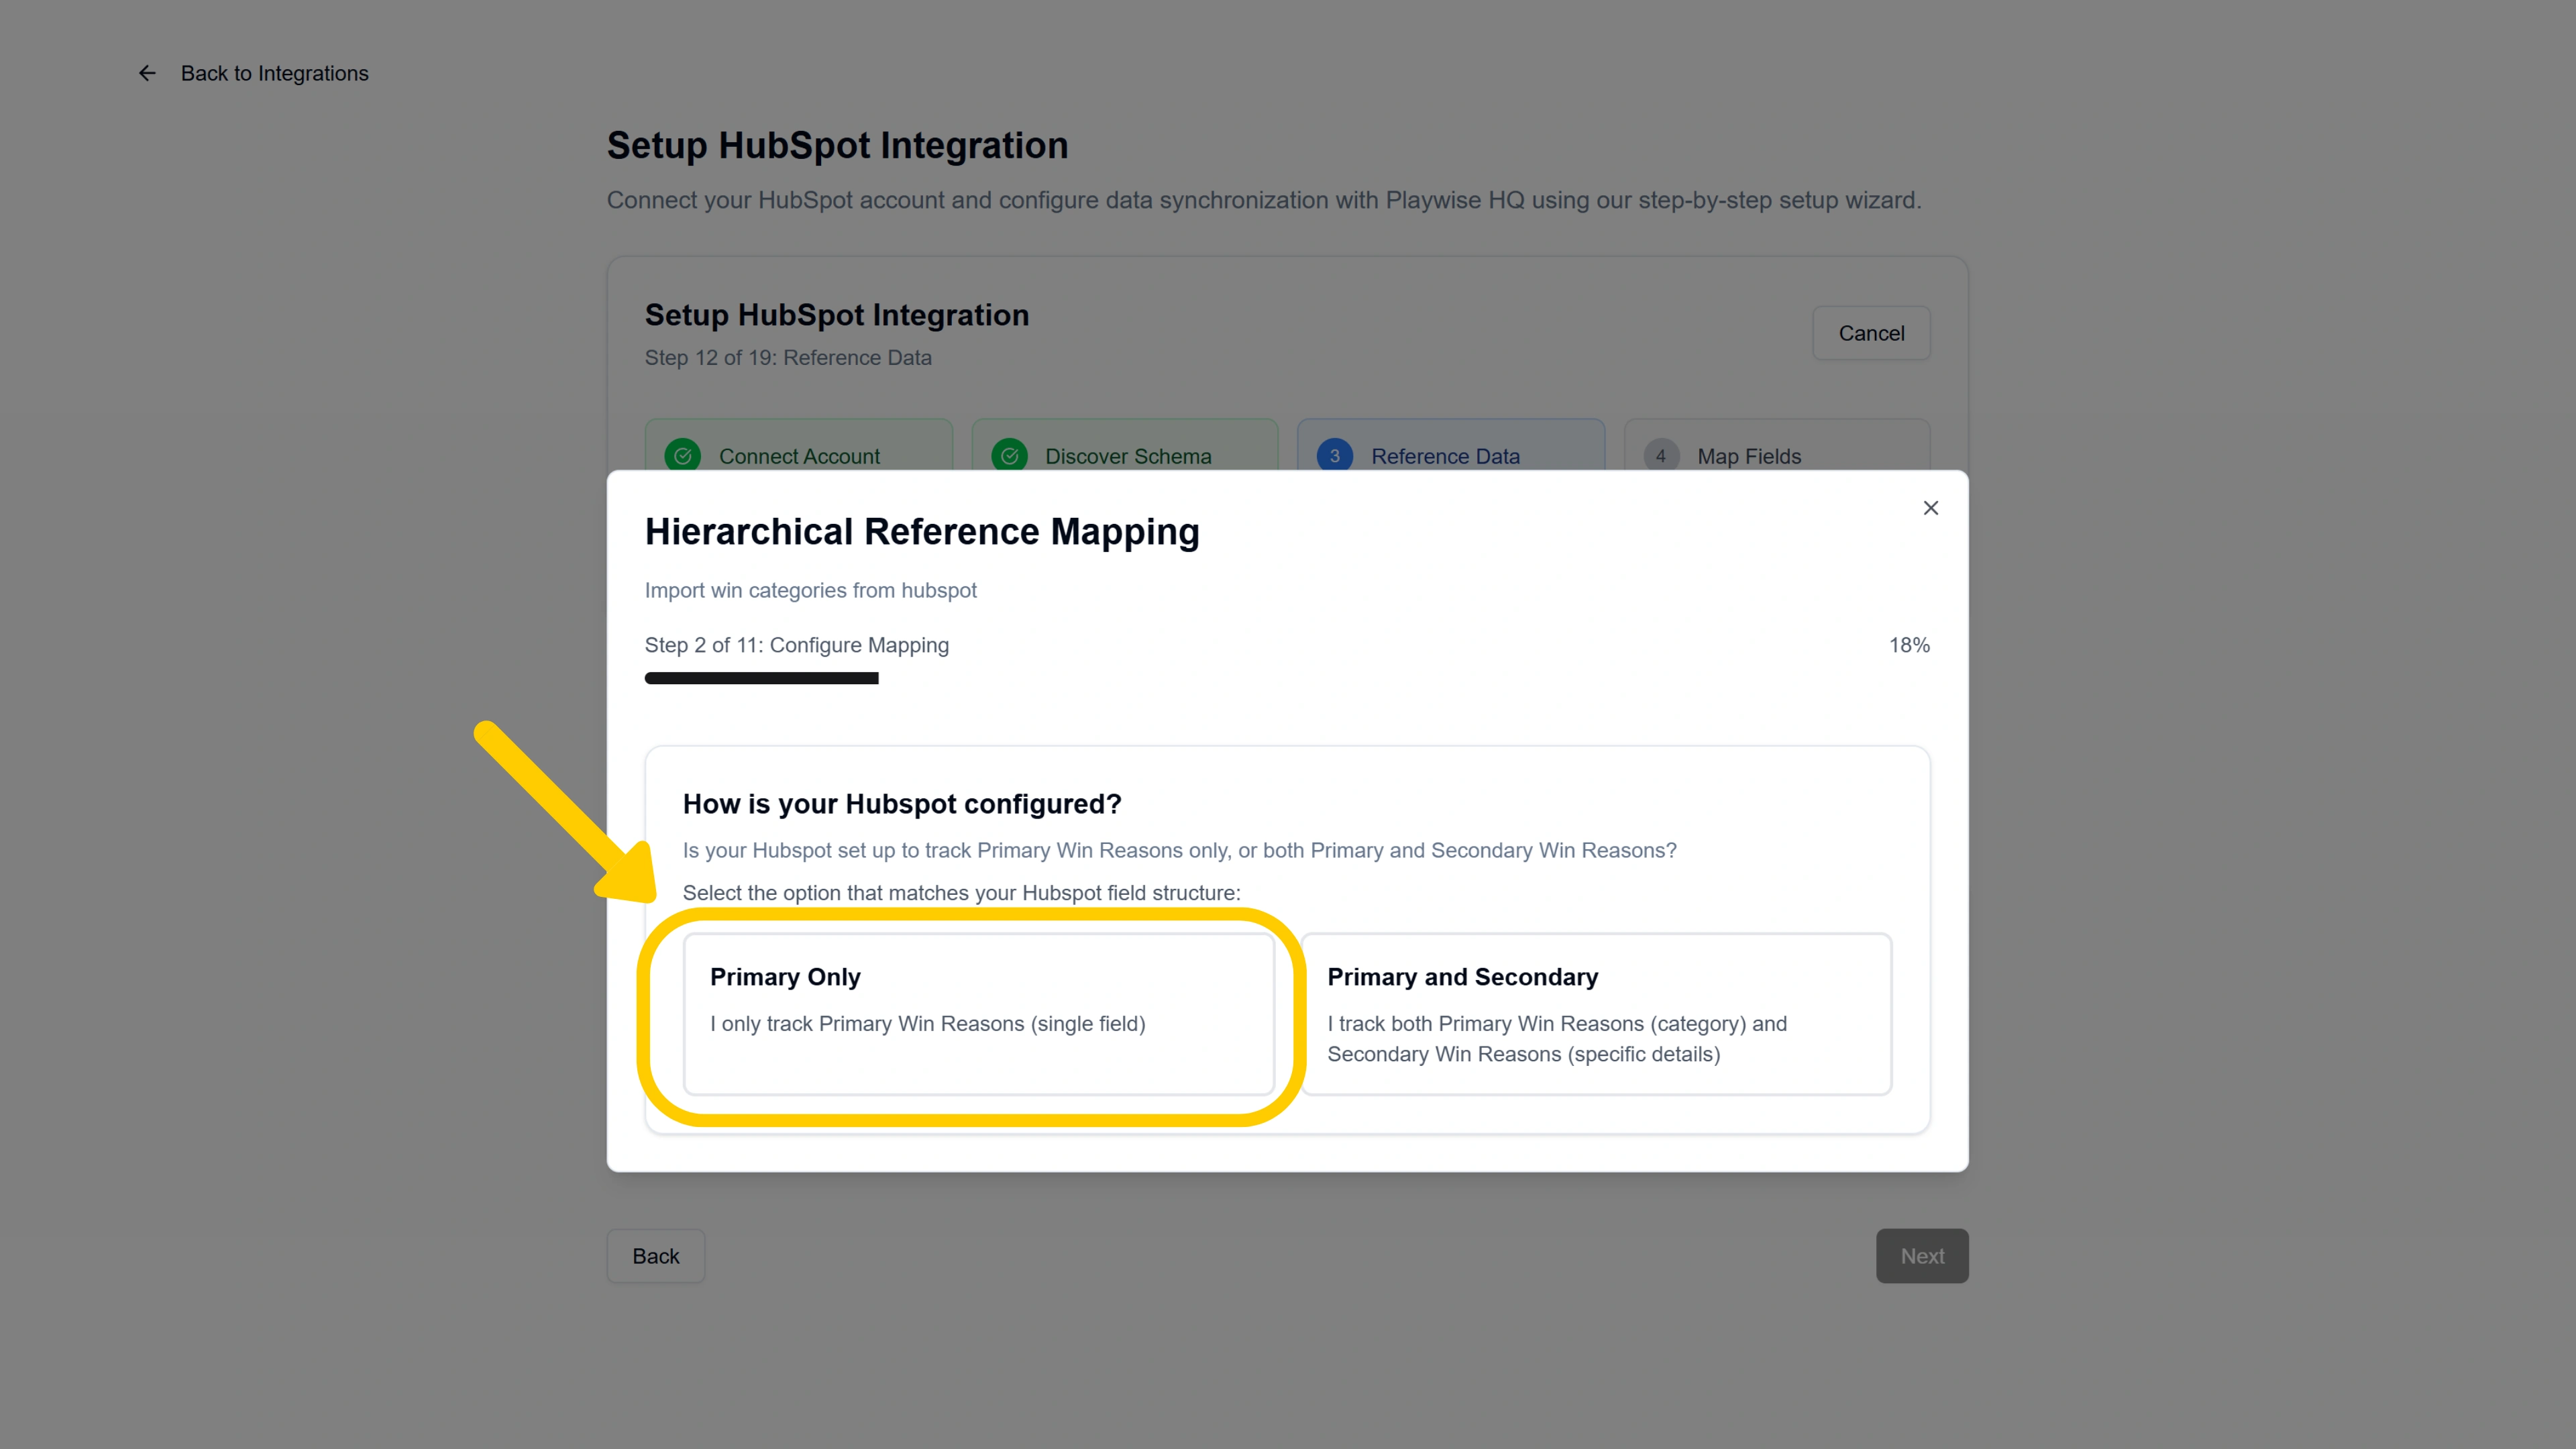
Select the option that matches your setup.
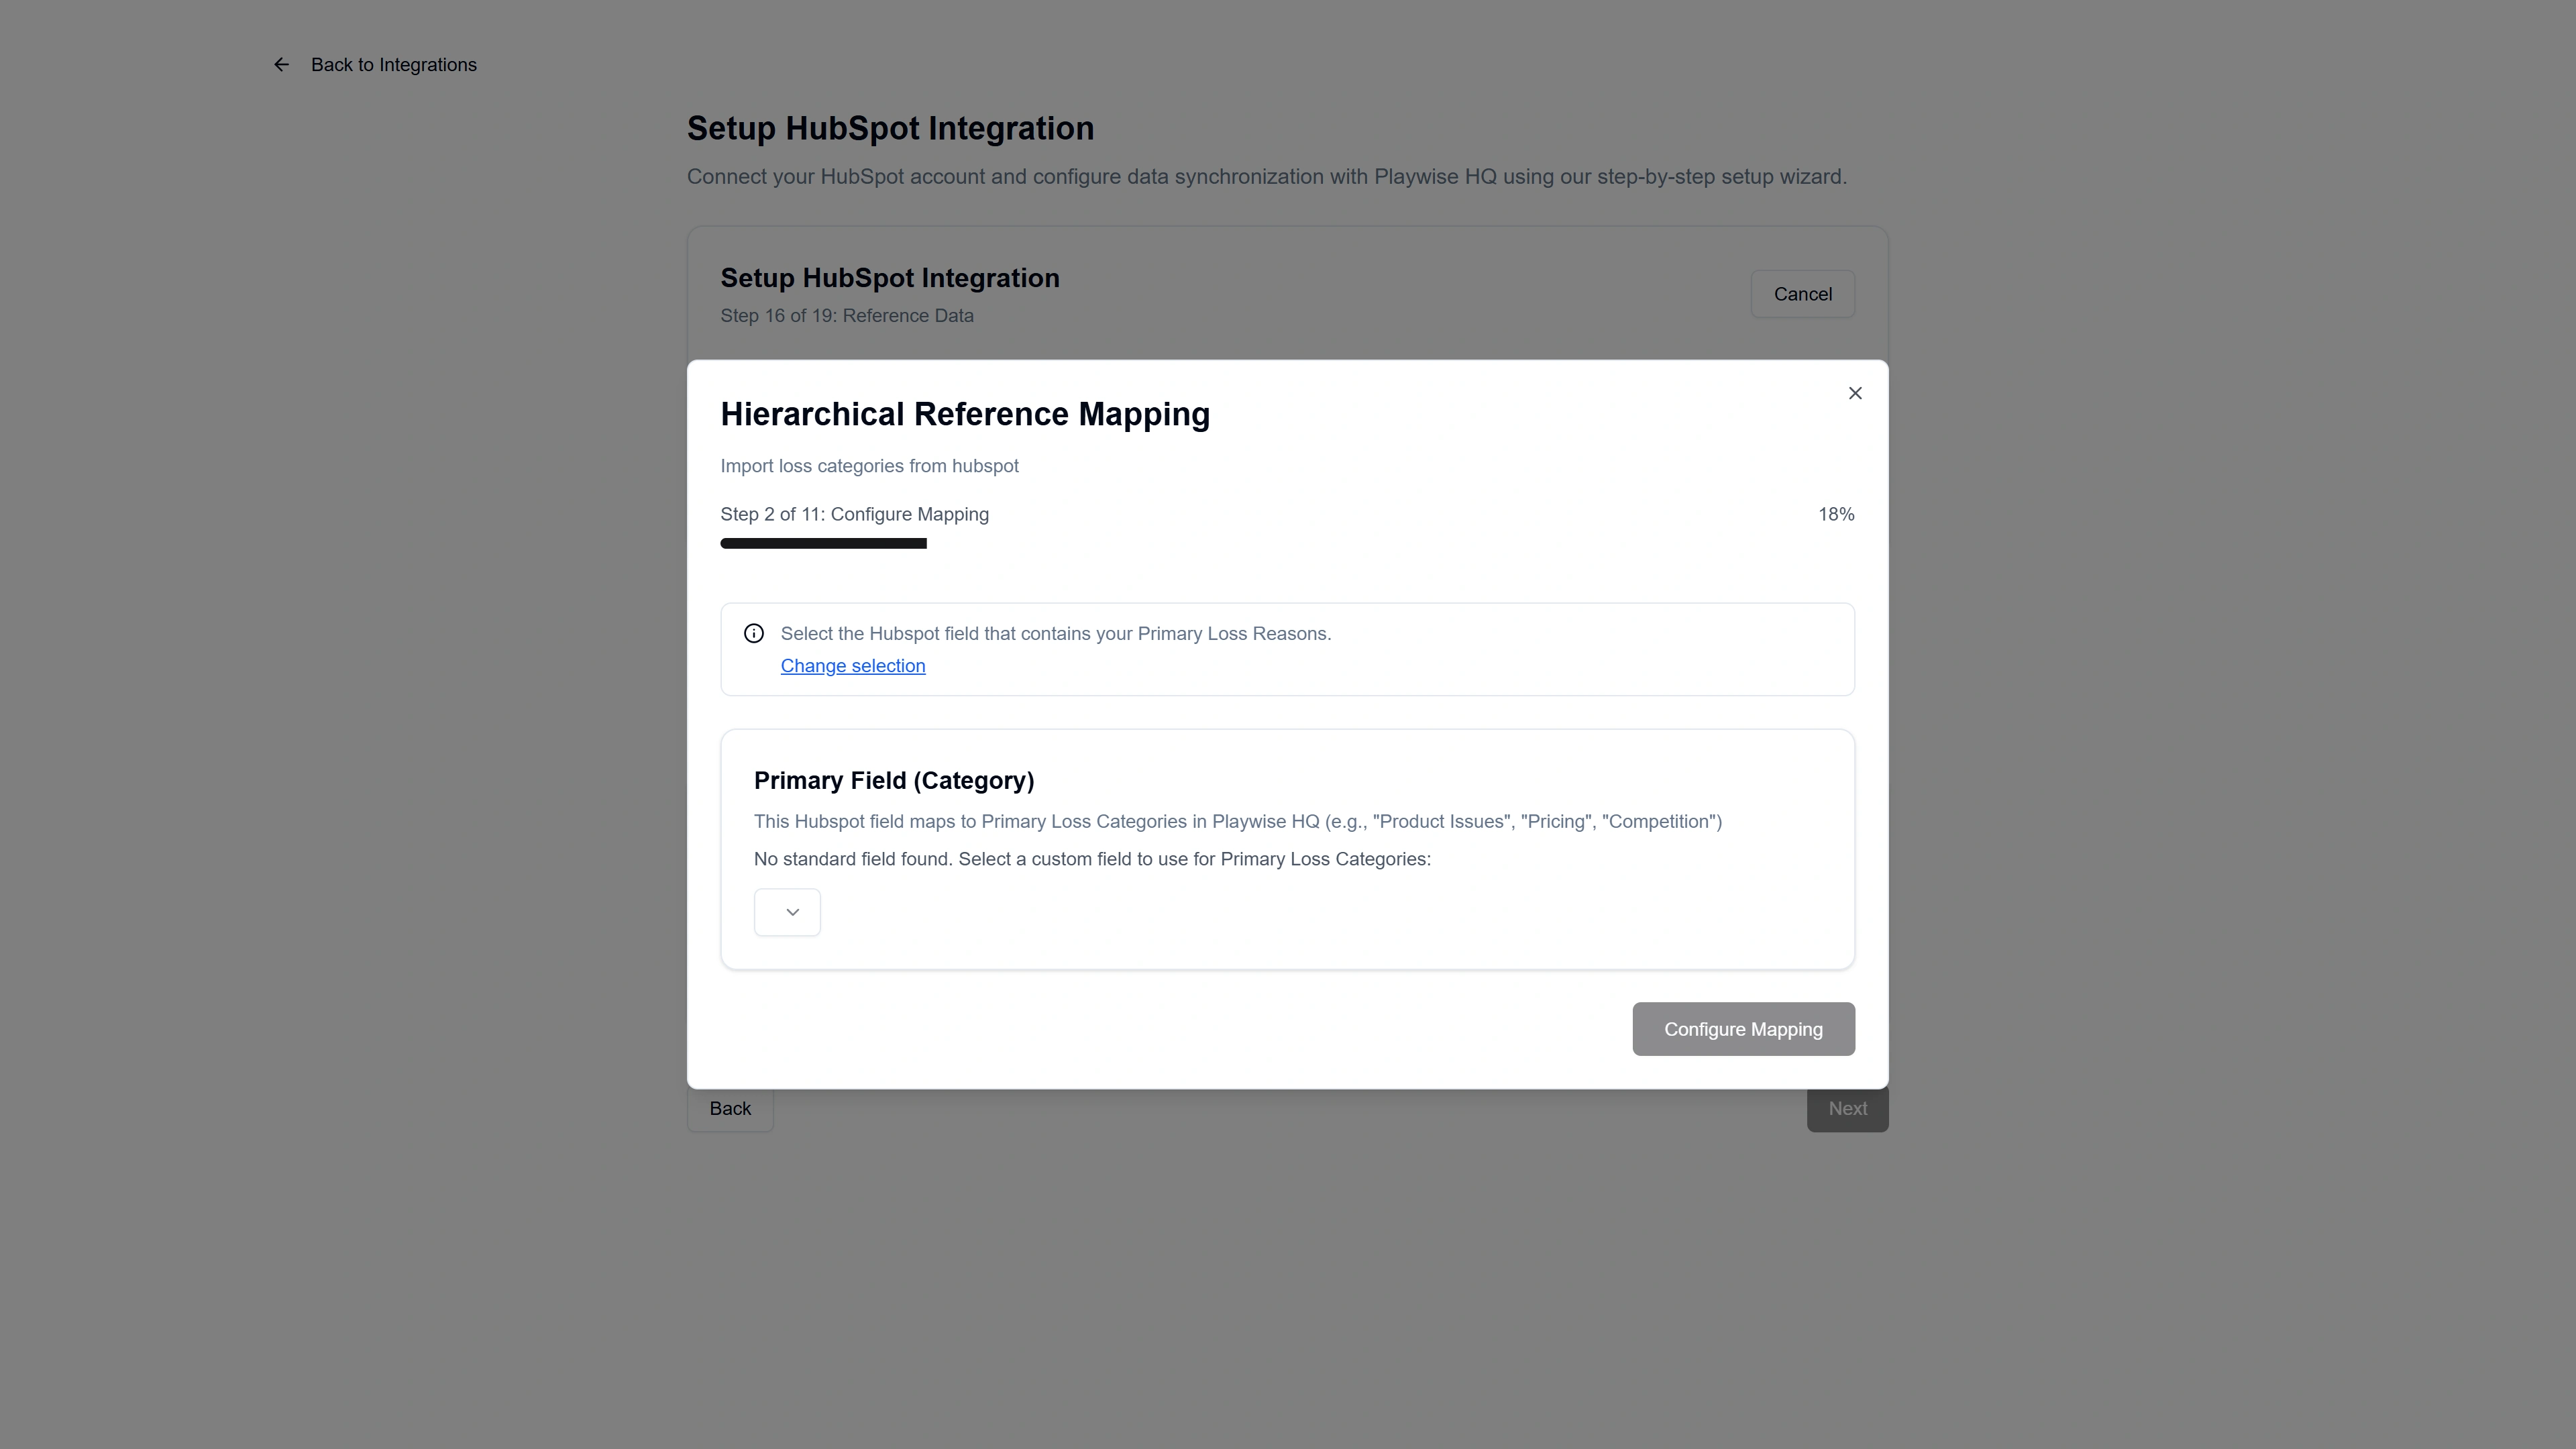
Step 9d: Select the HubSpot Field(s)
If you selected “Primary Only”:
- Under the “Primary Field (Category)” section, Playwise HQ may automatically detect a standard field. If detected, you will see a green confirmation: “Standard Field Available” with the field name.
- If no standard field is detected, select the correct HubSpot dropdown field from the list that you want to map your primary win category to. Fields are shown with AI confidence scores to help you identify the best match.
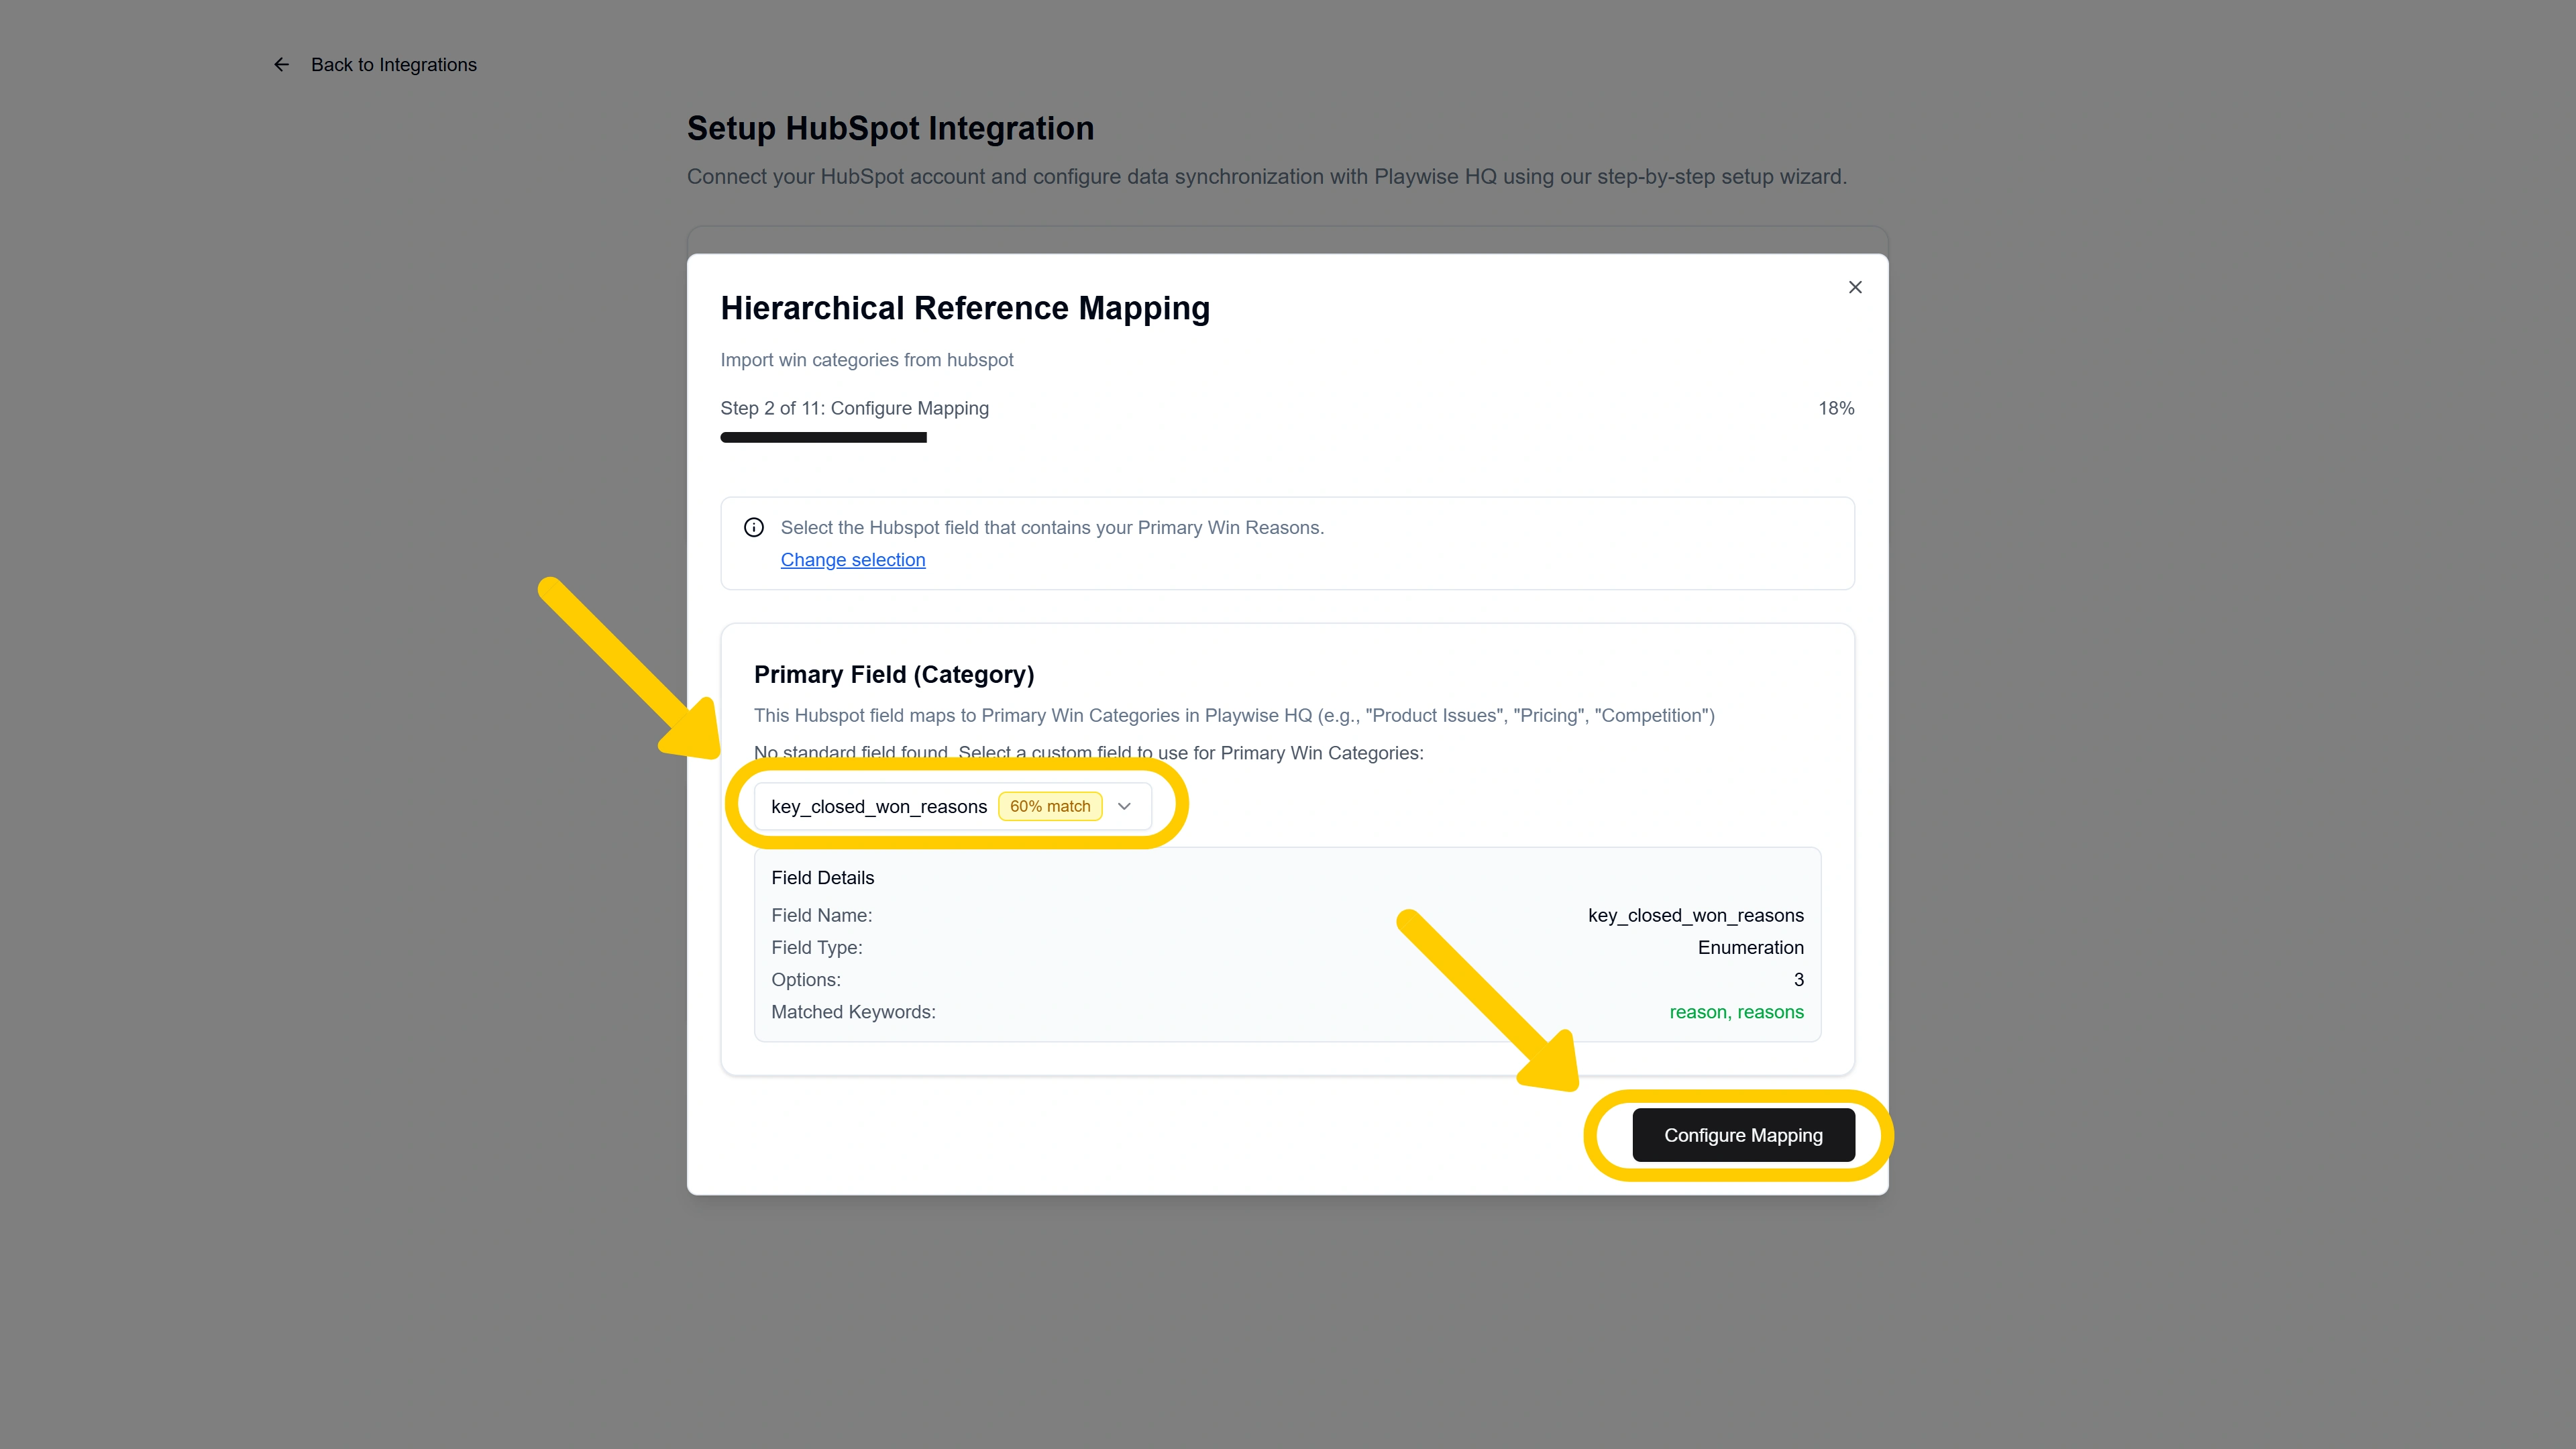
- Click “Configure Mapping” to proceed.
If you selected “Primary and Secondary”:
- Under “Primary Field (Category)”, select or confirm the HubSpot field that contains your high-level win categories.
- Under “Secondary Field (Specific Reason)”, select the HubSpot field that contains your specific win reasons. If no suitable secondary field is found, you can select “None (Flatten to primary only)” to treat all data as primary categories.

- Click “Configure Mapping” to proceed.
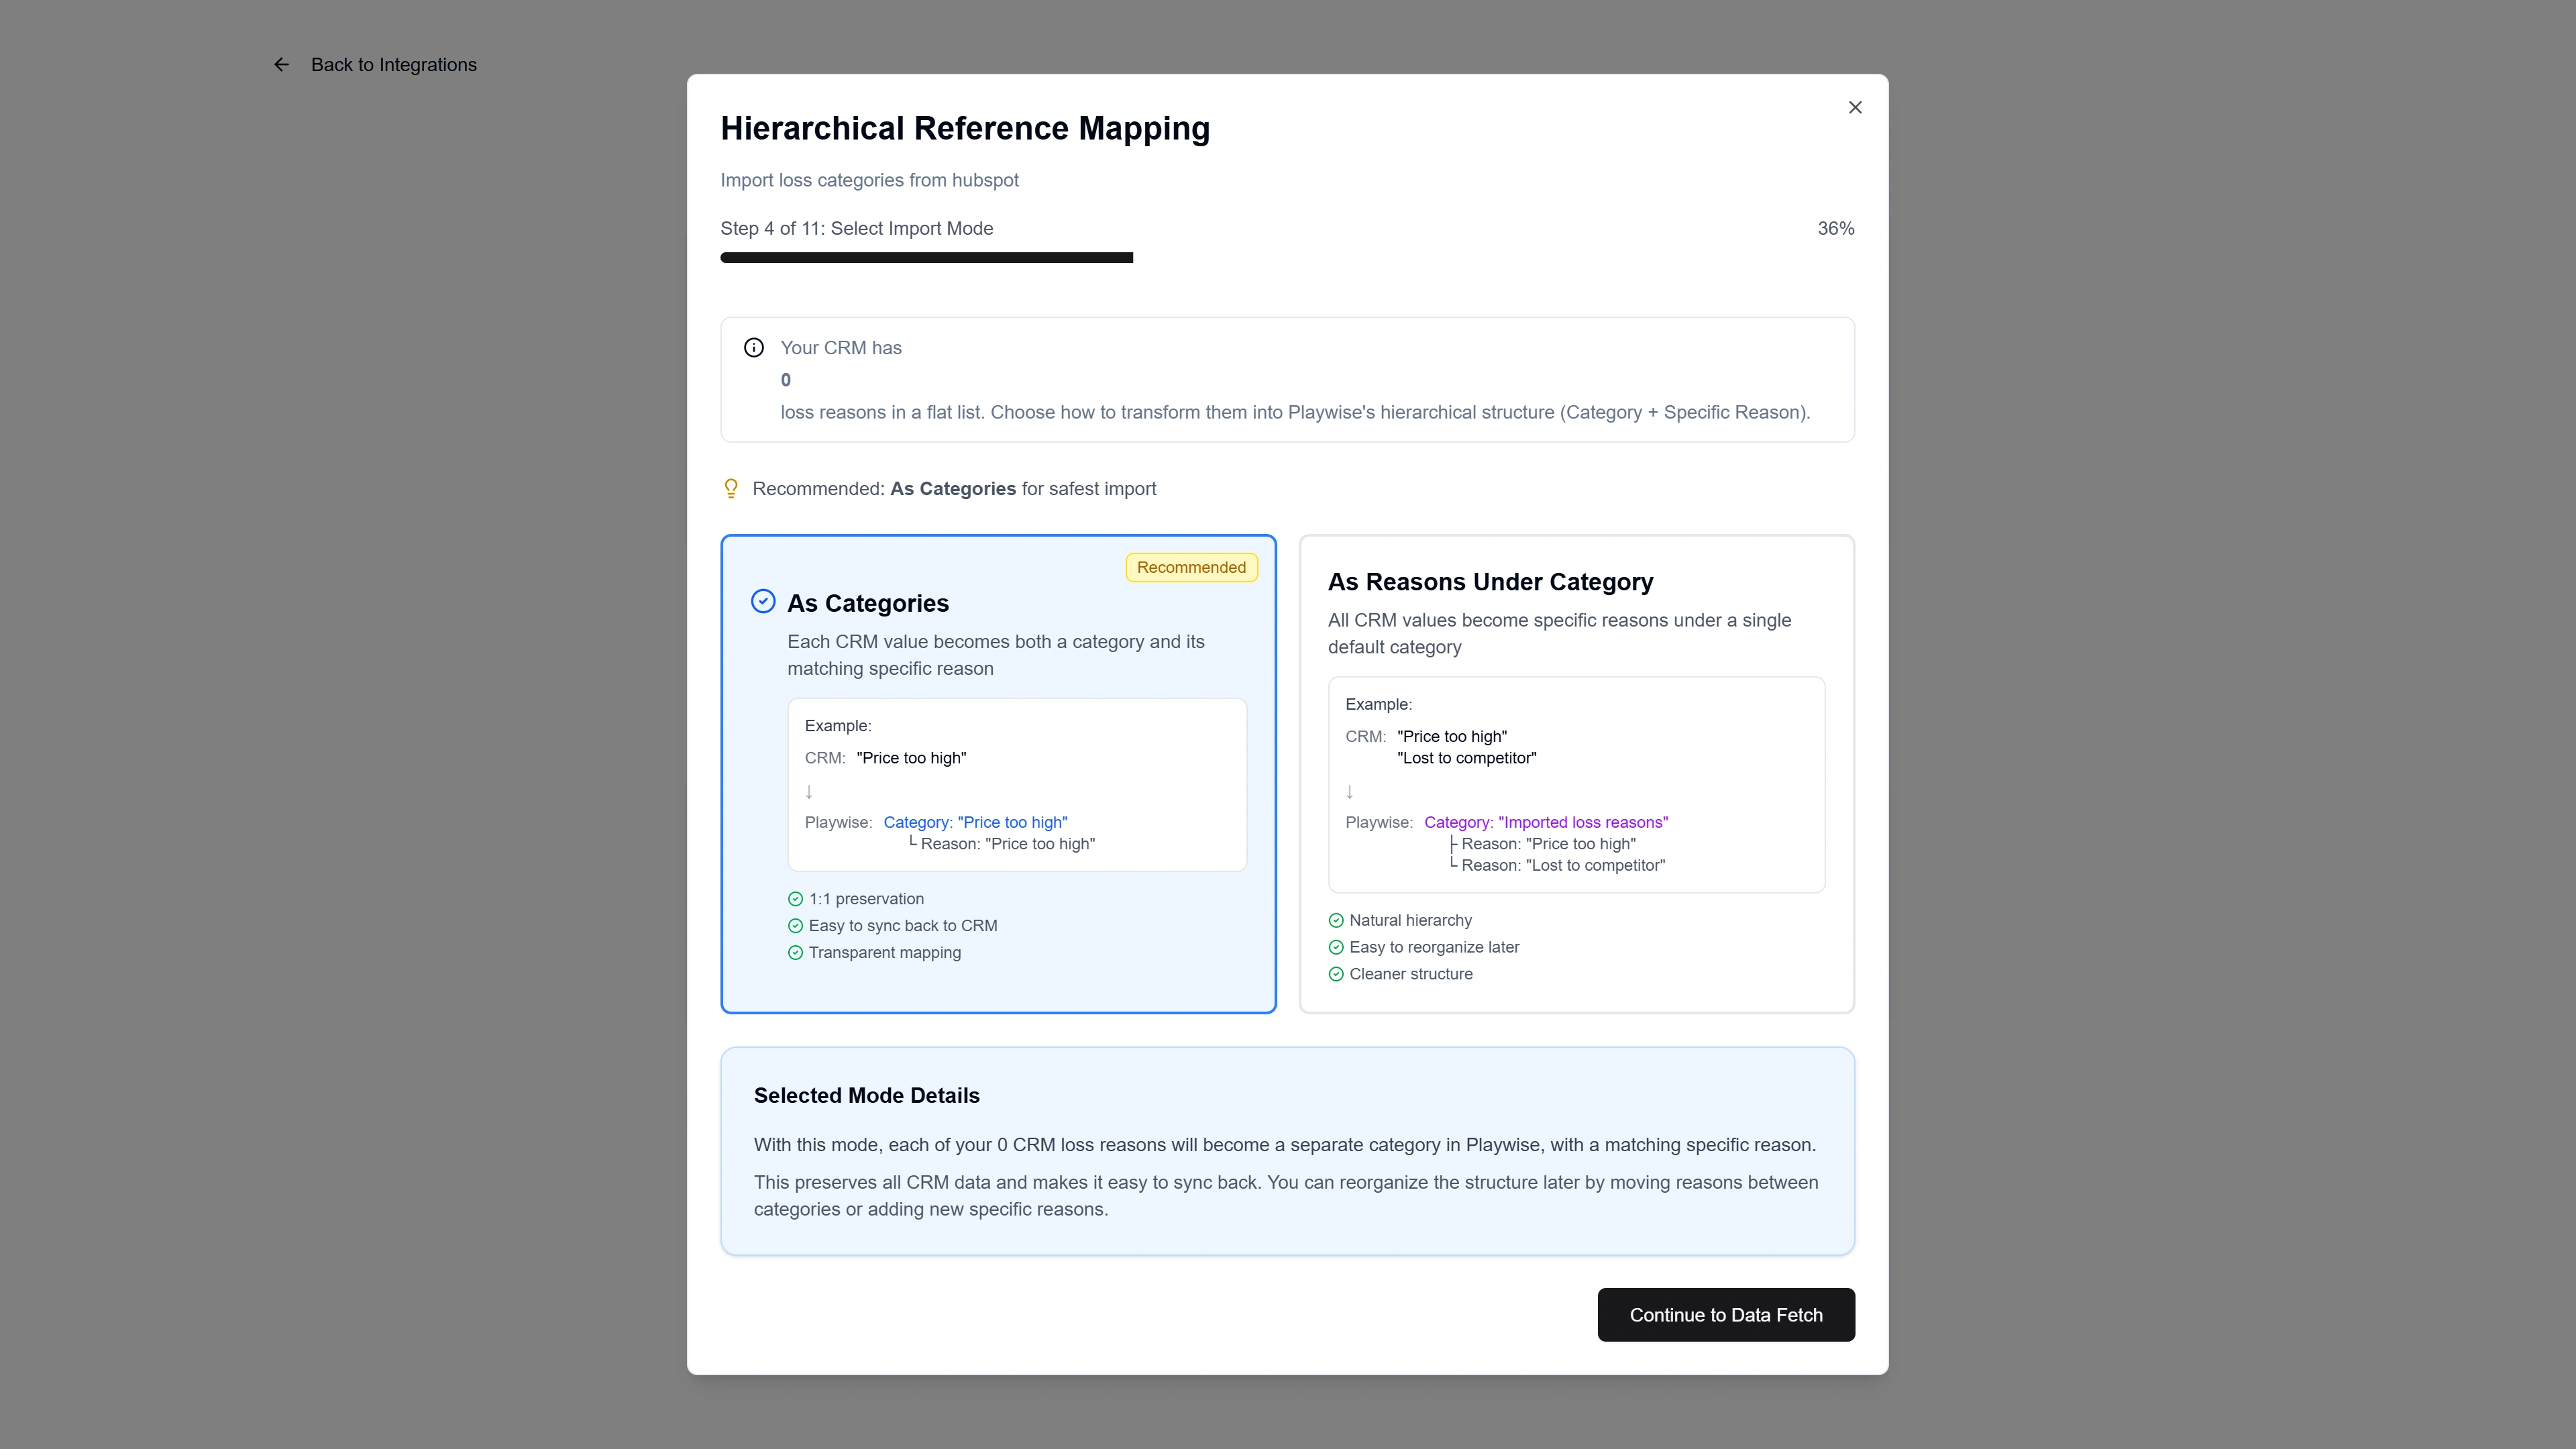
Step 9e: Choose the Import Mode
You will see a screen explaining how your HubSpot category data will be transformed into Playwise HQ’s structure. The available modes depend on whether you selected Primary Only or Primary and Secondary:
If you configured Primary Only (flat structure):
Two options are available:
As Categories (Recommended for flat structures) — Each HubSpot dropdown value becomes both a win category and a matching specific reason in Playwise HQ. This provides a clean 1:1 mapping that is easy to sync back to HubSpot.
As Reasons Under Category — All HubSpot dropdown values become specific reasons grouped under a single default parent category called “Imported win reasons”. This creates a natural hierarchy you can reorganise later.
If you configured Primary and Secondary (two-level structure):
Three options are available:
Hierarchical Mapping (Recommended for two-level structures) — Maps your primary HubSpot field values to Playwise HQ categories and your secondary field values to specific reasons within those categories. This preserves your full hierarchy and is the most accurate representation.
As Categories — Same as above; treats each primary value as a standalone category.
As Reasons Under Category — Groups all values under a single default category.
Each option includes a visual example showing how your HubSpot data will look in Playwise HQ. Select your preferred mode and click “Continue”.
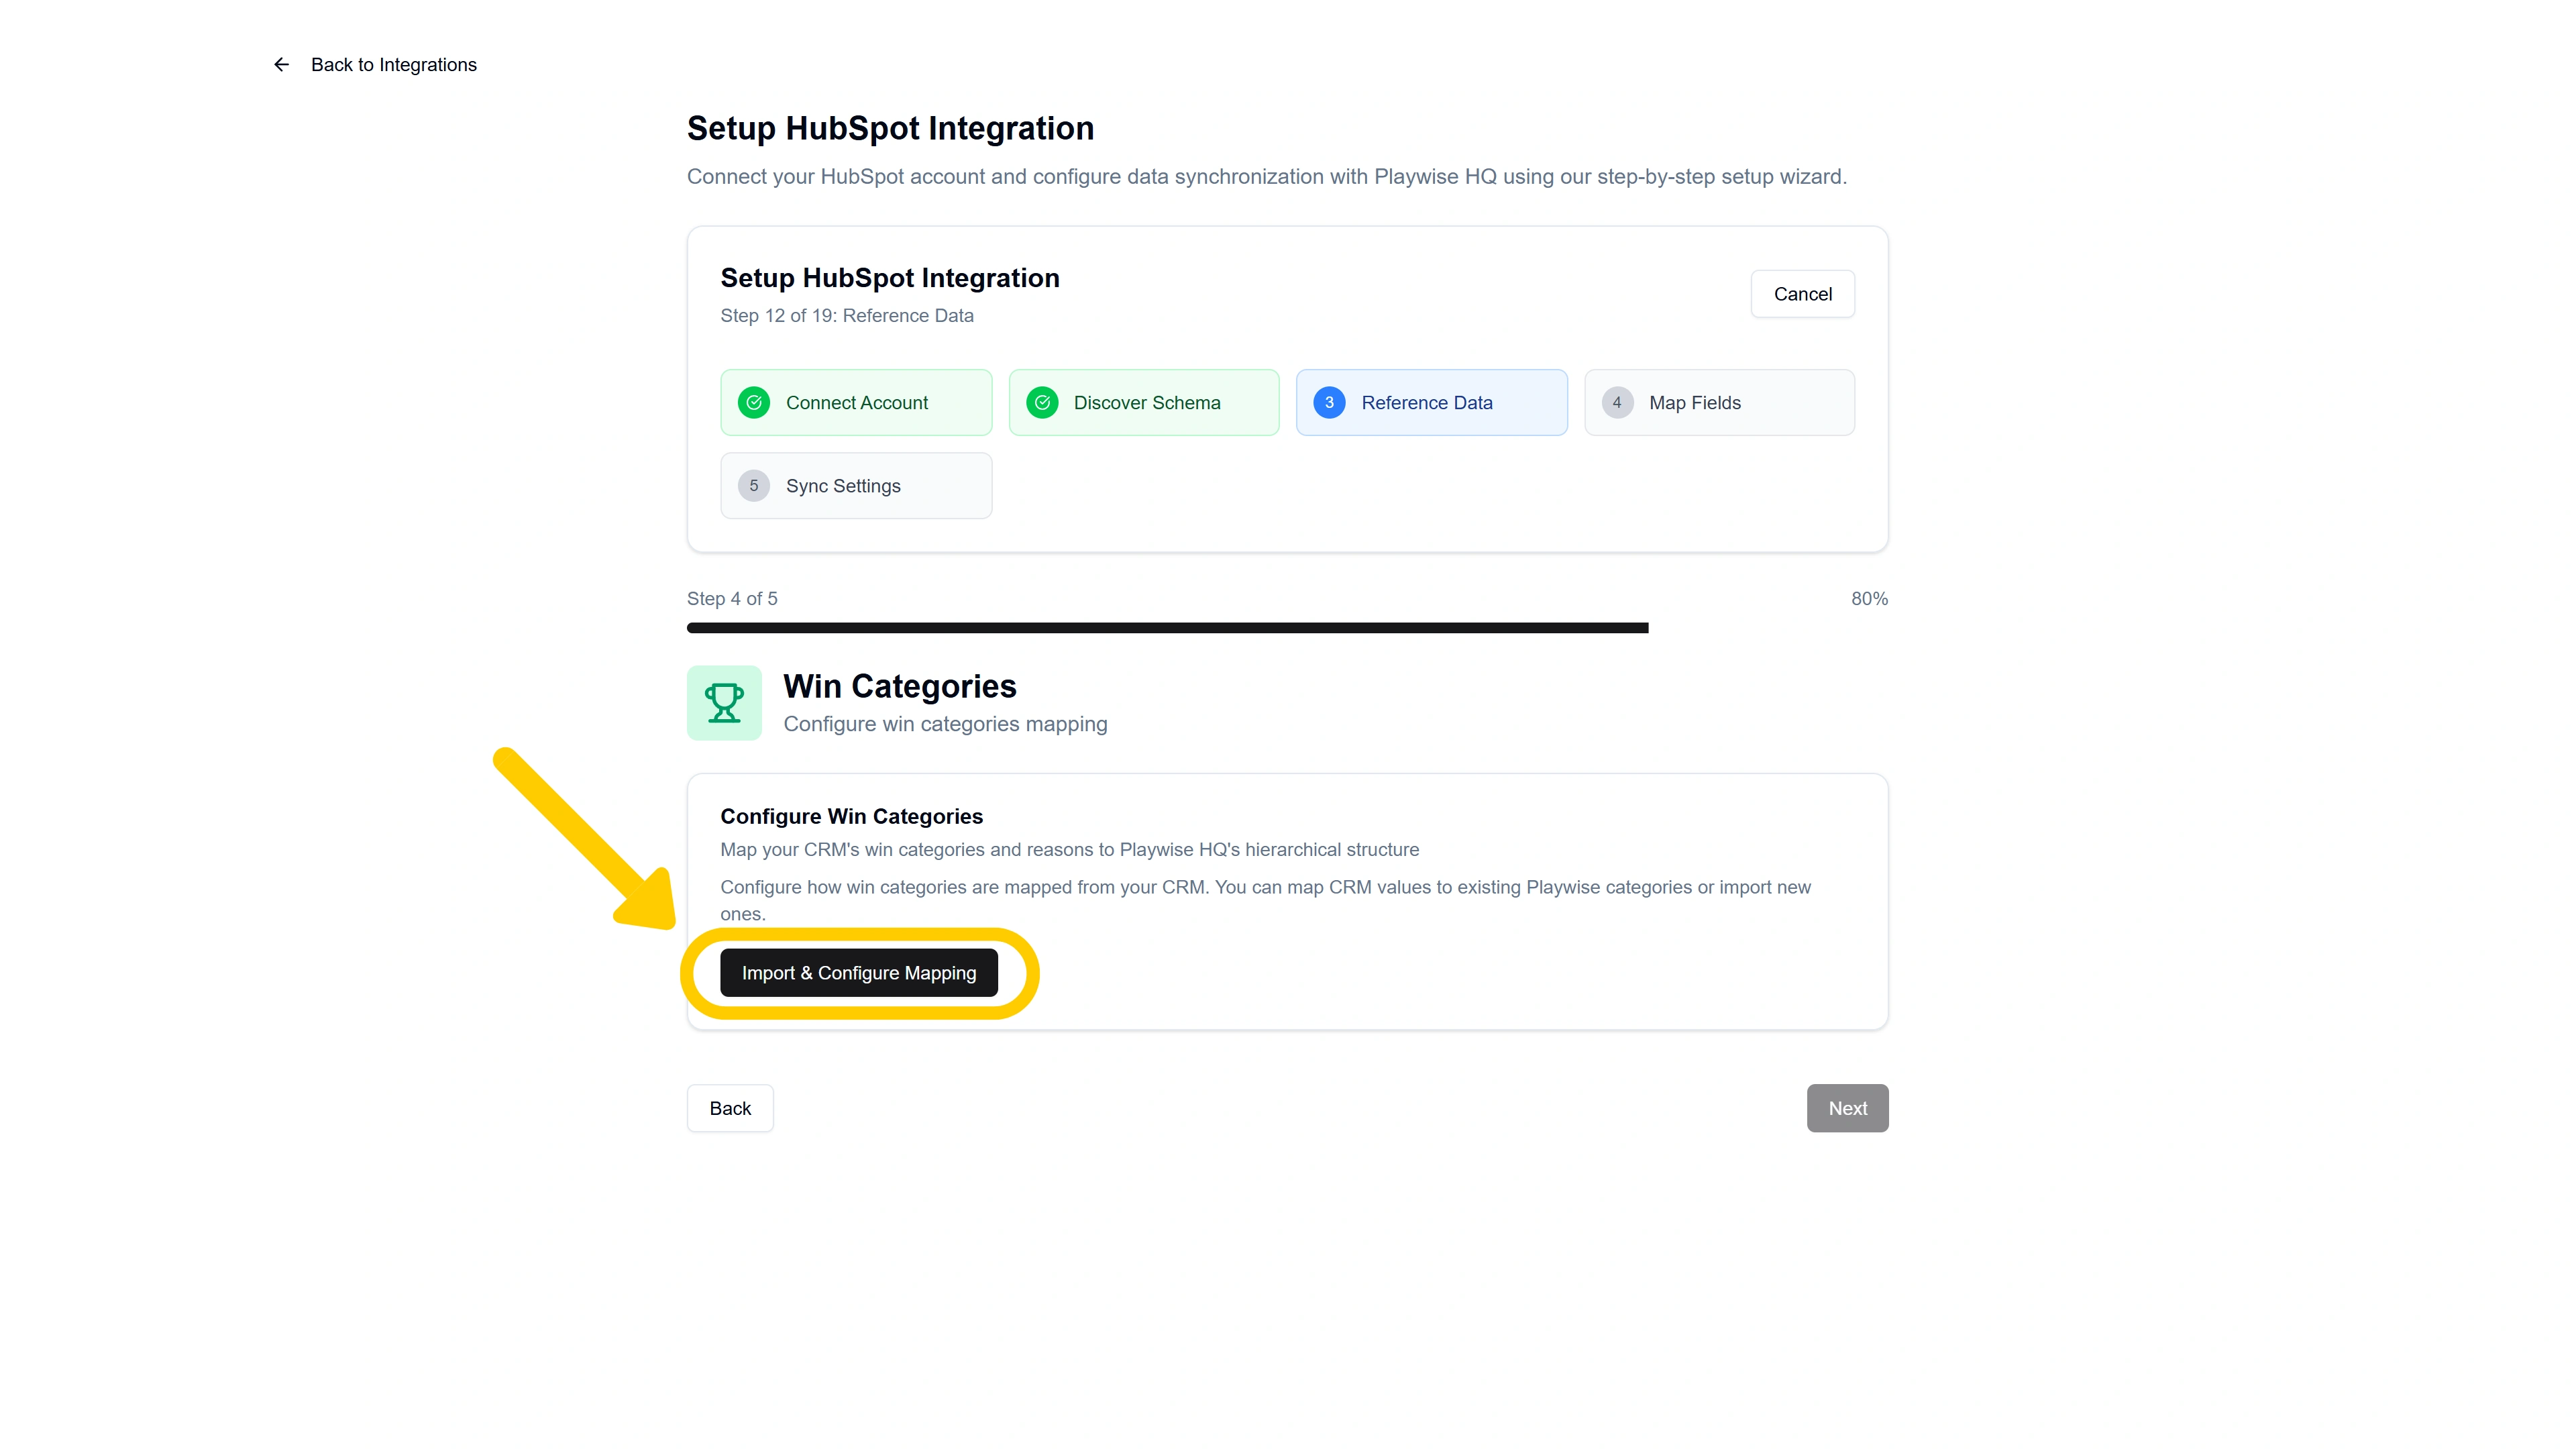
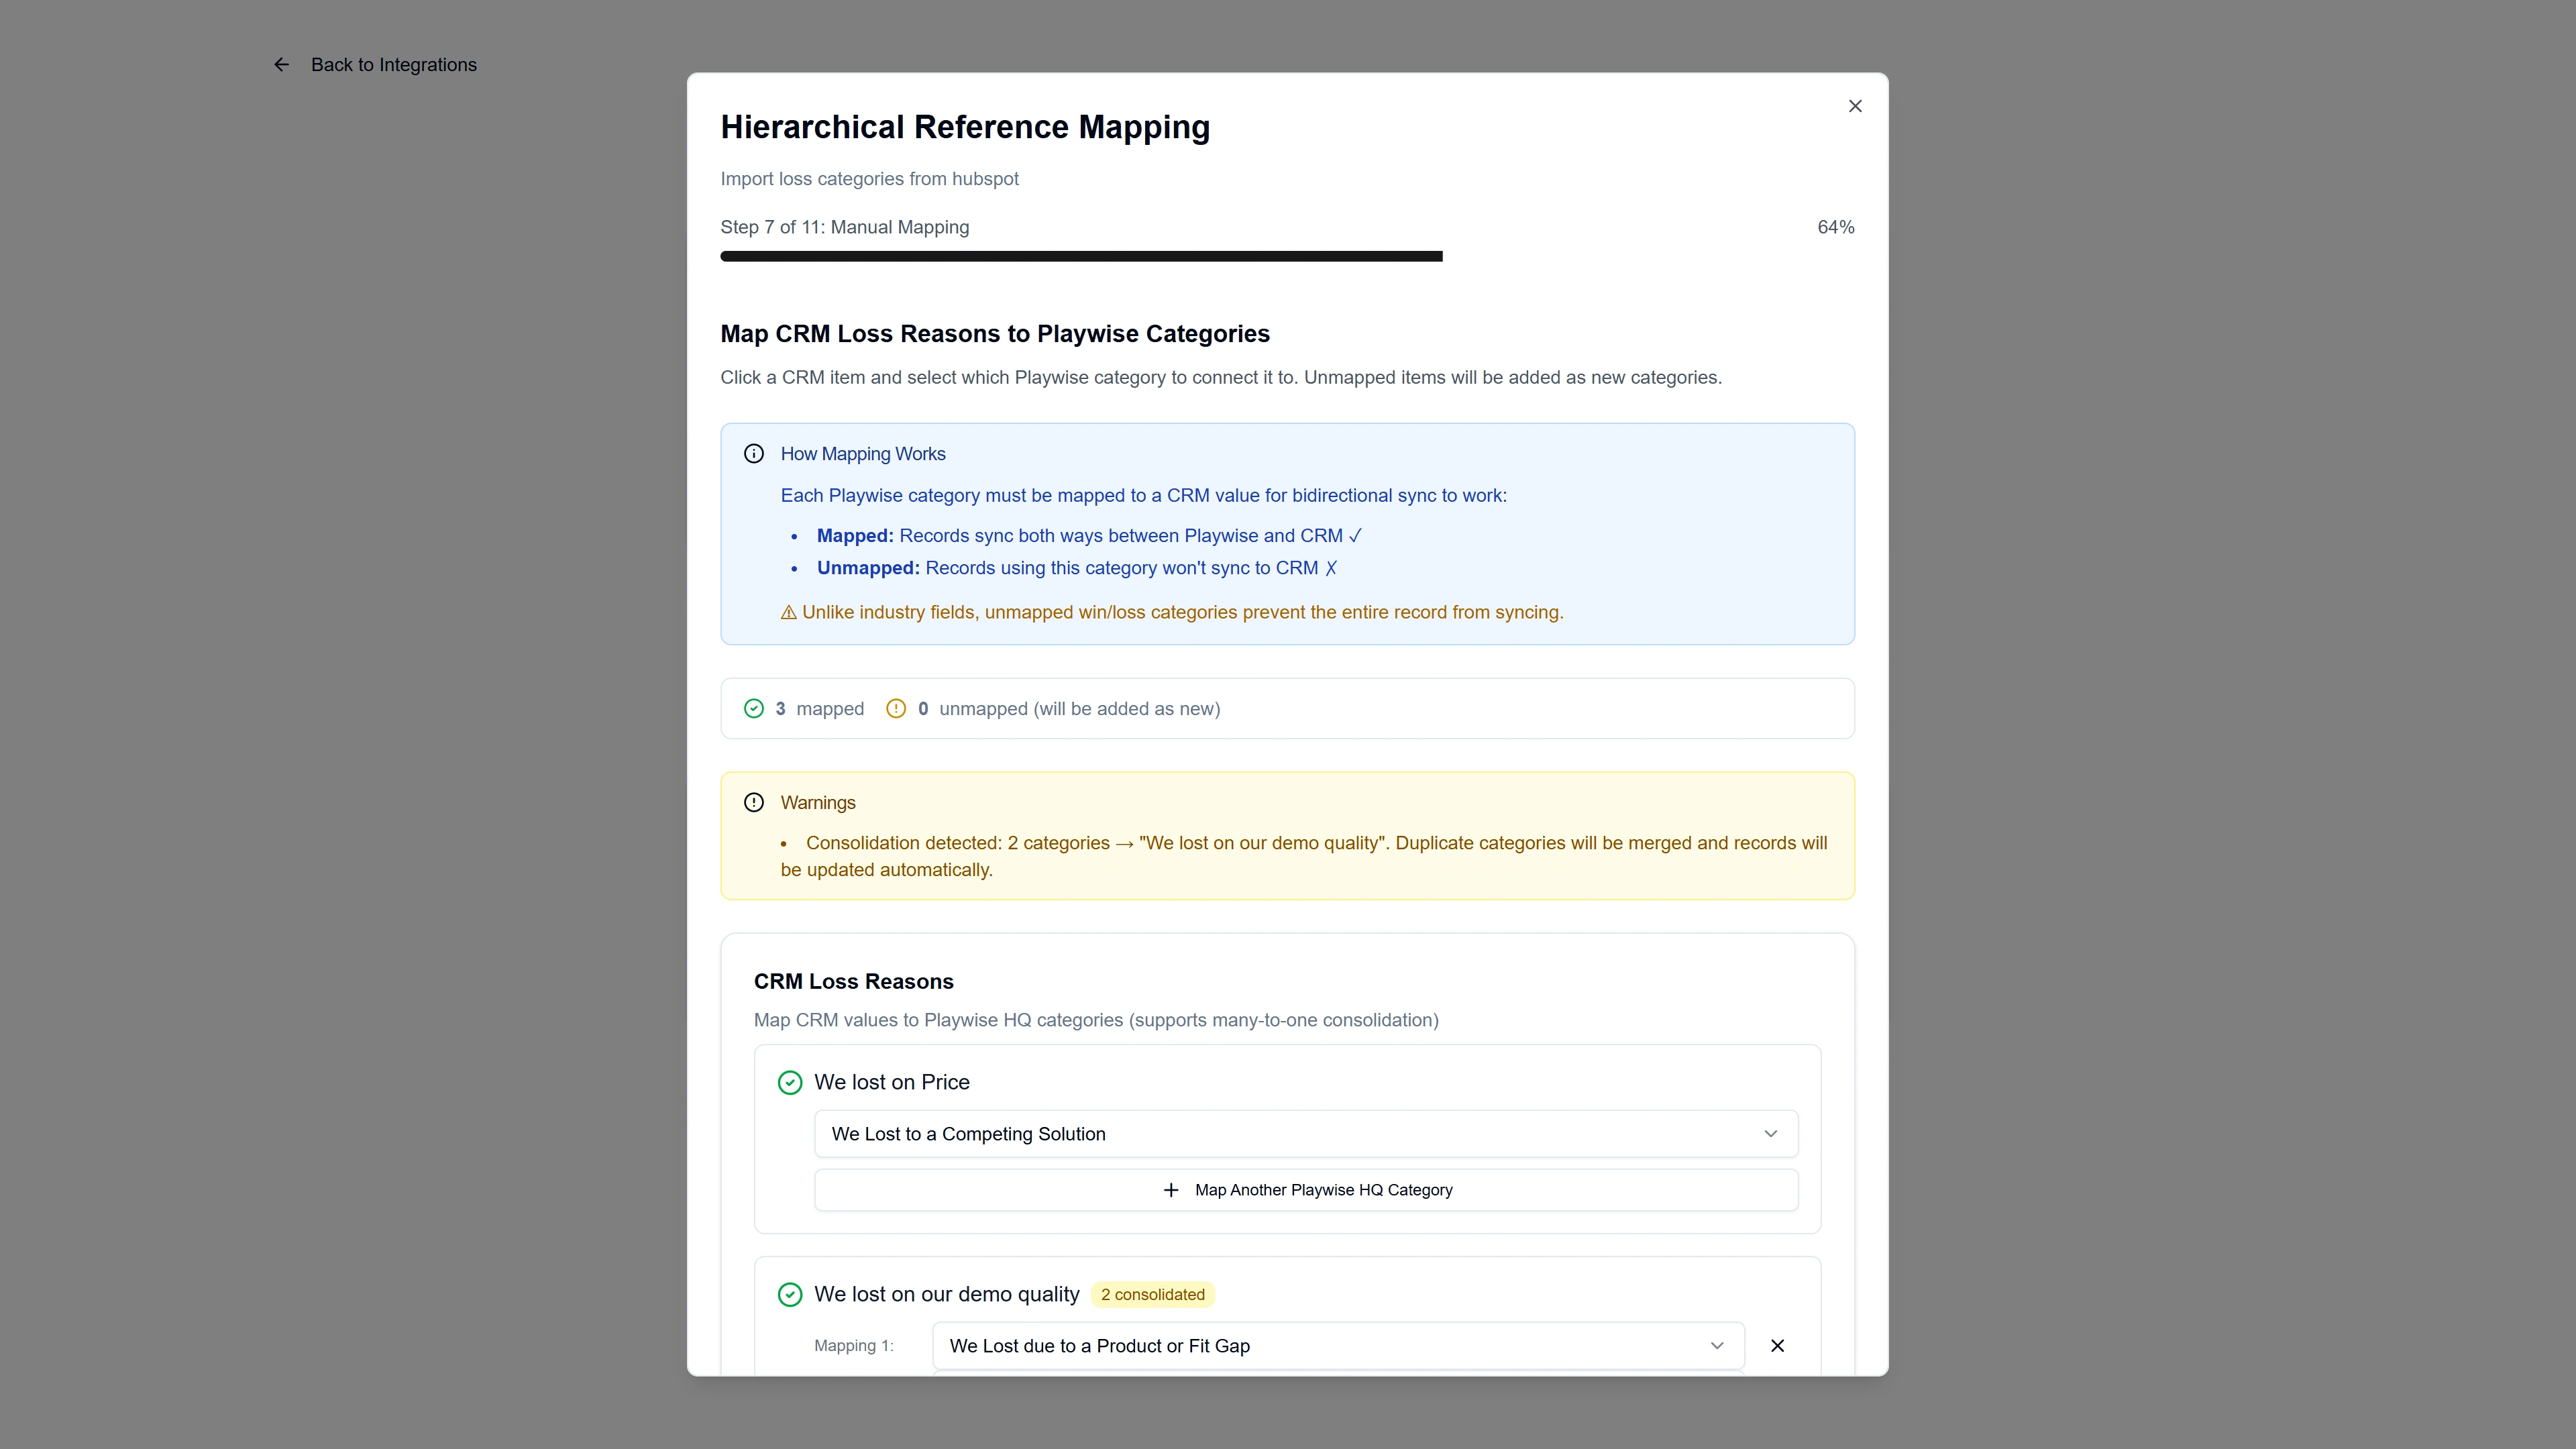
Step 9f: Map Your Win Categories
The mapping interface that appears depends on the import mode you selected:
For “As Categories” or “As Reasons Under Category” mode:
A mapping dialog opens where you match each HubSpot dropdown value to a Playwise HQ win category. You can choose to:
- Merge — Map HubSpot values to existing Playwise HQ categories and import any new ones. Use the dropdown selectors to create each mapping. Click “Apply Mapping” when done.
For “Hierarchical Mapping” mode (Primary and Secondary):
The mapping is a multi-step process:
Map Primary Categories — Match each HubSpot primary dropdown value to a Playwise HQ win category. For each HubSpot value, use the dropdown to select the corresponding Playwise category, or allow new categories to be created.
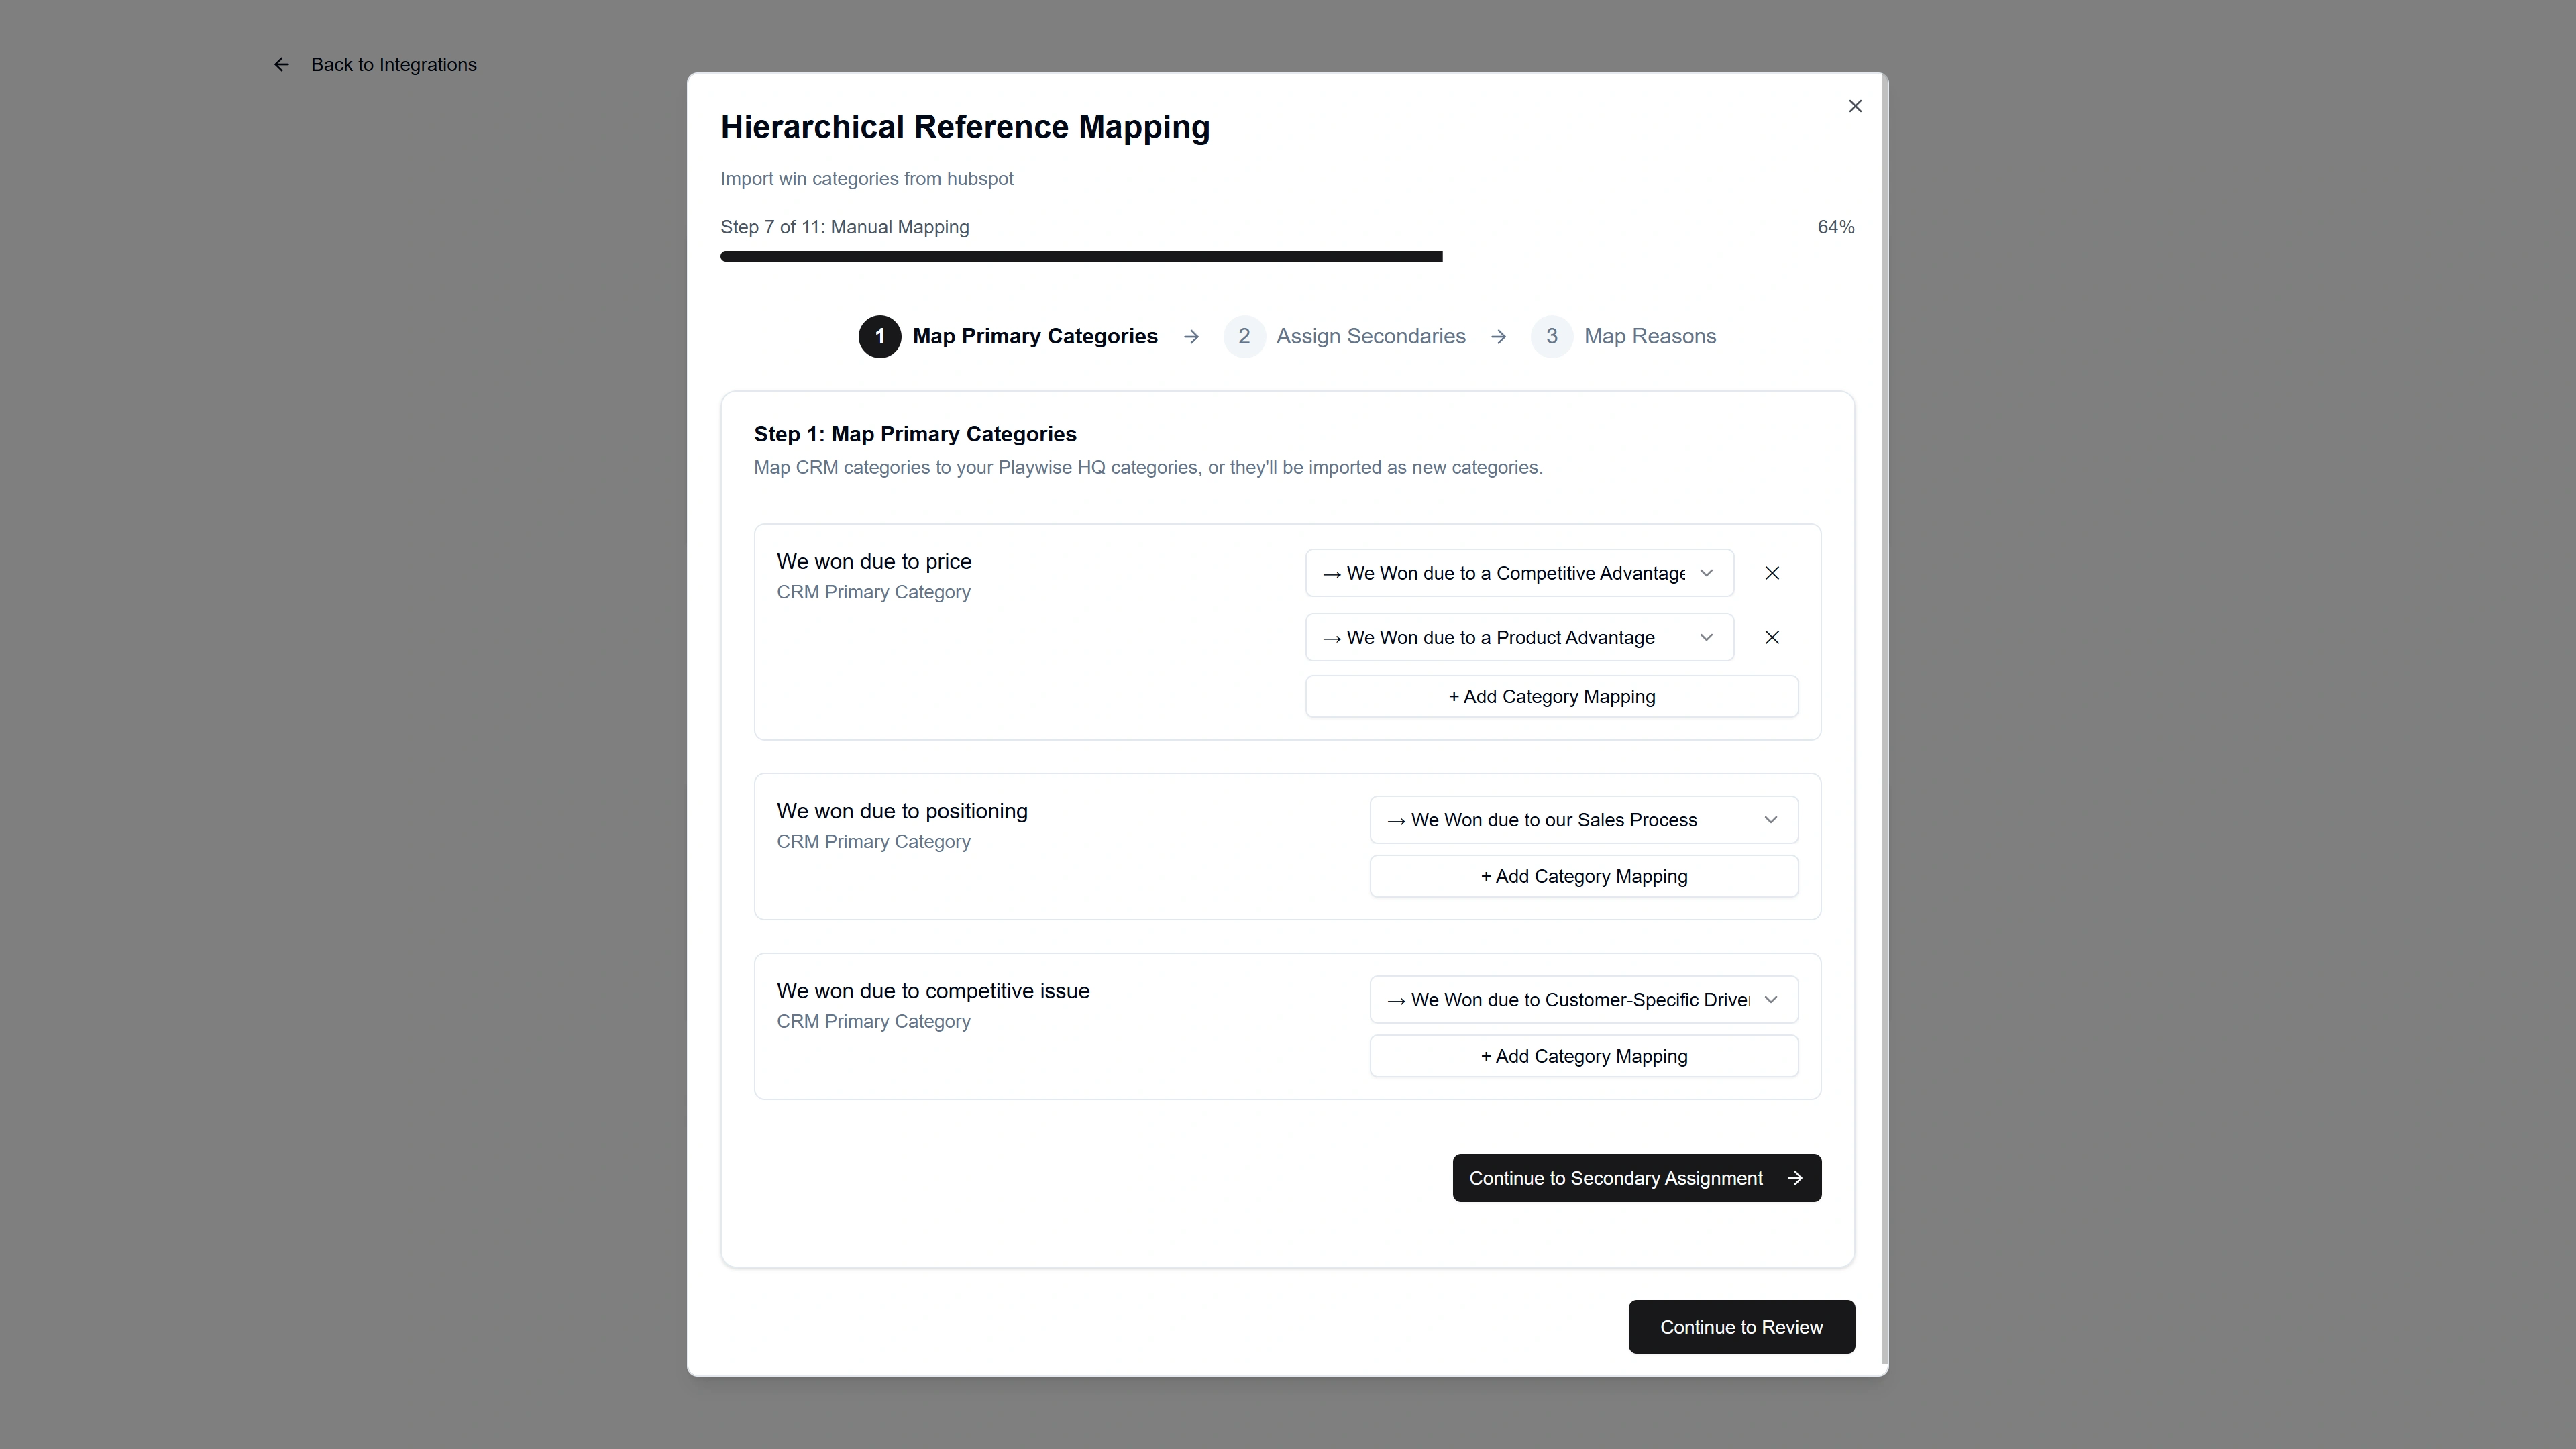
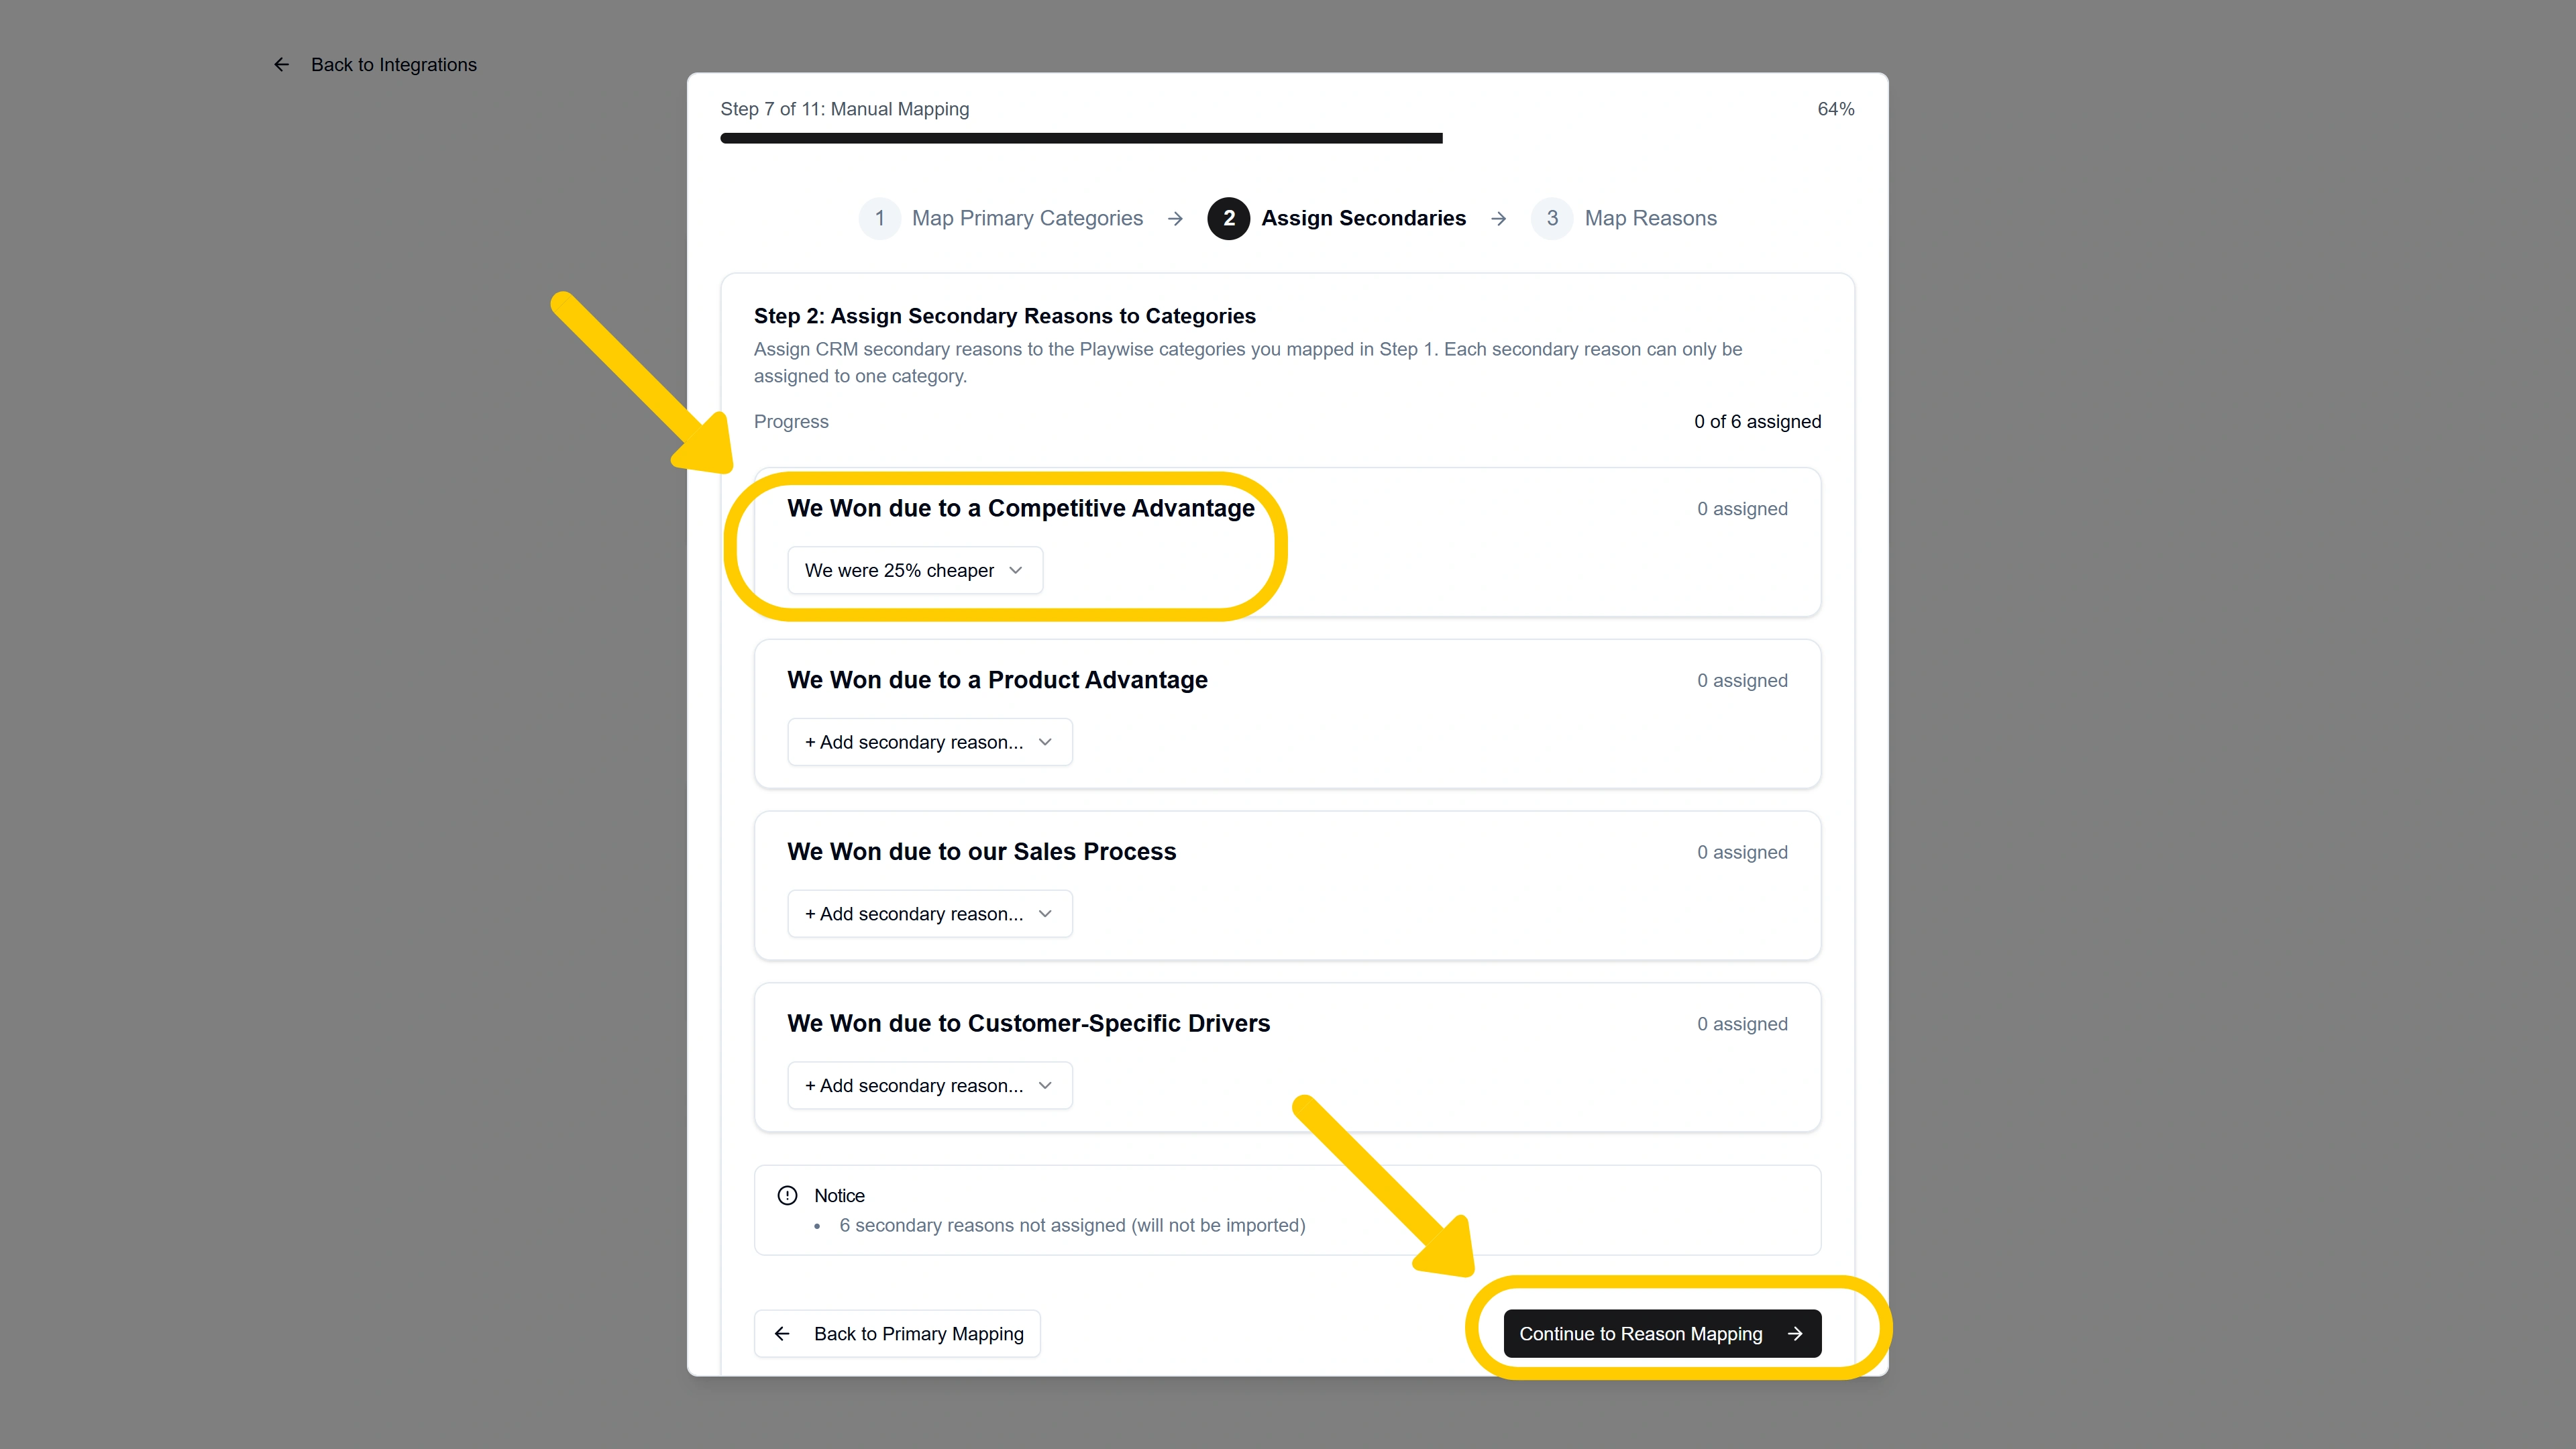
Assign Secondary Reasons to Categories — A screen titled “Assign Secondary Reasons to Categories” appears. For each Playwise category you mapped in the previous step, assign the relevant HubSpot secondary reasons that belong under it. A progress indicator shows how many secondary reasons you have assigned (e.g., “8 of 12 assigned”). Secondary reasons that are not assigned to any category will not be imported.
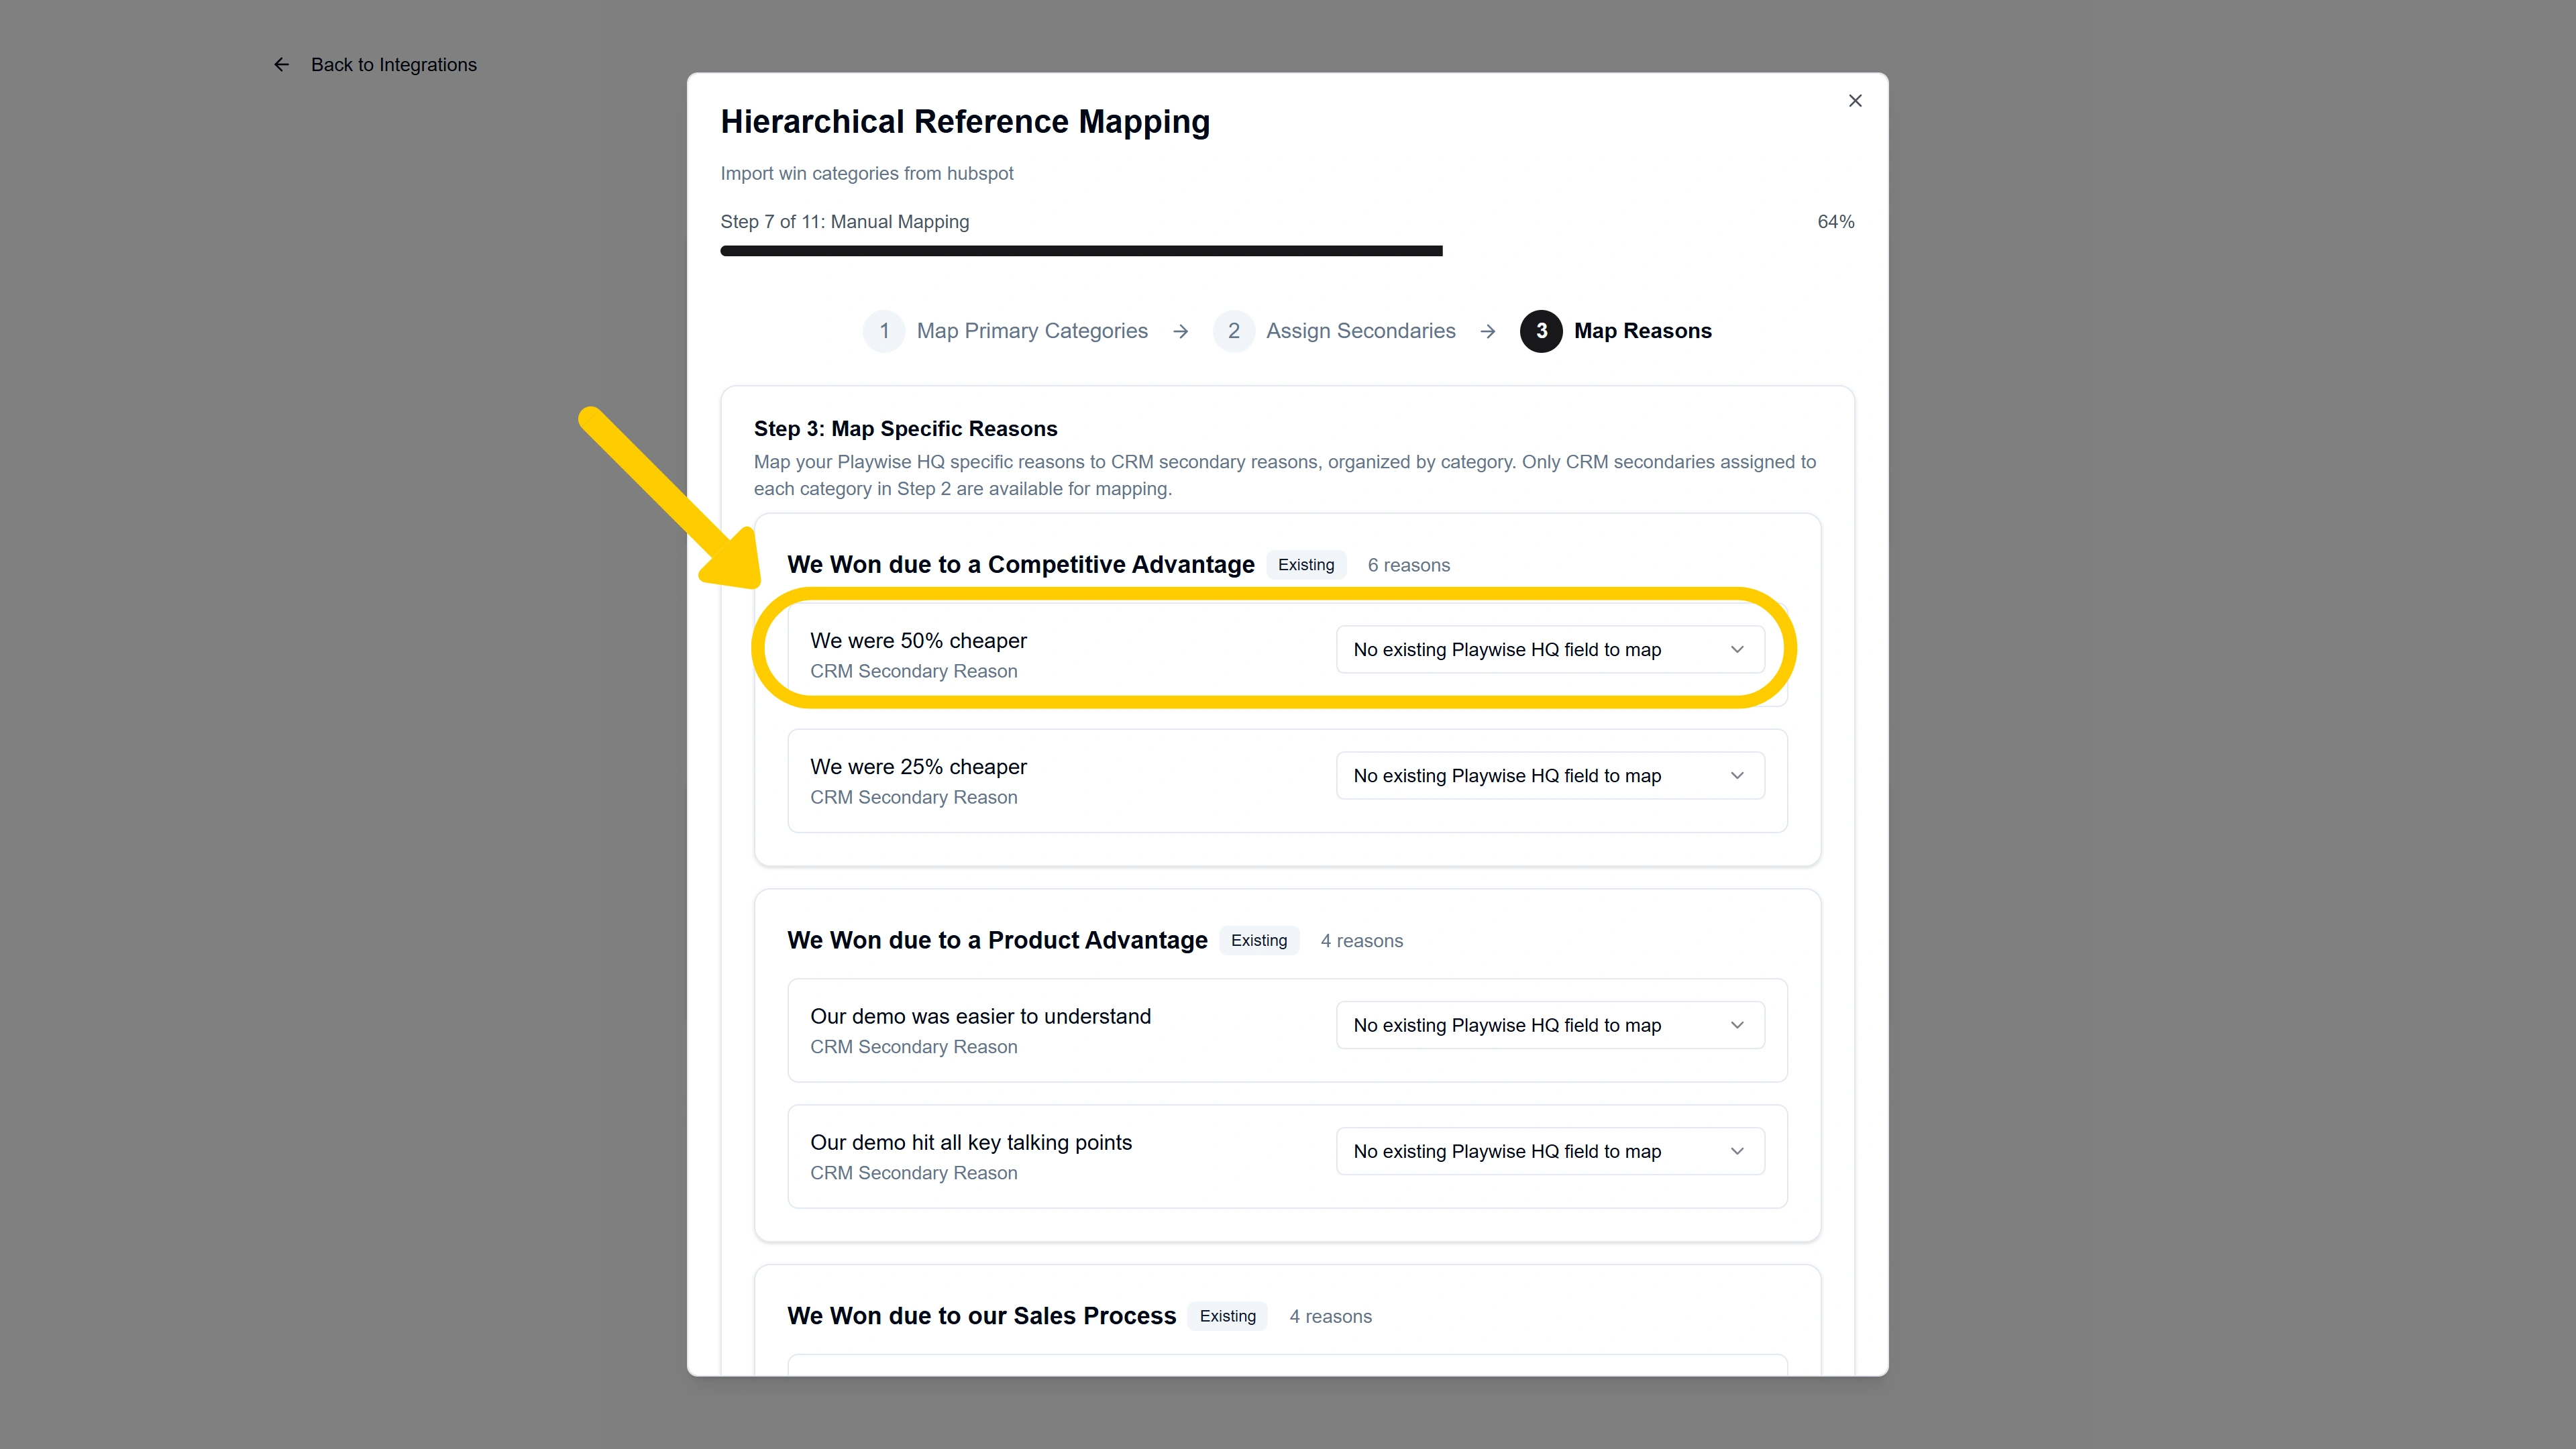
Map Specific Reasons — A screen titled “Map Specific Reasons” appears, organised by category. For each Playwise HQ specific reason within a category, map it to the corresponding HubSpot secondary reason. Only the secondary reasons you assigned to that category in the previous step are available. Click “Complete Mapping” when finished.
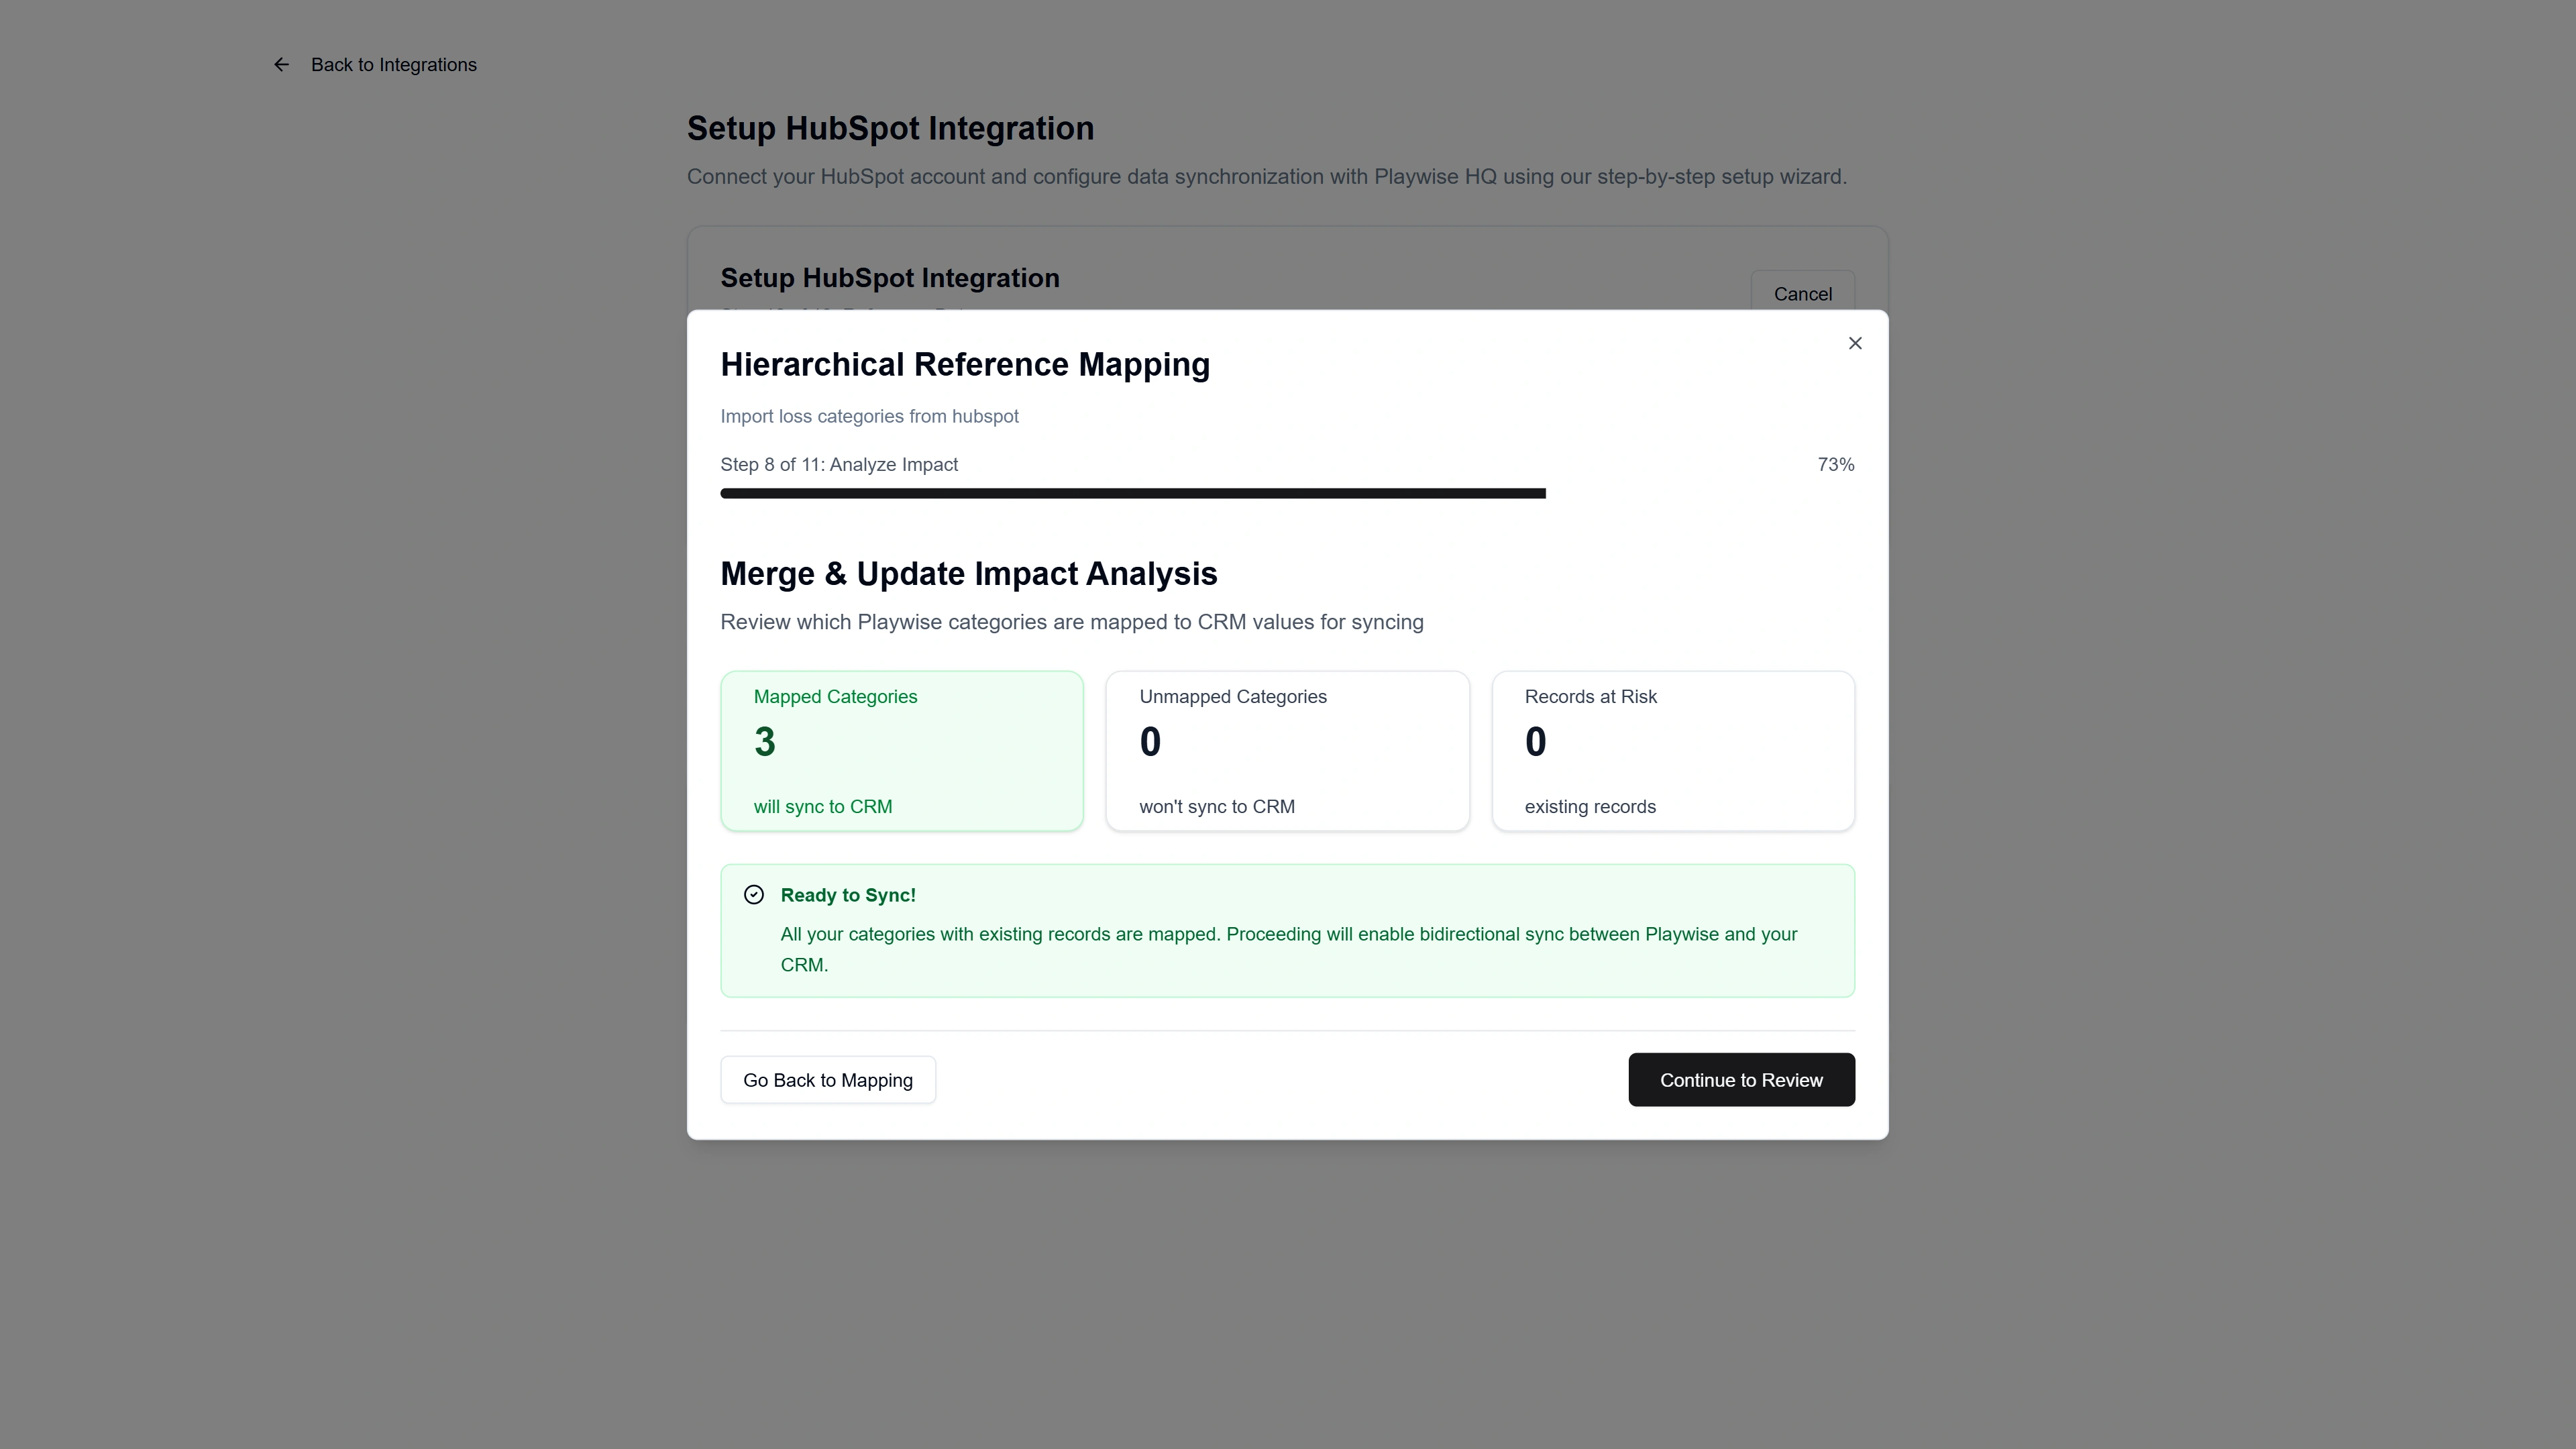
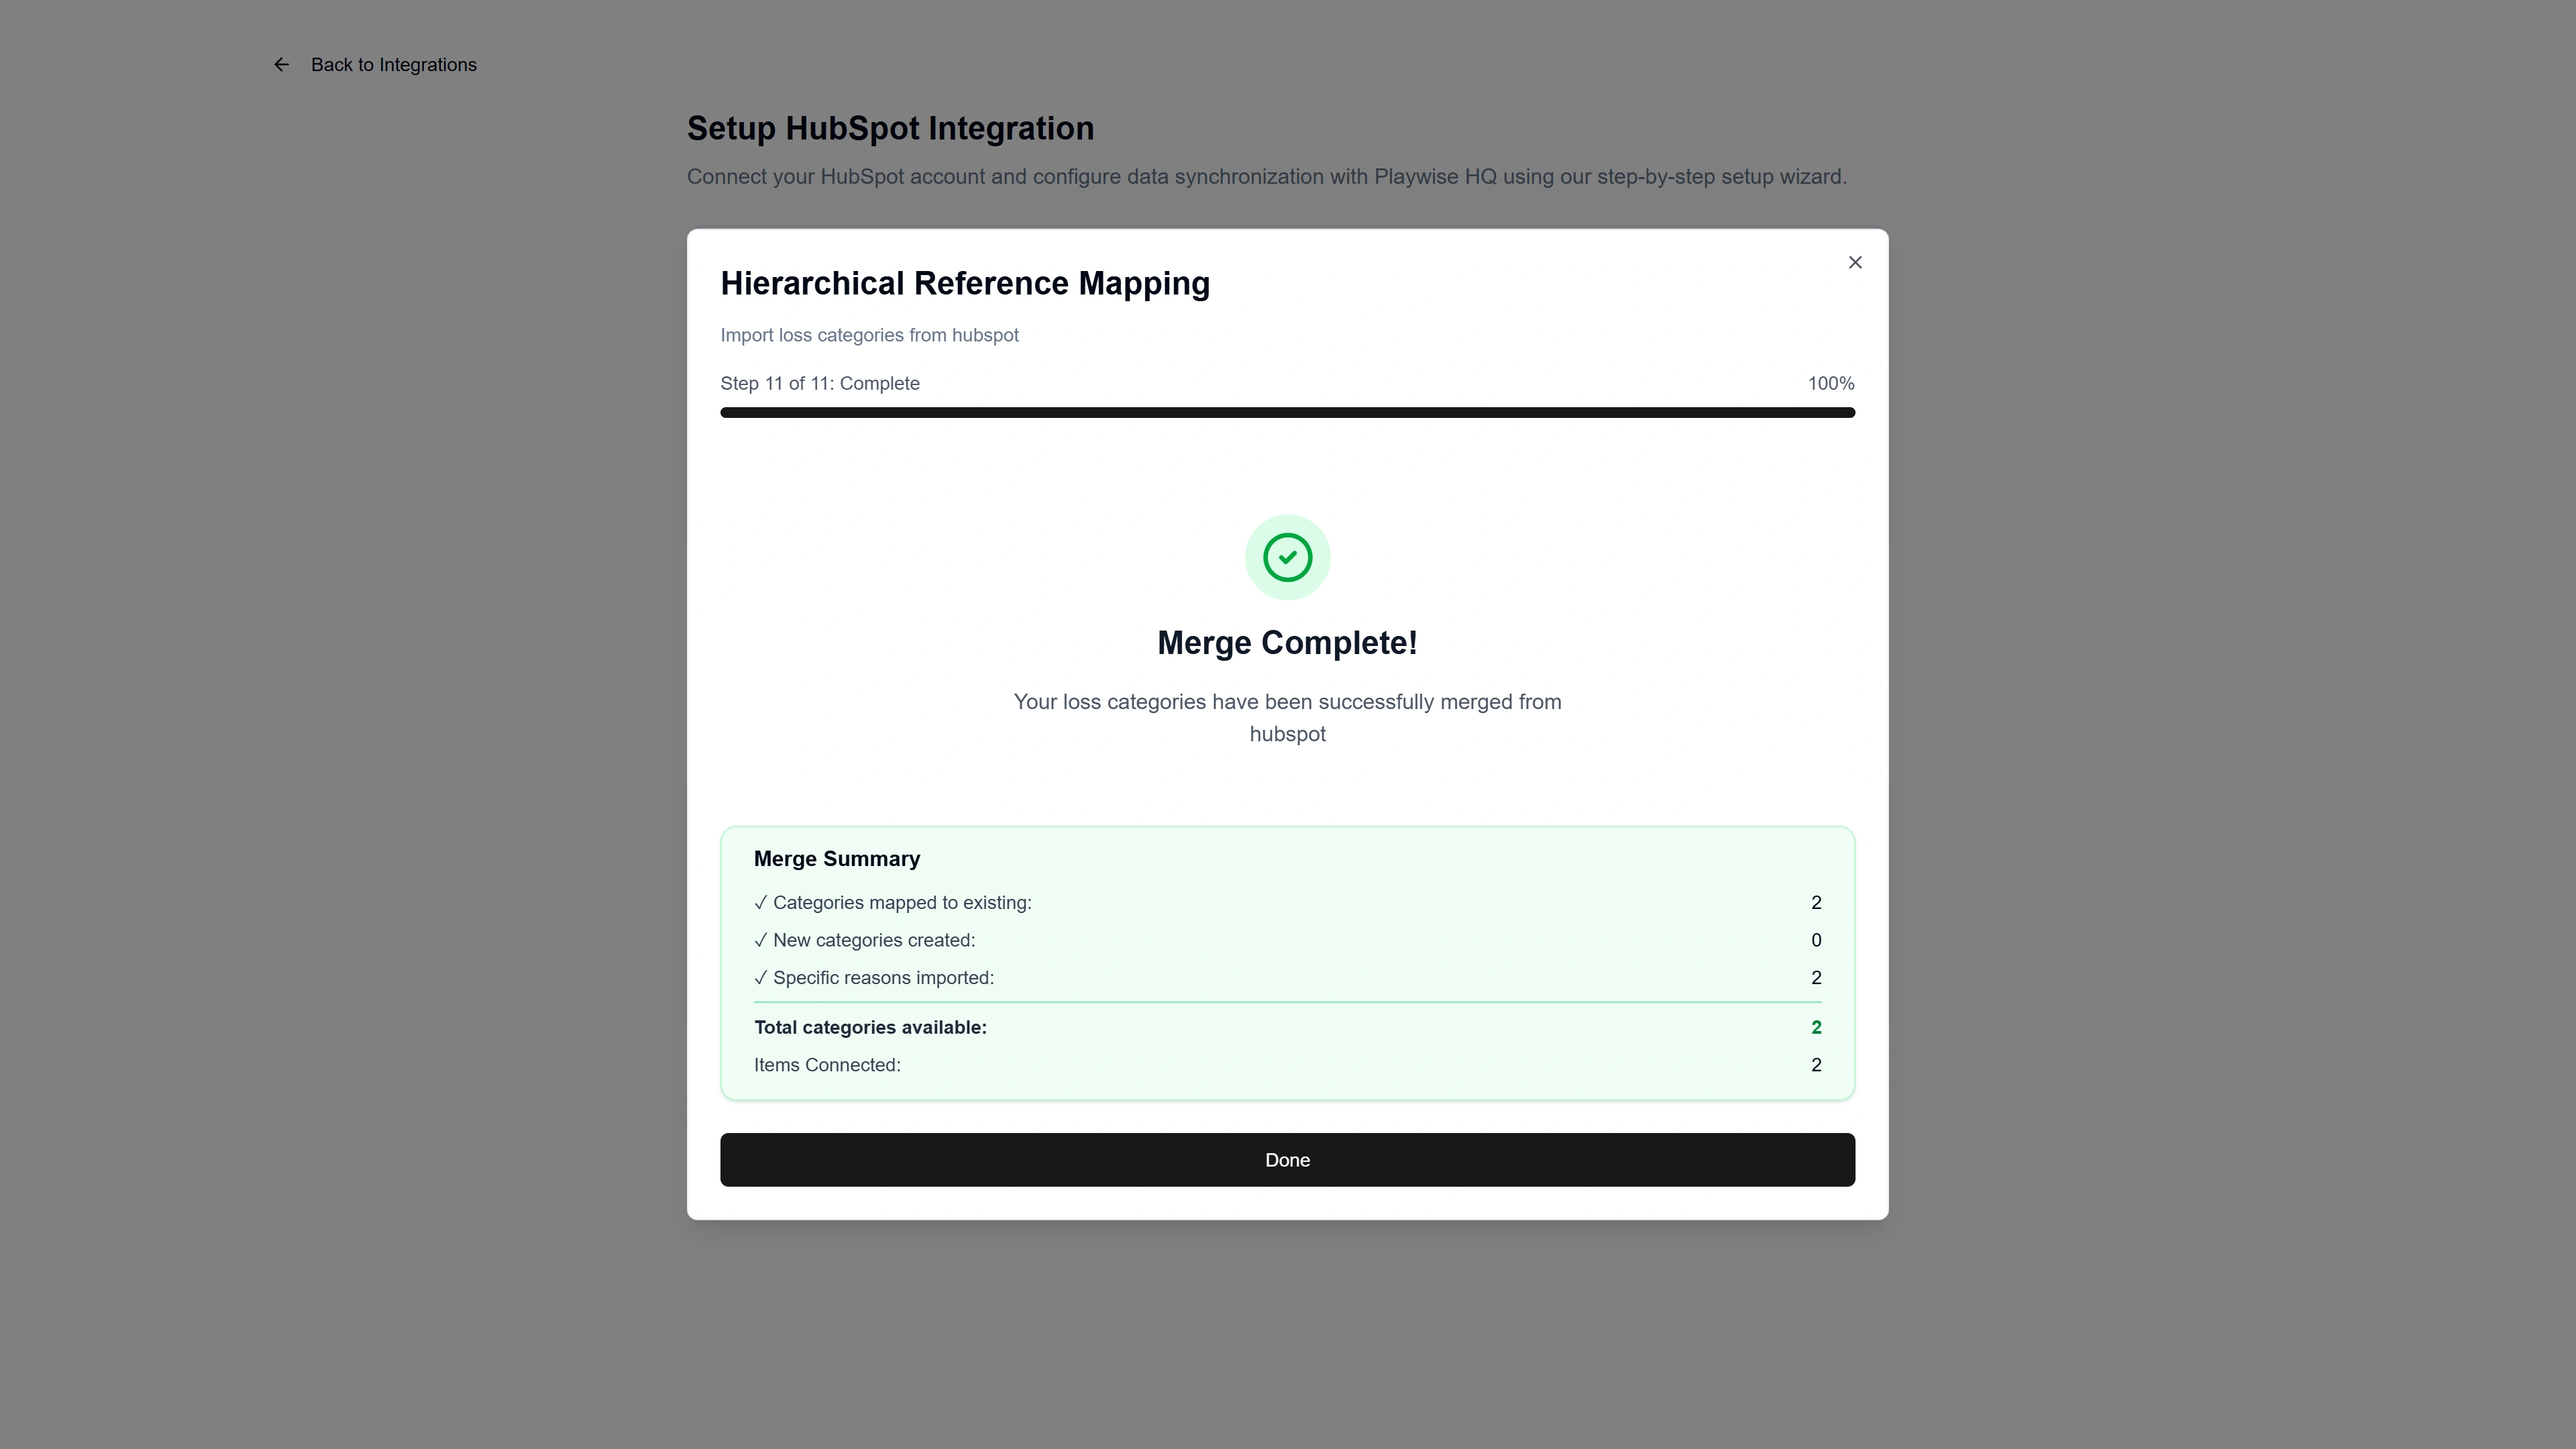
Step 9g: Review and Confirm
After mapping is complete, a screen appears confirming the categories have been mapped.
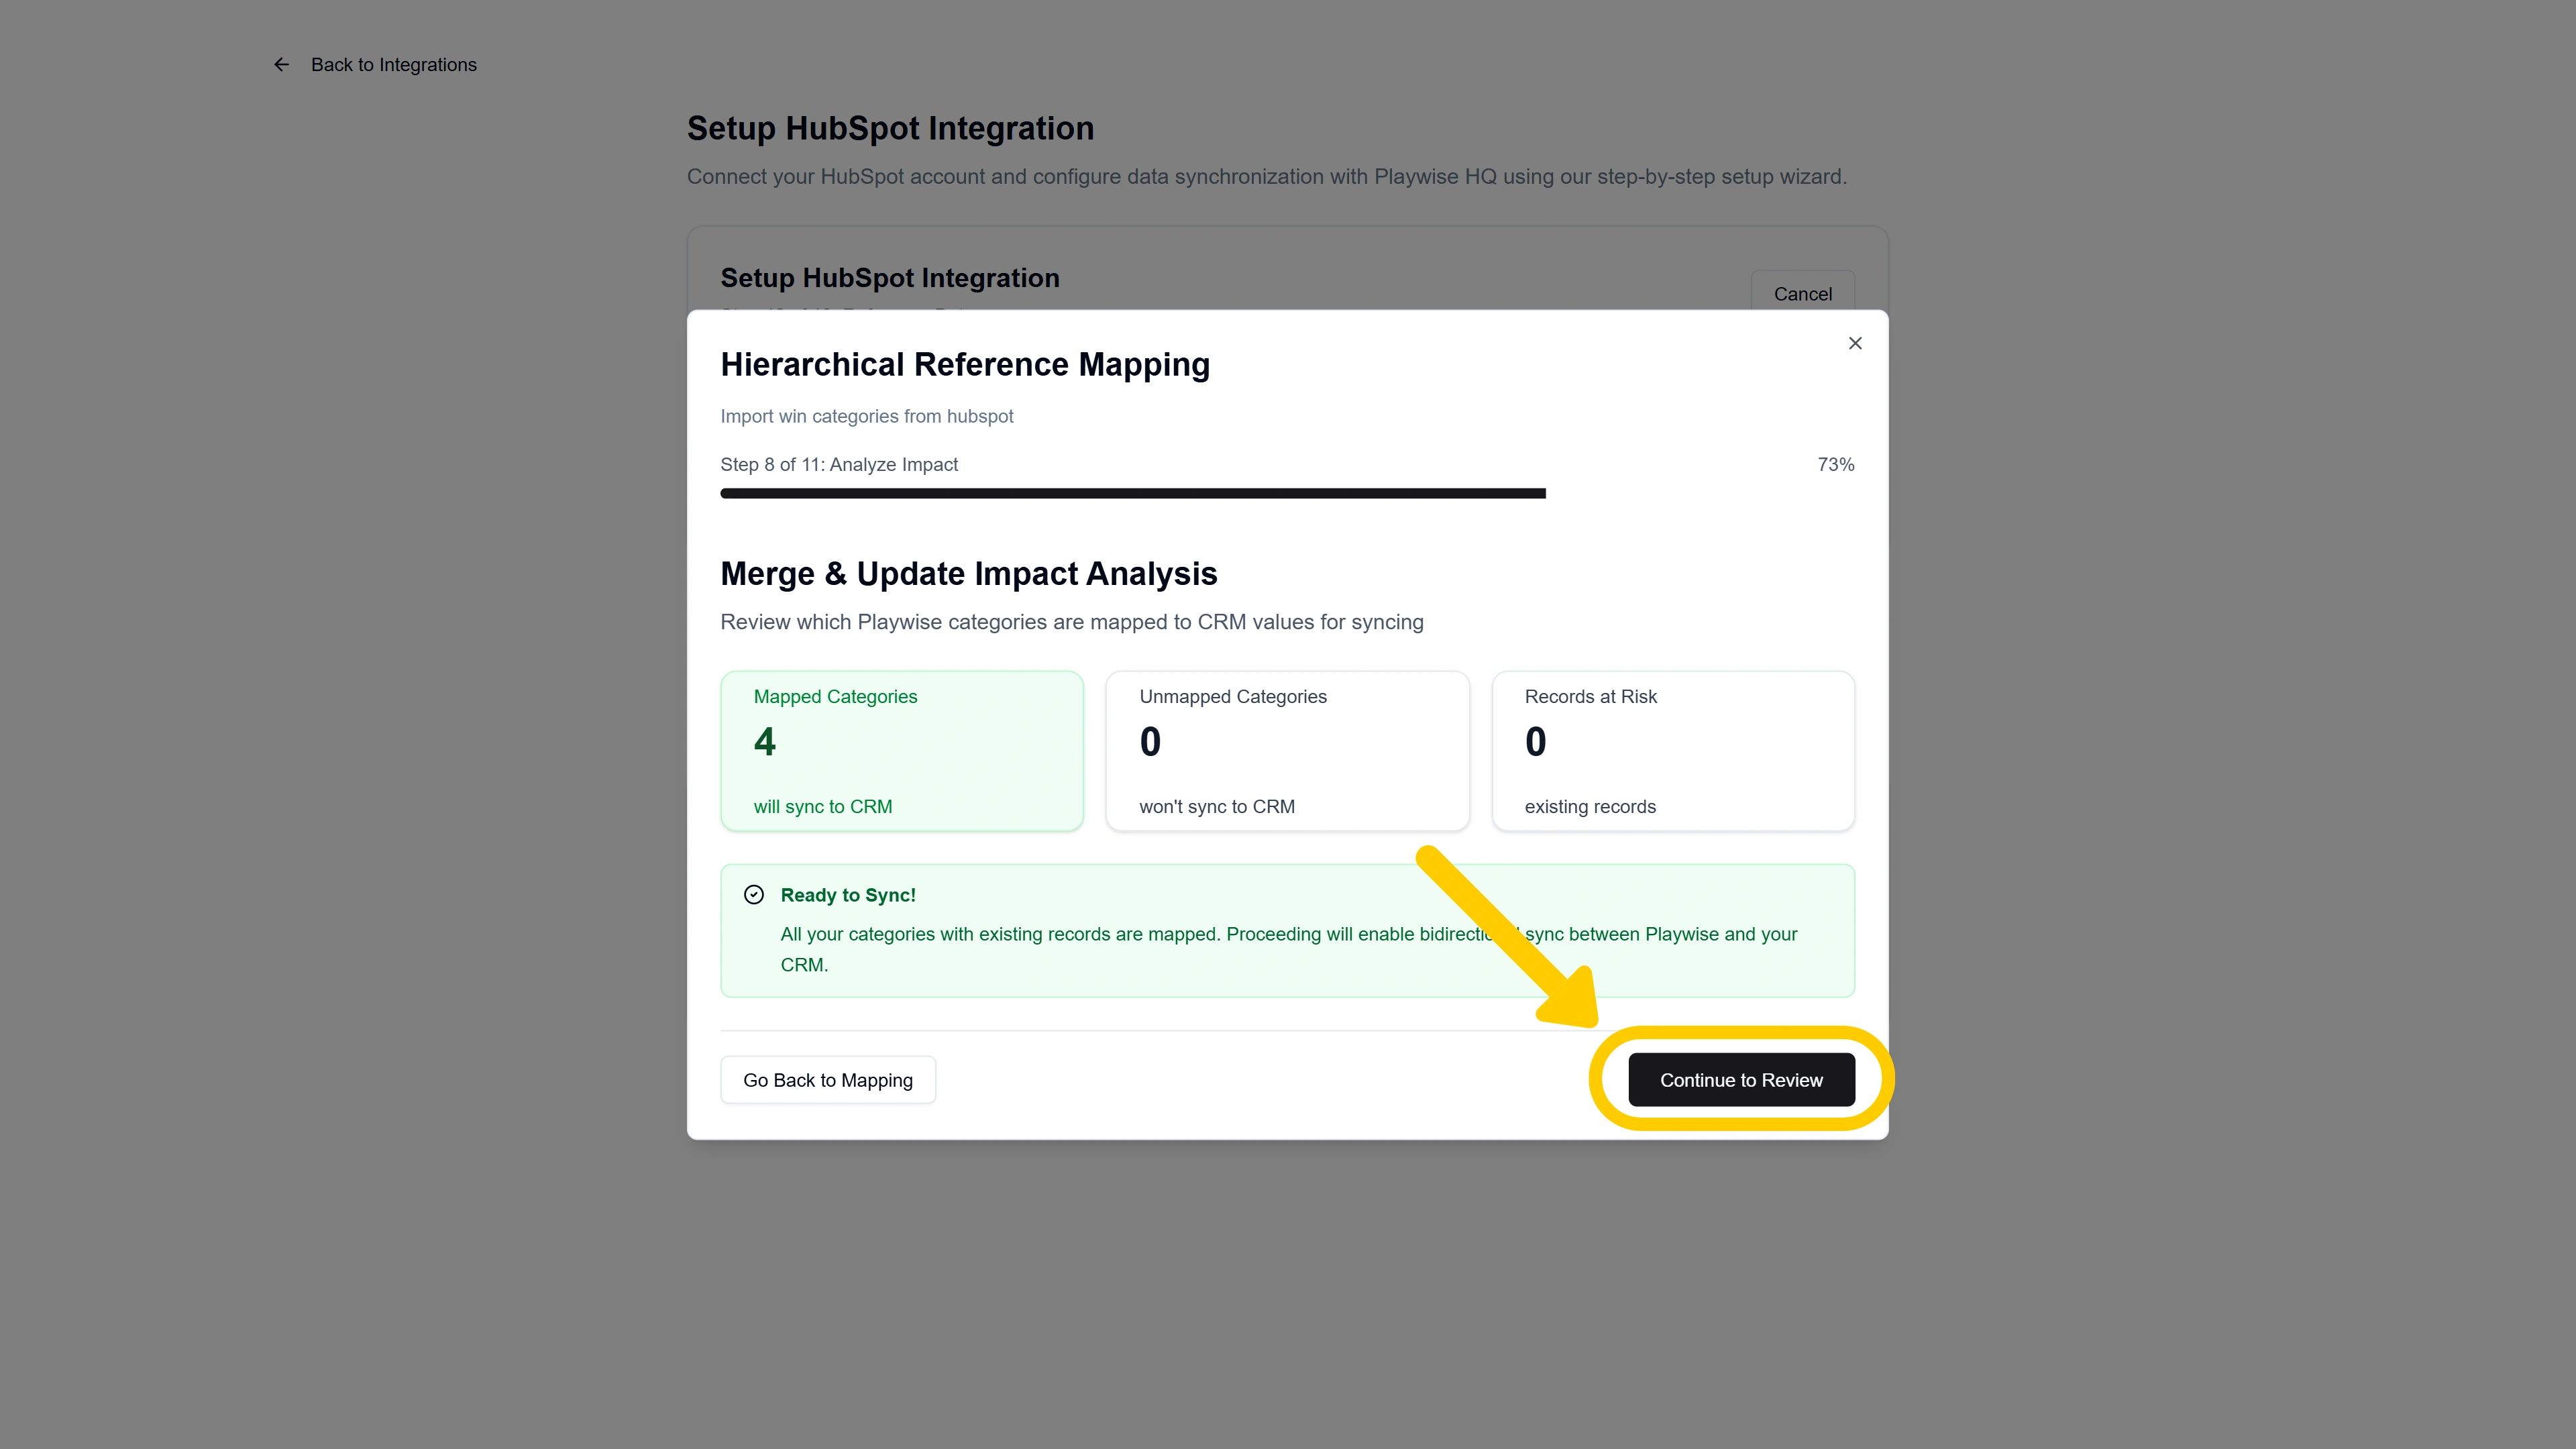
Click “Review” to then proceed and see: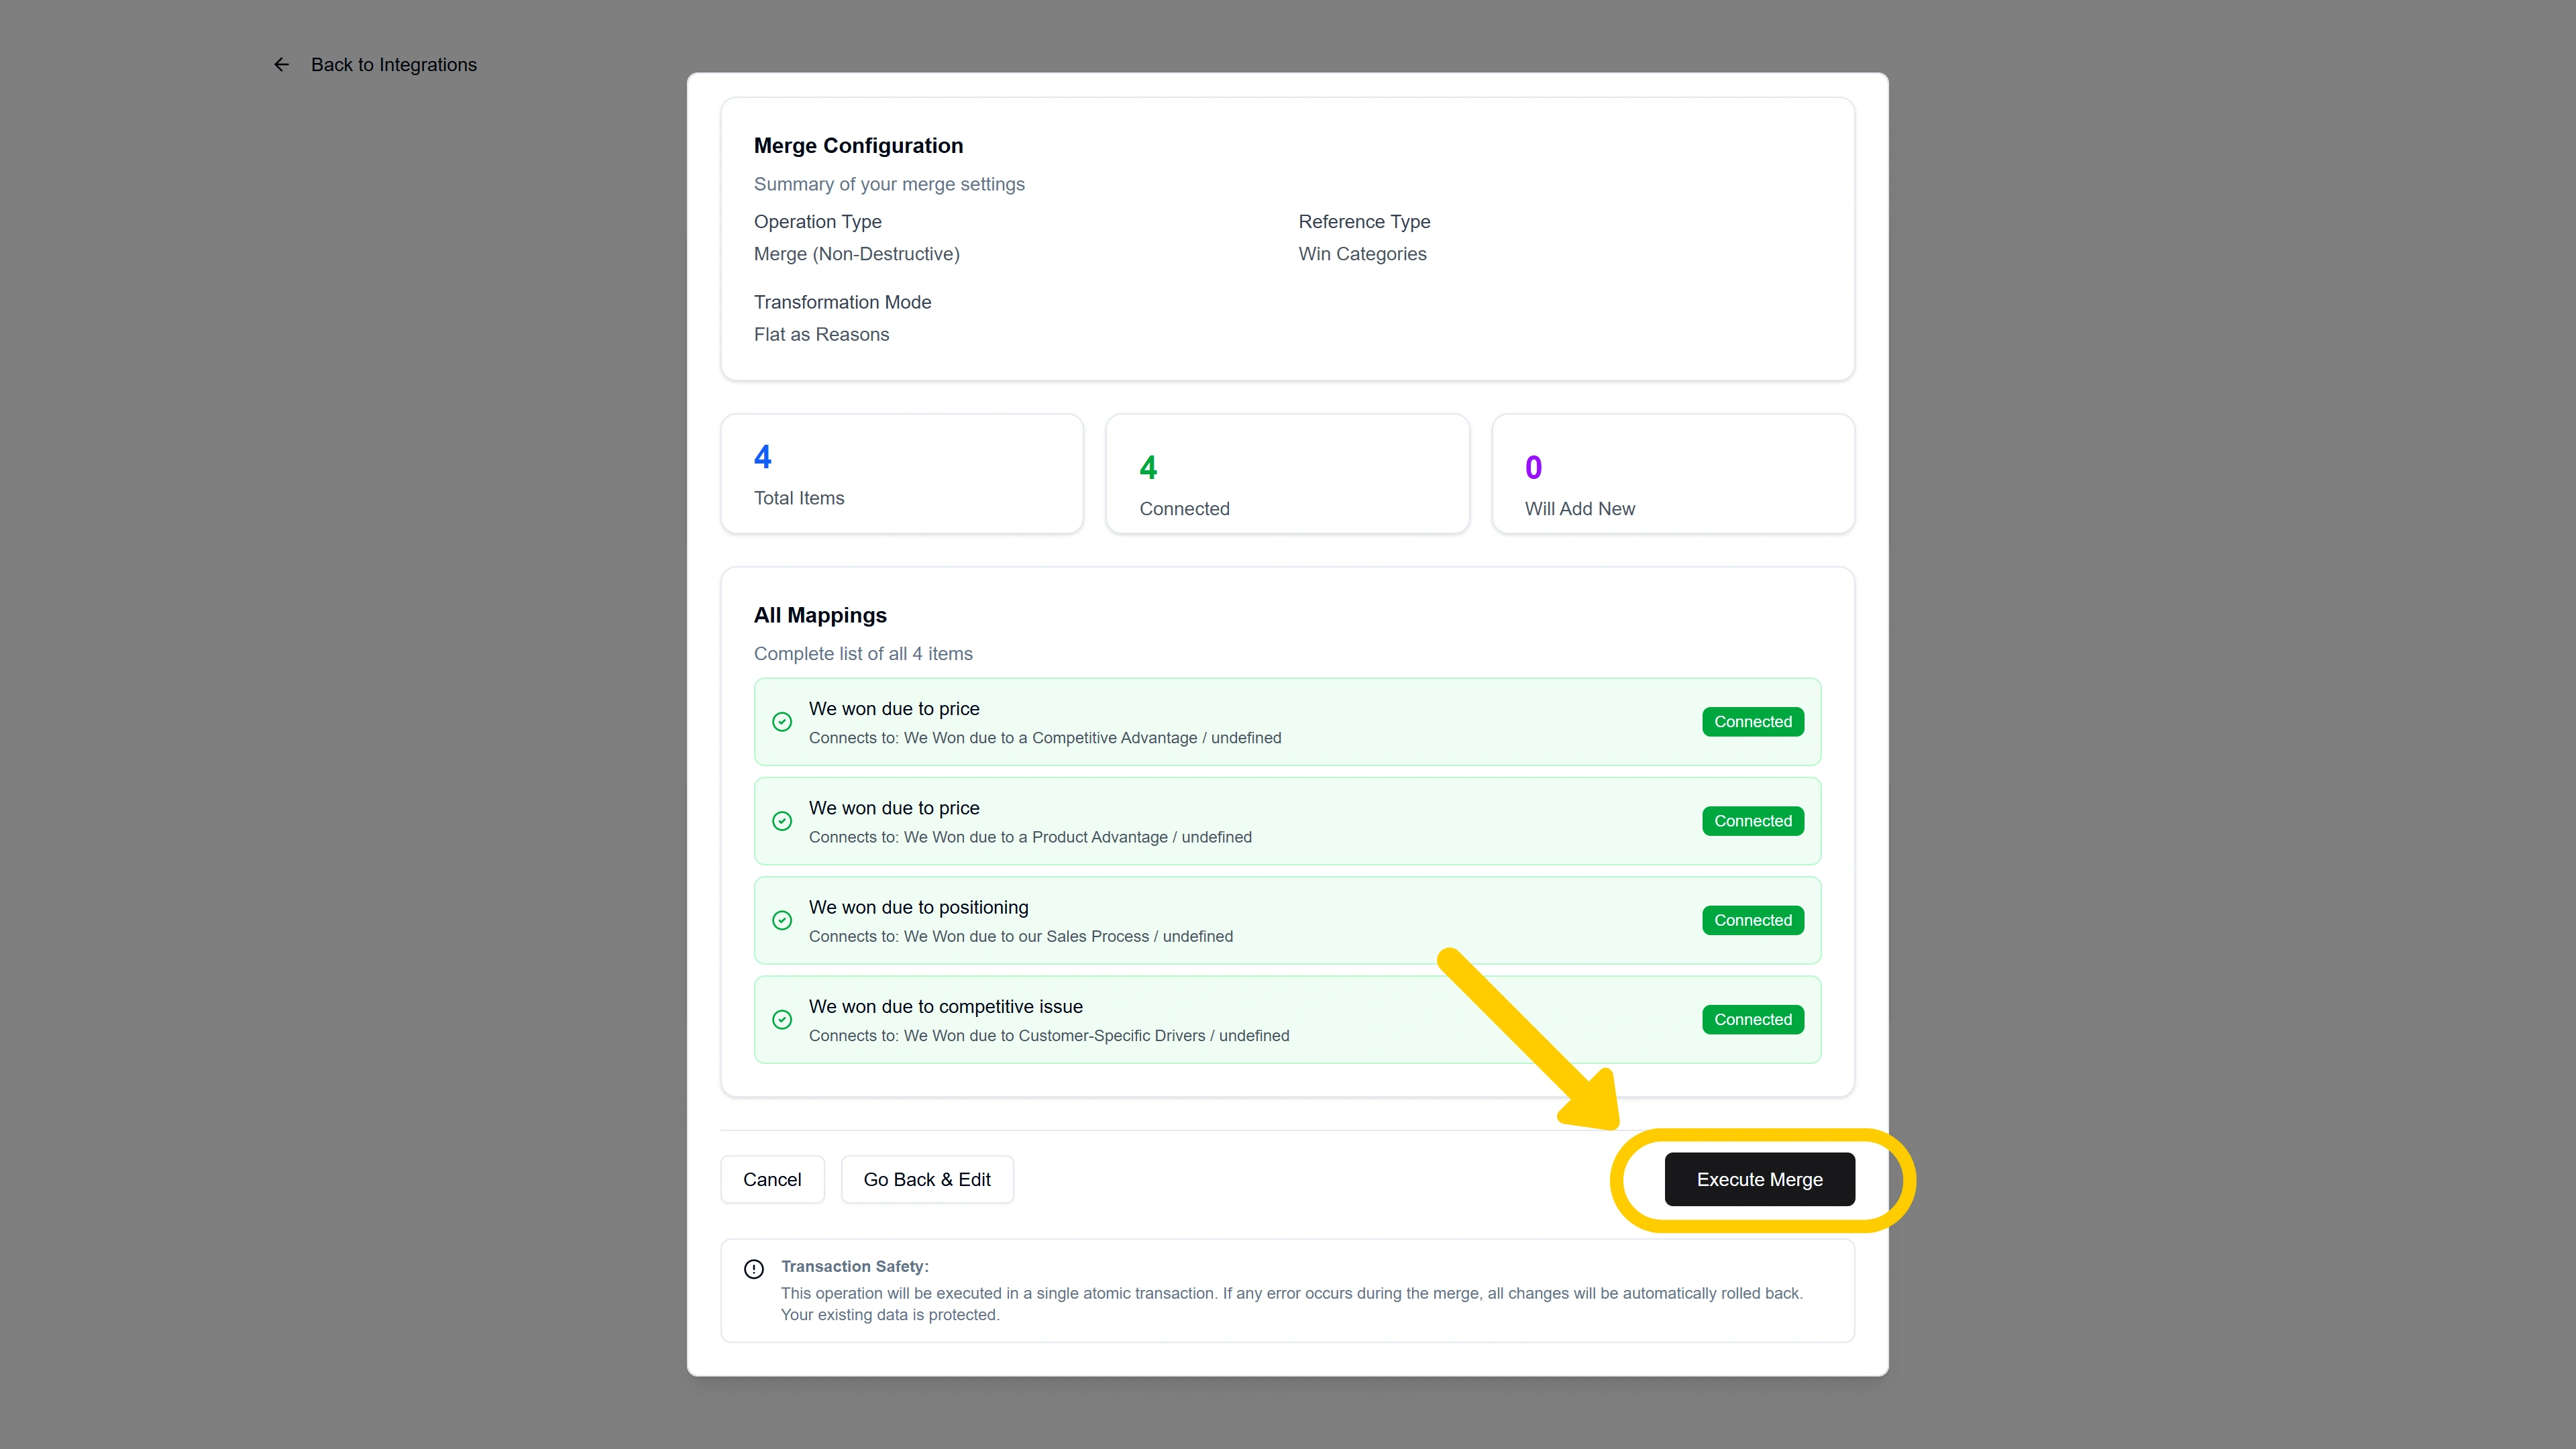
- The total number of categories and specific reasons being imported or mapped.
- A summary of what will be created, updated, or merged.
- Any unmapped categories or reasons that will not sync.
If everything looks correct, confirm the mapping. A success screen will appear: “Merge Complete!” with a summary showing categories mapped, new categories created, specific reasons imported, and the total categories now available.
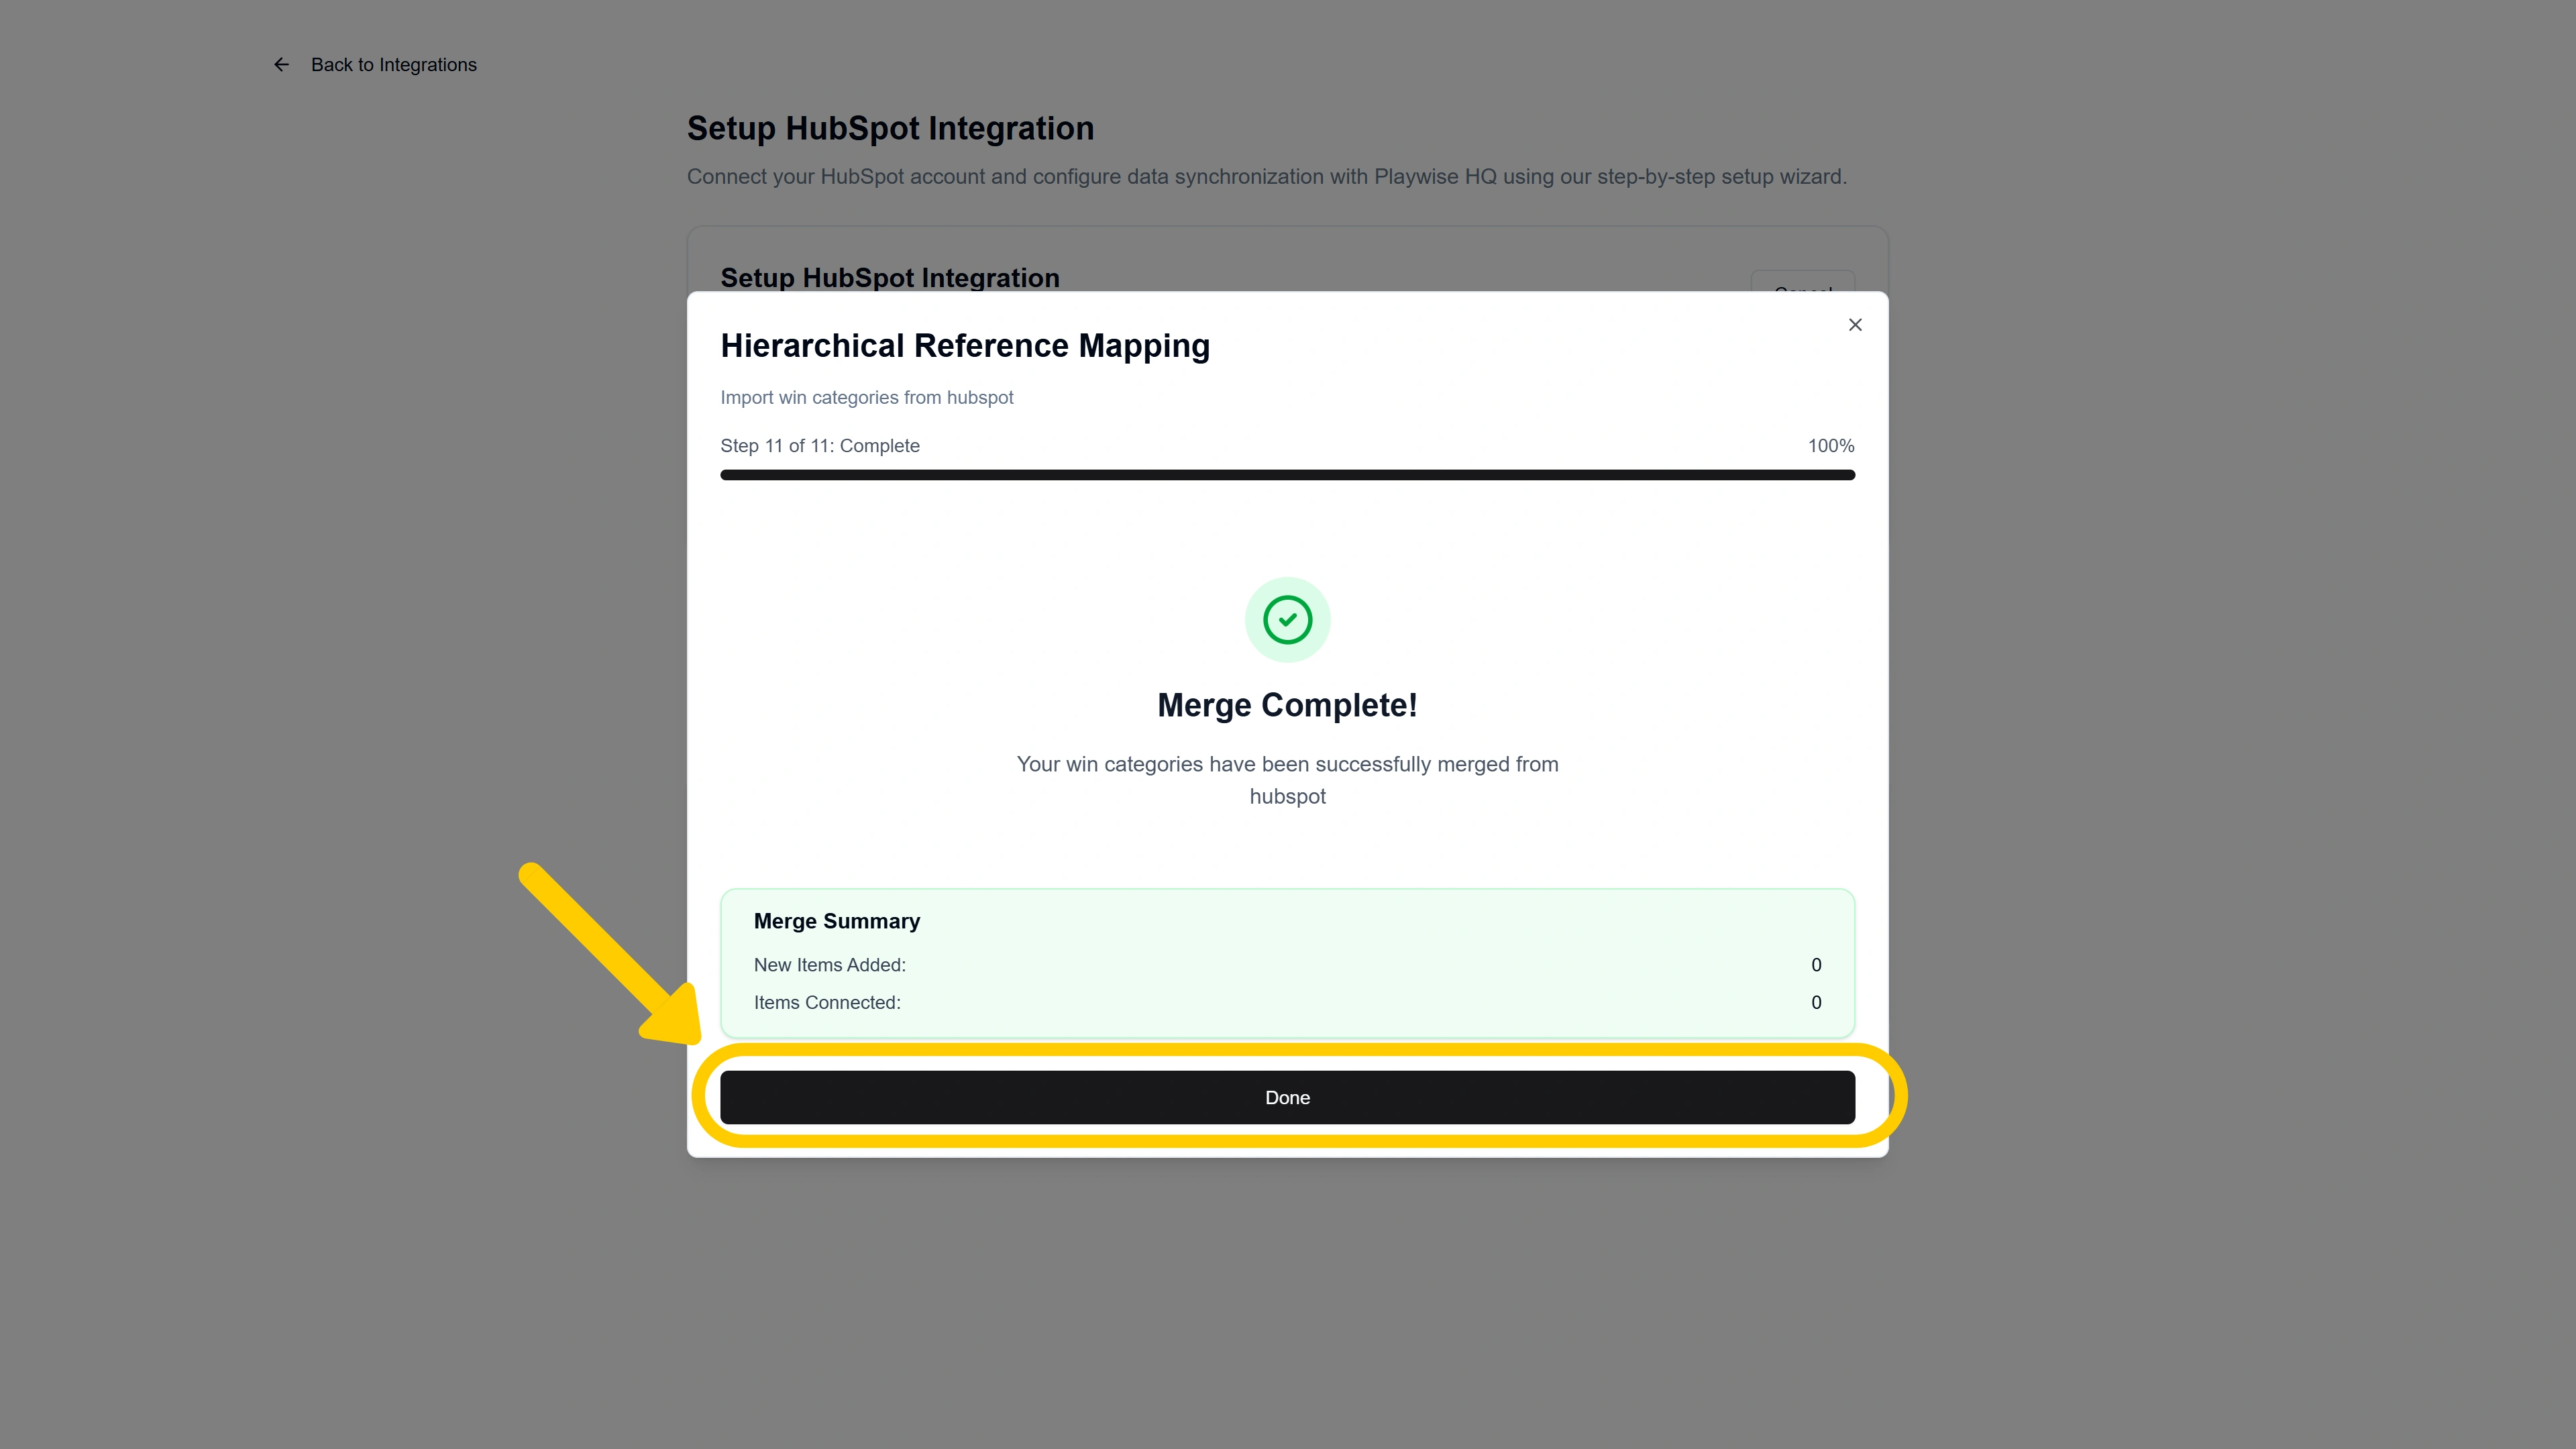
Click “Done” to close the mapping dialog and return to the wizard.
Step 10: Configure Loss Tracking
With win tracking configured (or skipped), the wizard moves to loss tracking. Loss categories and reasons help you identify weaknesses and areas for improvement — analysing patterns in lost deals to coach your team and improve win rates. Loss tracking involves the same set of substeps as win tracking, with loss-specific labels and a red colour scheme.
Step 10a: Answer the Loss Tracking Question
You will see a question card with a red X icon: “Do you track reasons why deals are LOST in HubSpot?”
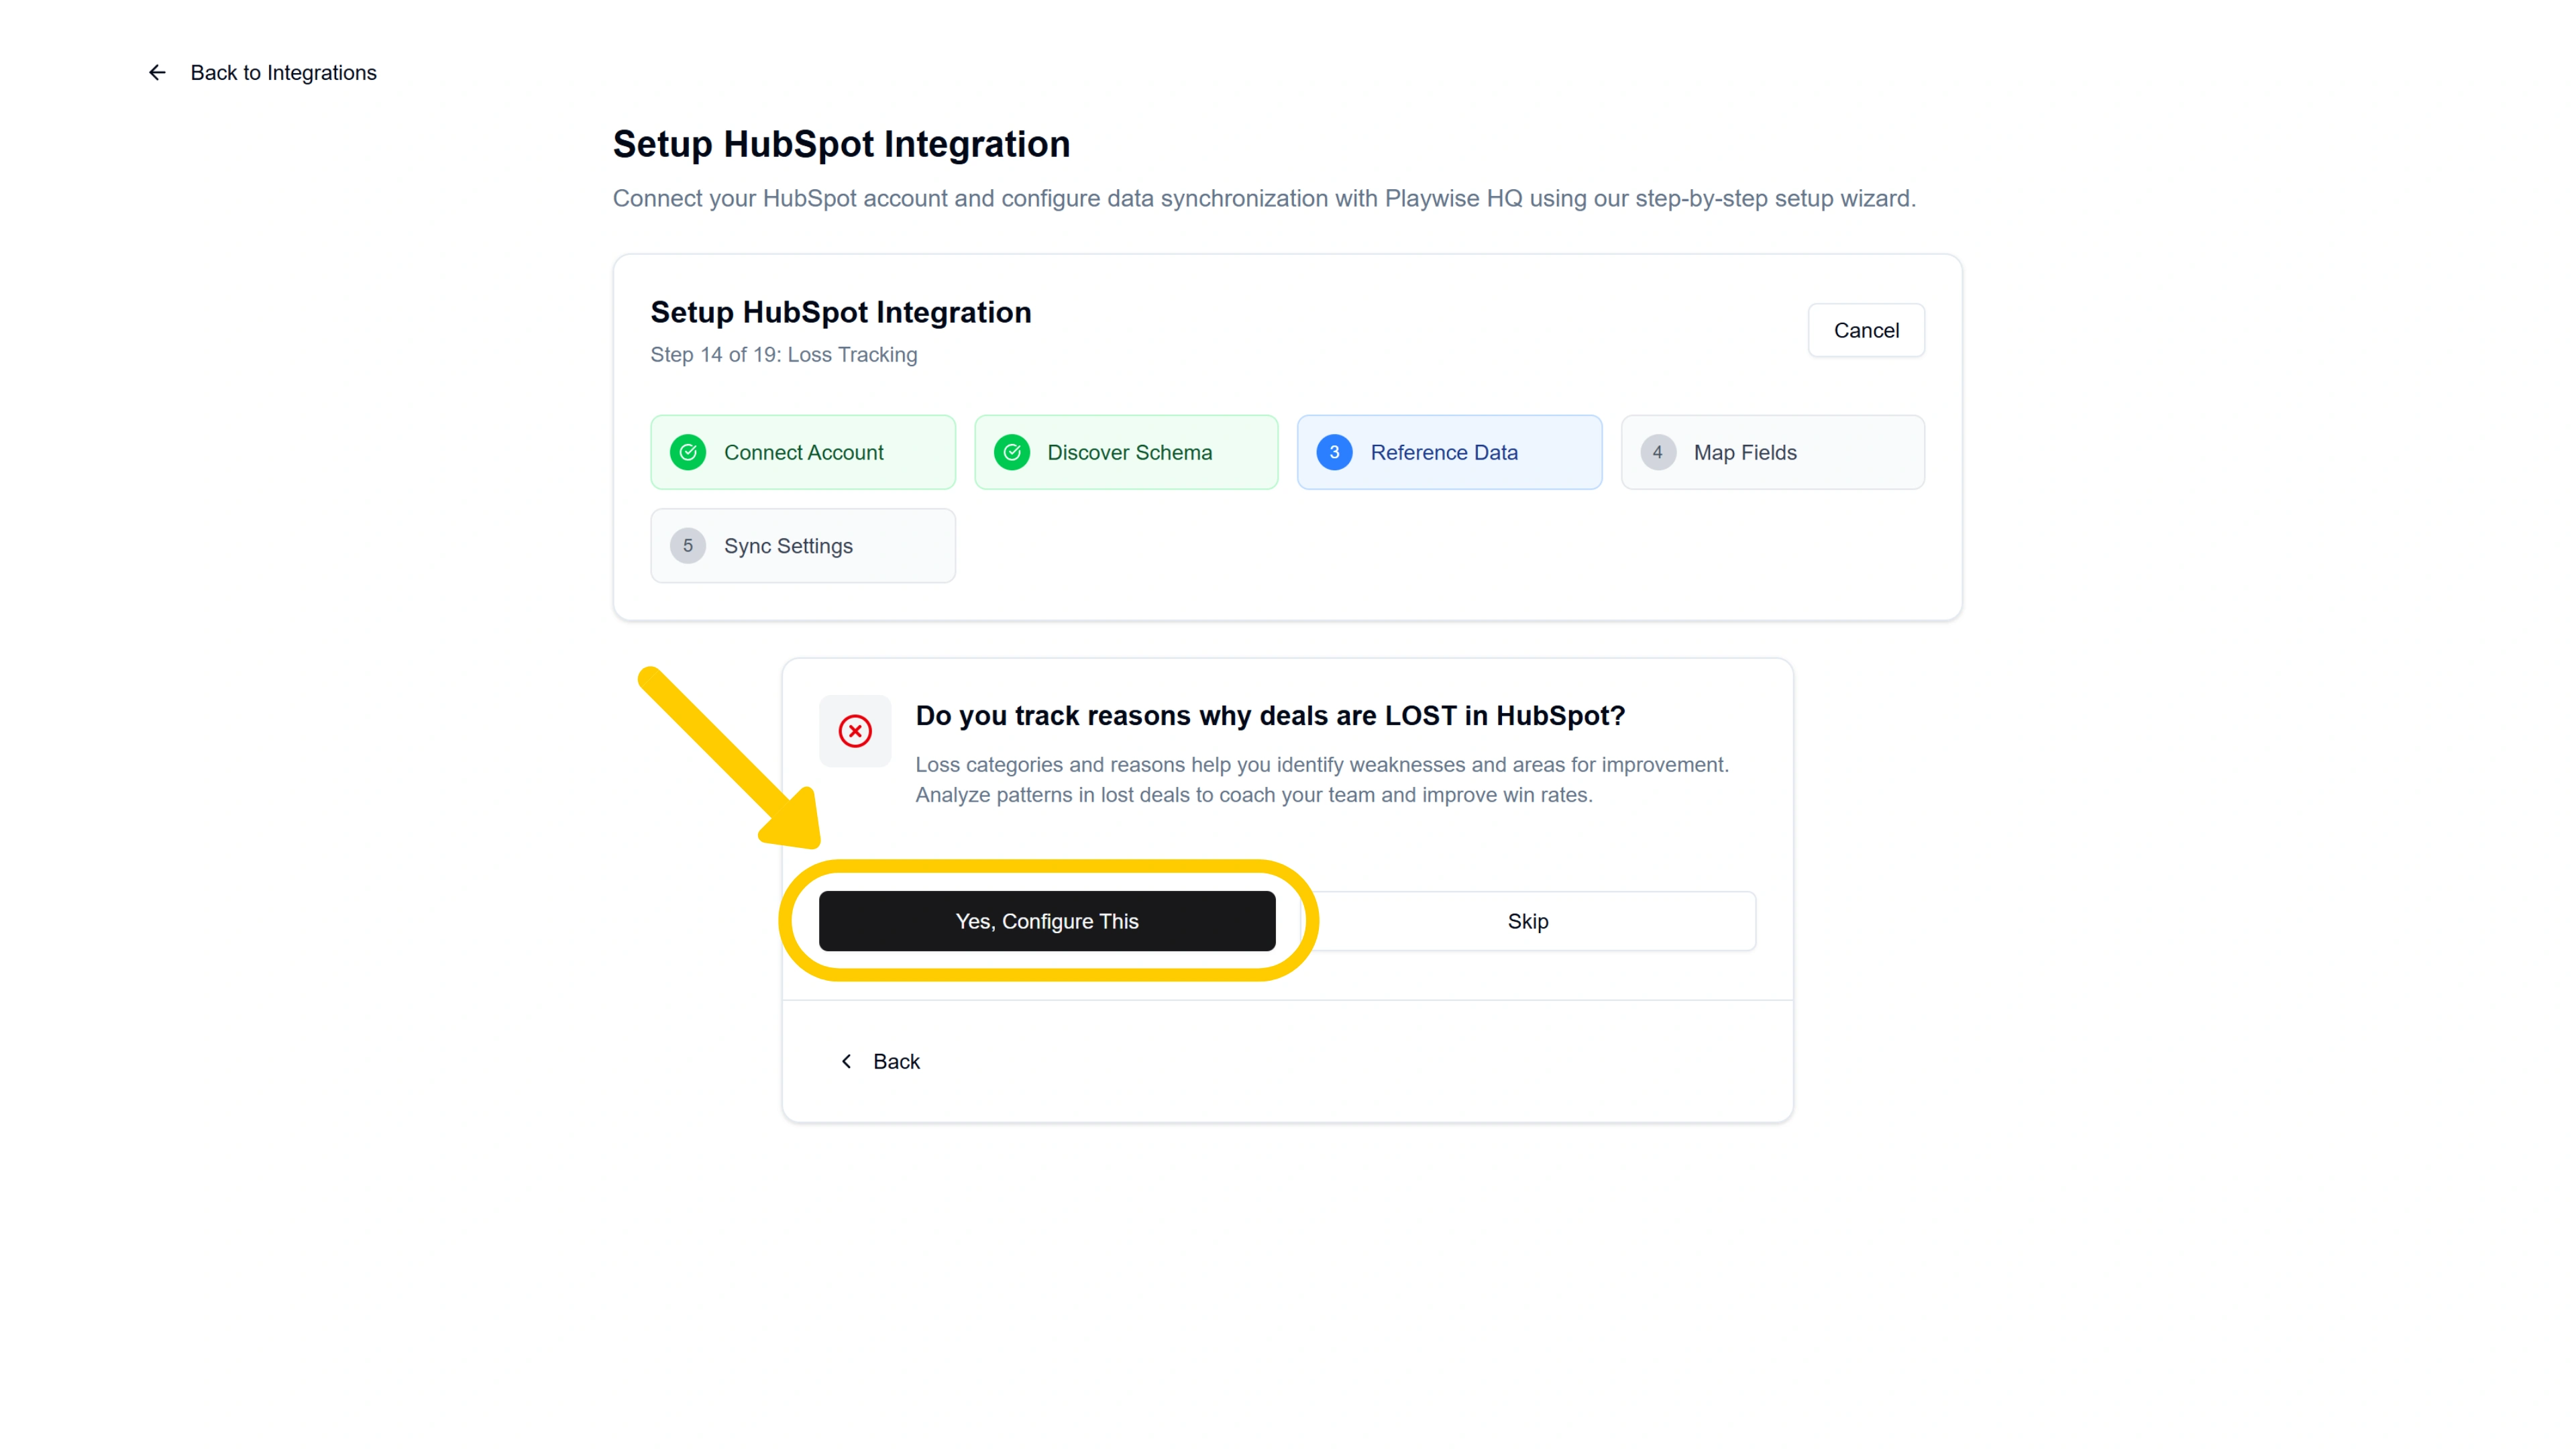
- Click “Yes, Configure This” to proceed with loss tracking setup.
- Click “Skip” if you do not track loss reasons in HubSpot (you can always configure this later from the management page).
Step 10b: Select How You Track Loss Reasons
If you clicked “Yes”, you will see a screen titled “How do you track Loss Reasons?” with three options:

Dropdown list (structured categories) — You use predefined categories or picklist values in HubSpot (e.g., “Lost to Competitor”, “Budget Constraints”, “No Decision”). Choose this if your reps select from a fixed list when recording why a deal was lost.
Free text field (unstructured notes) — You use a HubSpot text field where reps type their loss reasons in their own words. Choose this if your team writes freeform explanations.
Both dropdown and text field — You use categories for primary classification and a text field for additional detail. Choose this if your team selects a category and also writes supporting notes.
Select the option that matches your HubSpot setup and click “Continue”.
Tip: If you are not sure which option applies, you can check your HubSpot deal properties to see how loss reasons are recorded. You can also change this setting later.
What happens next depends on which tracking type you selected:
If You Selected “Free Text Field” – Step 10c: Map the Loss Reason Text Field
You will see a screen titled “Map Loss Reasons Text Field” asking you to select which HubSpot text field should sync with Playwise HQ’s Loss Reason Detail field.
- From the dropdown, select the HubSpot text field that your team uses to record loss reasons.
- A mapping preview will appear showing the HubSpot field on the left and the Playwise HQ “Loss Reason Detail” field on the right, connected by an arrow.
- Click “Continue”.
The text field will sync bidirectionally — changes made in either system will be reflected in the other.
If You Selected “Dropdown List” – Step 10c: Define Your HubSpot Category Structure
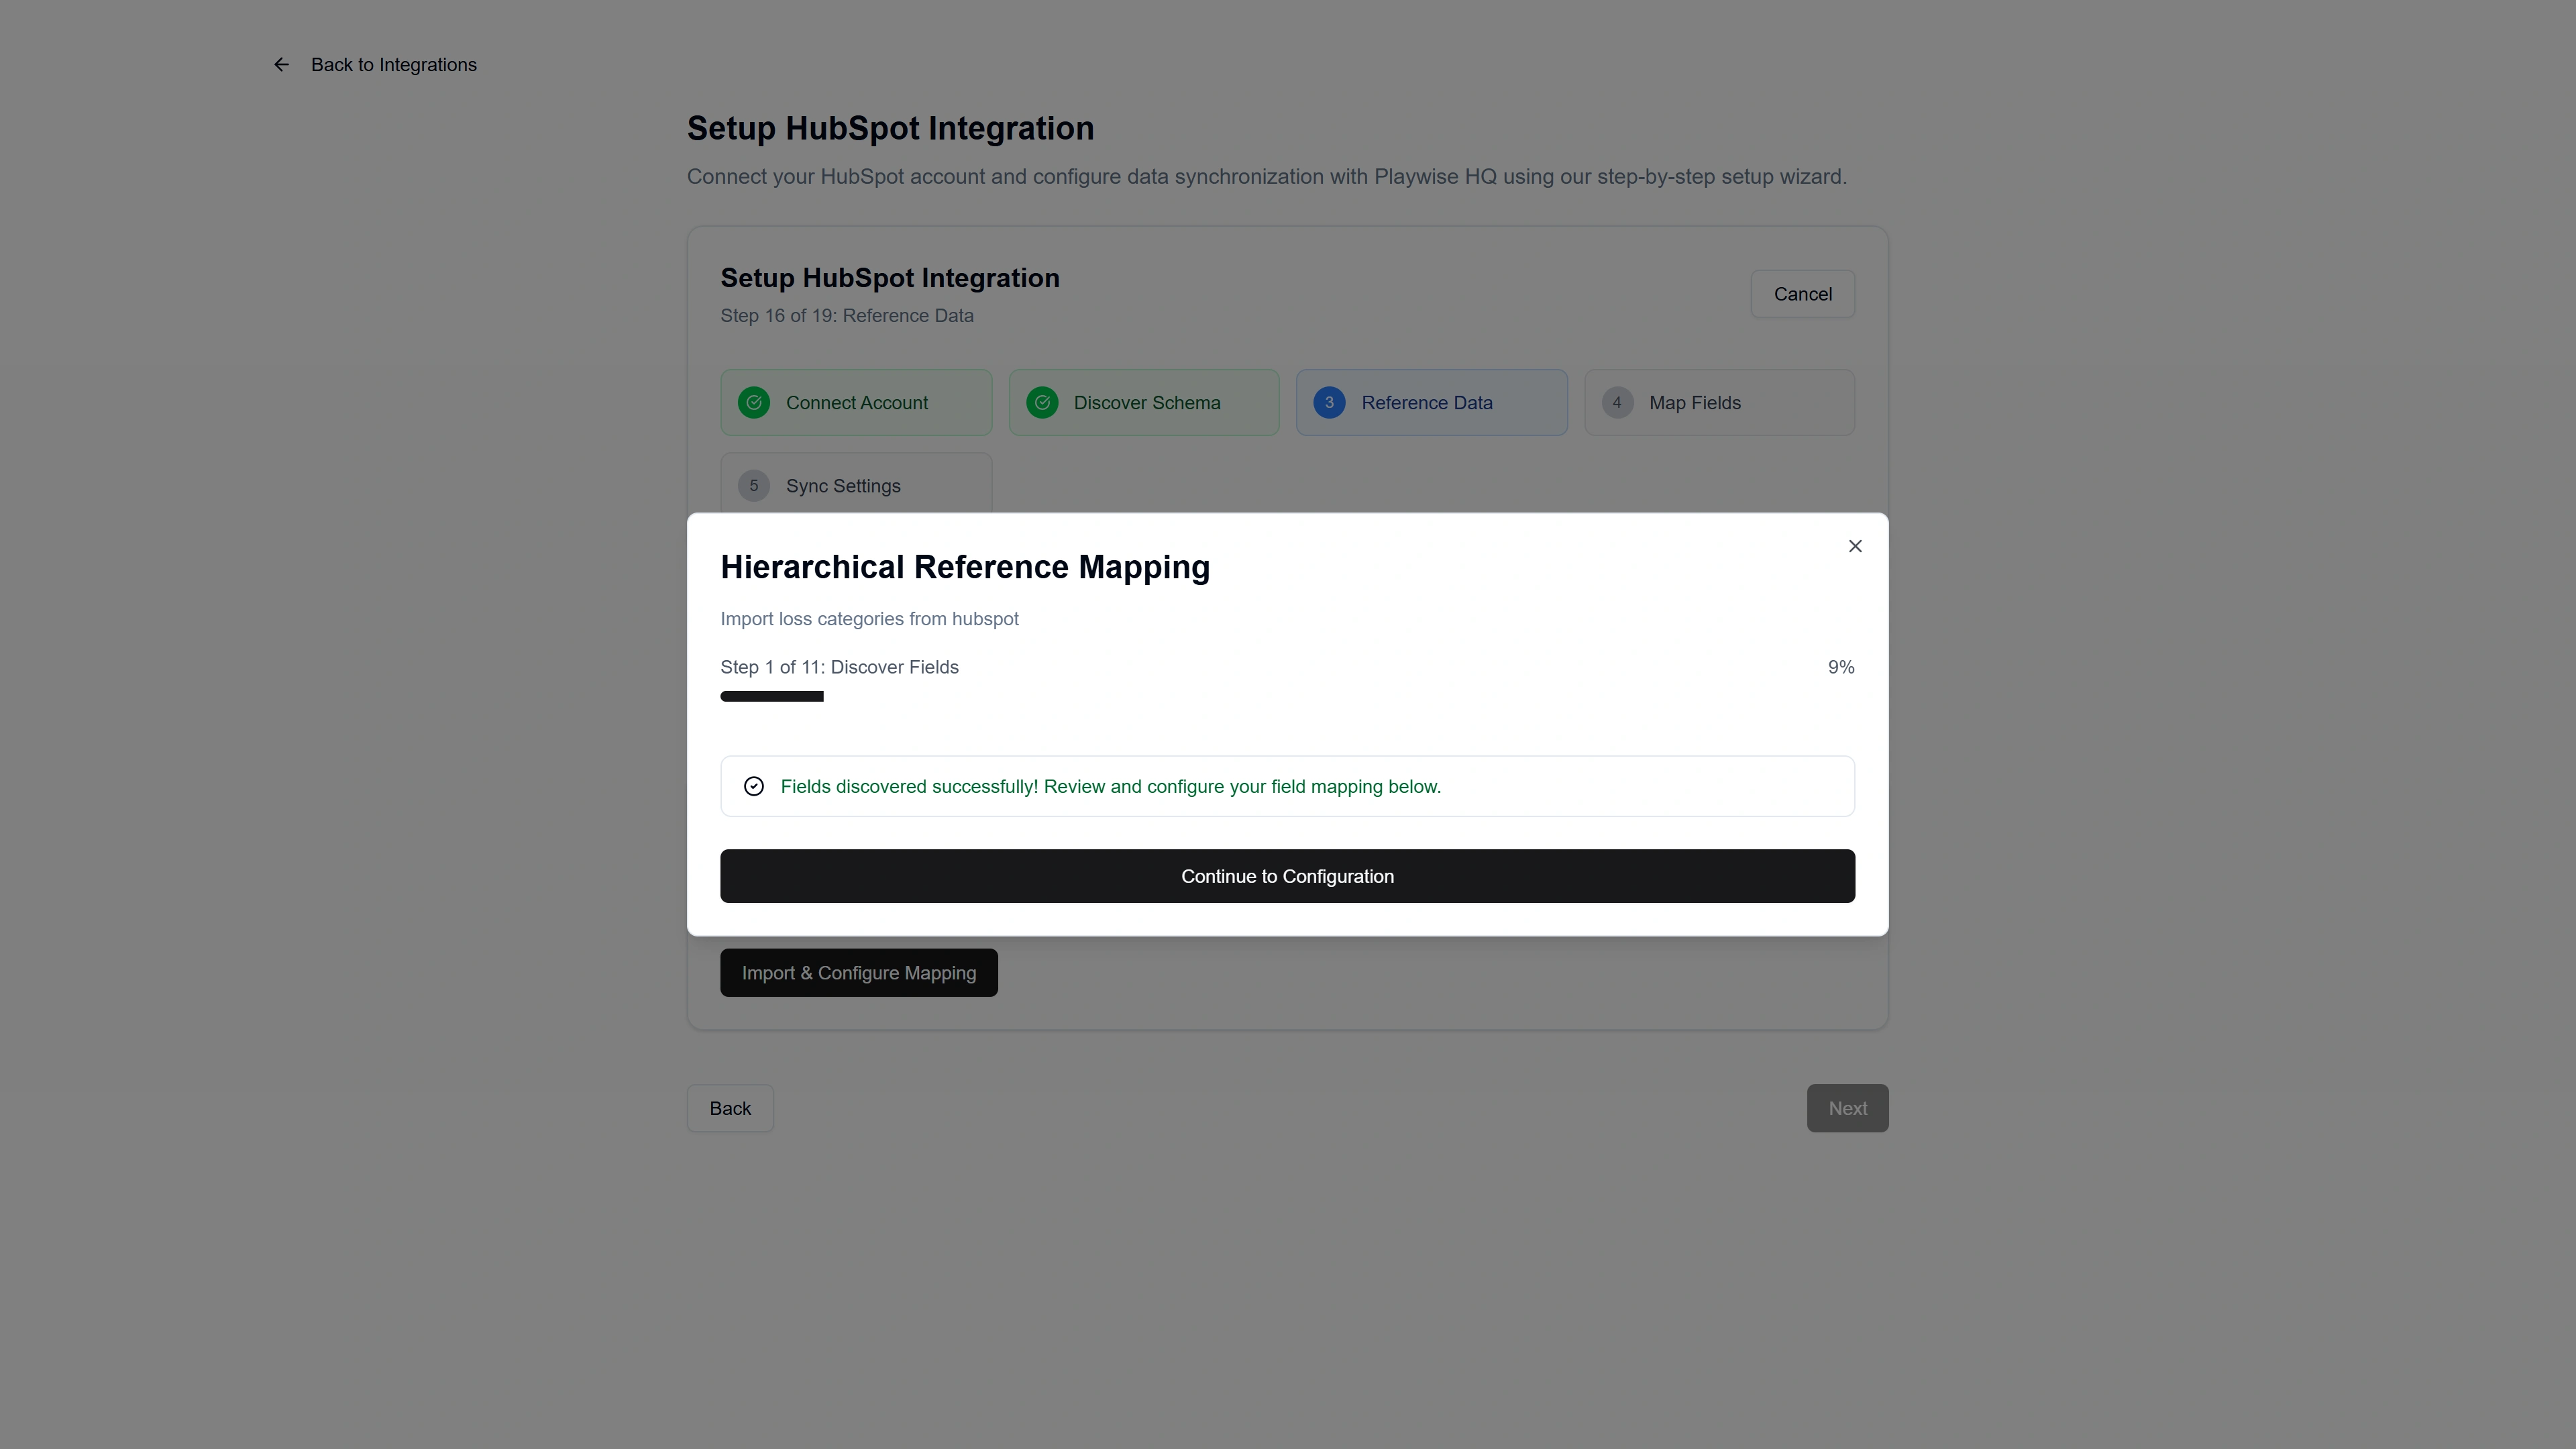
First you need to import and configure your field mapping.
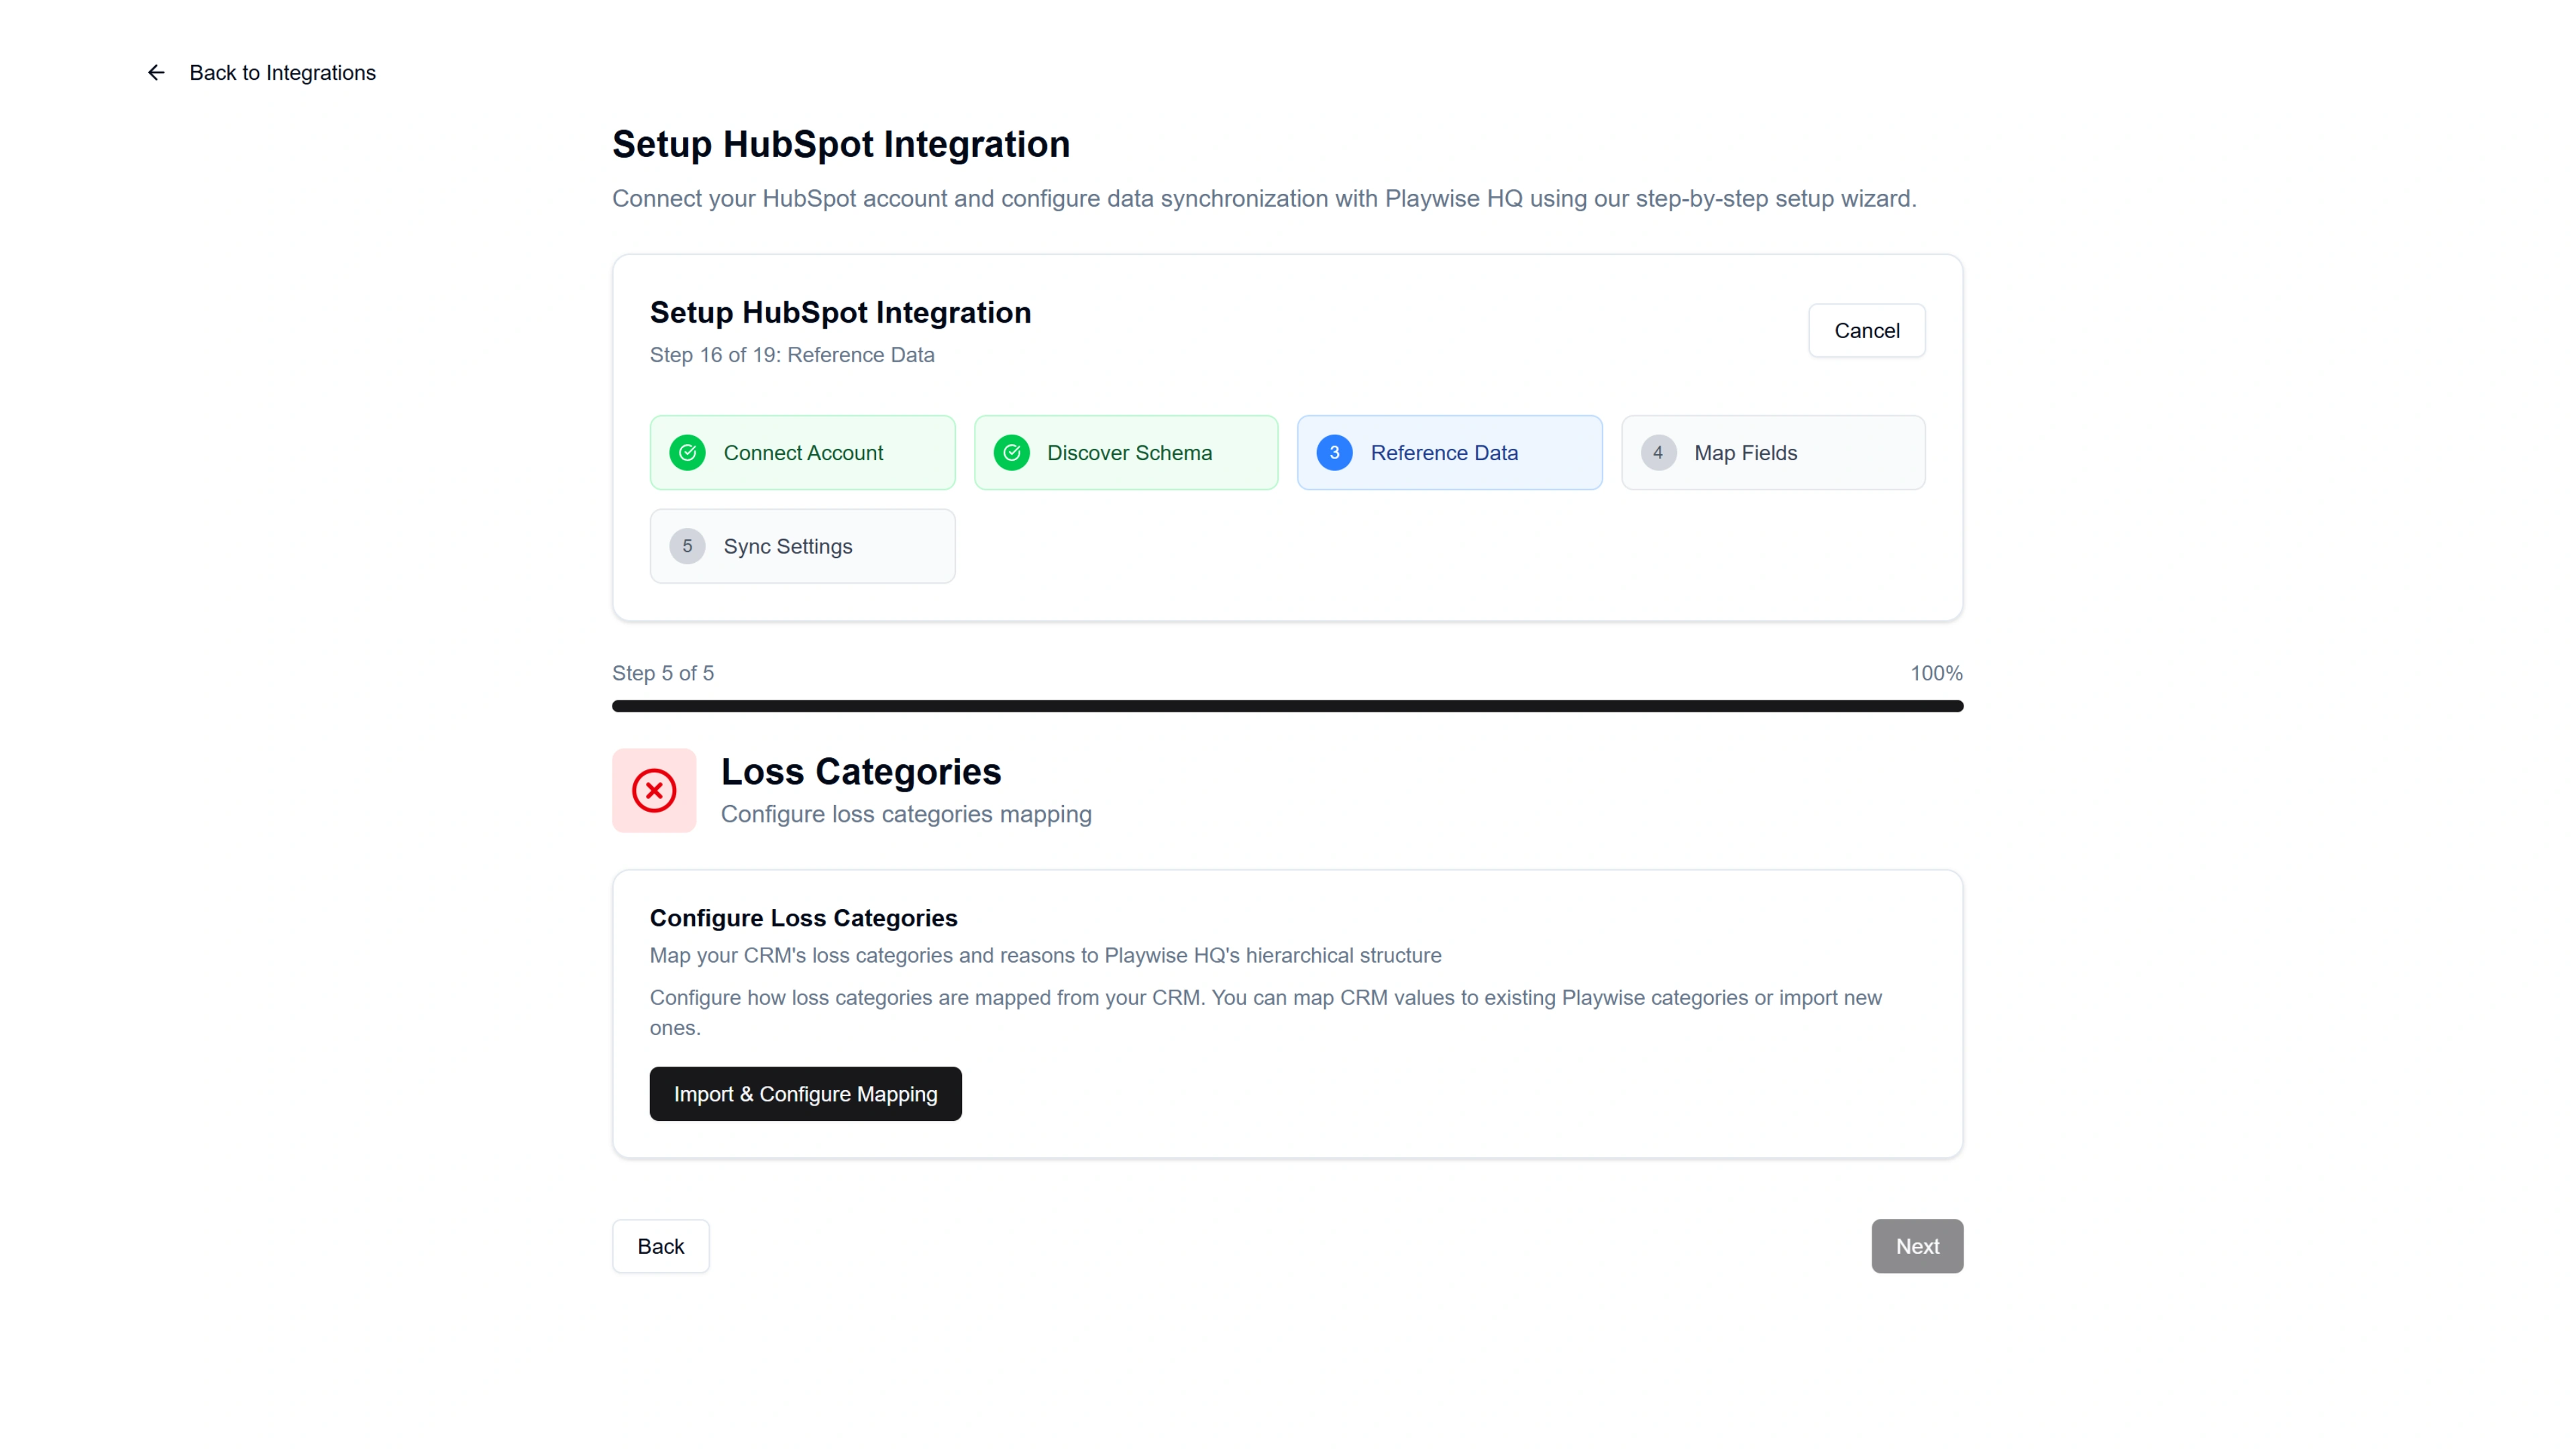
You then need to click to “Continue to Configuration” after the import is complete.
You will then see a screen titled “How is your HubSpot configured?” asking whether your HubSpot tracks primary loss reasons only, or both primary and secondary (specific) reasons.
- Primary Only — Your HubSpot has a single dropdown field with loss reason categories (e.g., “Lost to Competitor”, “Budget Constraints”). Choose this if you have one level of categorisation.
- Primary and Secondary — Your HubSpot has two related fields: one for the high-level category and another for specific reasons within that category (e.g., Category: “Lost to Competitor” → Specific Reason: “Competitor Had Better Pricing”). Choose this if you have a two-level hierarchy.
Select the option that matches your setup.

Step 10d: Select the HubSpot Field(s)
If you selected “Primary Only”:
- Under the “Primary Field (Category)” section, Playwise HQ may automatically detect a standard field. If detected, you will see a green confirmation: “Standard Field Available” with the field name.
- If no standard field is detected, select the correct HubSpot dropdown field from the list. Fields are shown with AI confidence scores to help you identify the best match.
- Click “Configure Mapping” to proceed.
If you selected “Primary and Secondary”:
- Under “Primary Field (Category)”, select or confirm the HubSpot field that contains your high-level loss categories.
- Under “Secondary Field (Specific Reason)”, select the HubSpot field that contains your specific loss reasons. If no suitable secondary field is found, you can select “None (Flatten to primary only)” to treat all data as primary categories.
- Click “Configure Mapping” to proceed.
Step 10e: Choose the Import Mode
You will see a screen explaining how your HubSpot category data will be transformed into Playwise HQ’s structure. The available modes depend on whether you selected Primary Only or Primary and Secondary:
If you configured Primary Only (flat structure):
Two options are available:
As Categories (Recommended for flat structures) — Each HubSpot dropdown value becomes both a loss category and a matching specific reason in Playwise HQ. This provides a clean 1:1 mapping that is easy to sync back to HubSpot.
As Reasons Under Category — All HubSpot dropdown values become specific reasons grouped under a single default parent category called “Imported Loss Reasons”. This creates a natural hierarchy you can reorganise later.
If you configured Primary and Secondary (two-level structure):
Three options are available:
Hierarchical Mapping (Recommended for two-level structures) — Maps your primary HubSpot field values to Playwise HQ categories and your secondary field values to specific reasons within those categories. This preserves your full hierarchy and is the most accurate representation.
As Categories — Same as above; treats each primary value as a standalone category.
As Reasons Under Category — Groups all values under a single default category.
Each option includes a visual example showing how your HubSpot data will look in Playwise HQ. Select your preferred mode and click “Continue”.
Step 10f: Map Your Loss Categories
The mapping interface that appears depends on the import mode you selected:
For “As Categories” or “As Reasons Under Category” mode:
A mapping dialog opens where you match each HubSpot dropdown value to a Playwise HQ loss category. You can choose to:
- Merge — Map HubSpot values to existing Playwise HQ categories and import any new ones. Use the dropdown selectors to create each mapping. Click “Apply Mapping” when done.
For “Hierarchical Mapping” mode (Primary and Secondary):
The mapping is a multi-step process:
Map Primary Categories — Match each HubSpot primary dropdown value to a Playwise HQ loss category. For each HubSpot value, use the dropdown to select the corresponding Playwise category, or allow new categories to be created.
Assign Secondary Reasons to Categories — A screen titled “Assign Secondary Reasons to Categories” appears. For each Playwise category you mapped in the previous step, assign the relevant HubSpot secondary reasons that belong under it. A progress indicator shows how many secondary reasons you have assigned (e.g., “8 of 12 assigned”). Secondary reasons that are not assigned to any category will not be imported.
Map Specific Reasons — A screen titled “Map Specific Reasons” appears, organised by category. For each Playwise HQ specific reason within a category, map it to the corresponding HubSpot secondary reason. Only the secondary reasons you assigned to that category in the previous step are available. Click “Complete Mapping” when finished.
Step 10g: Review and Confirm
After mapping is complete, a screen shows:
- The number of mapped categories
- The number of unmapped categories
- Any records at risk.
If everything looks okay, click “Continue to Review”.
You will then see a screen as a final confirmation step. Click “Execute Merge” to complete the process.
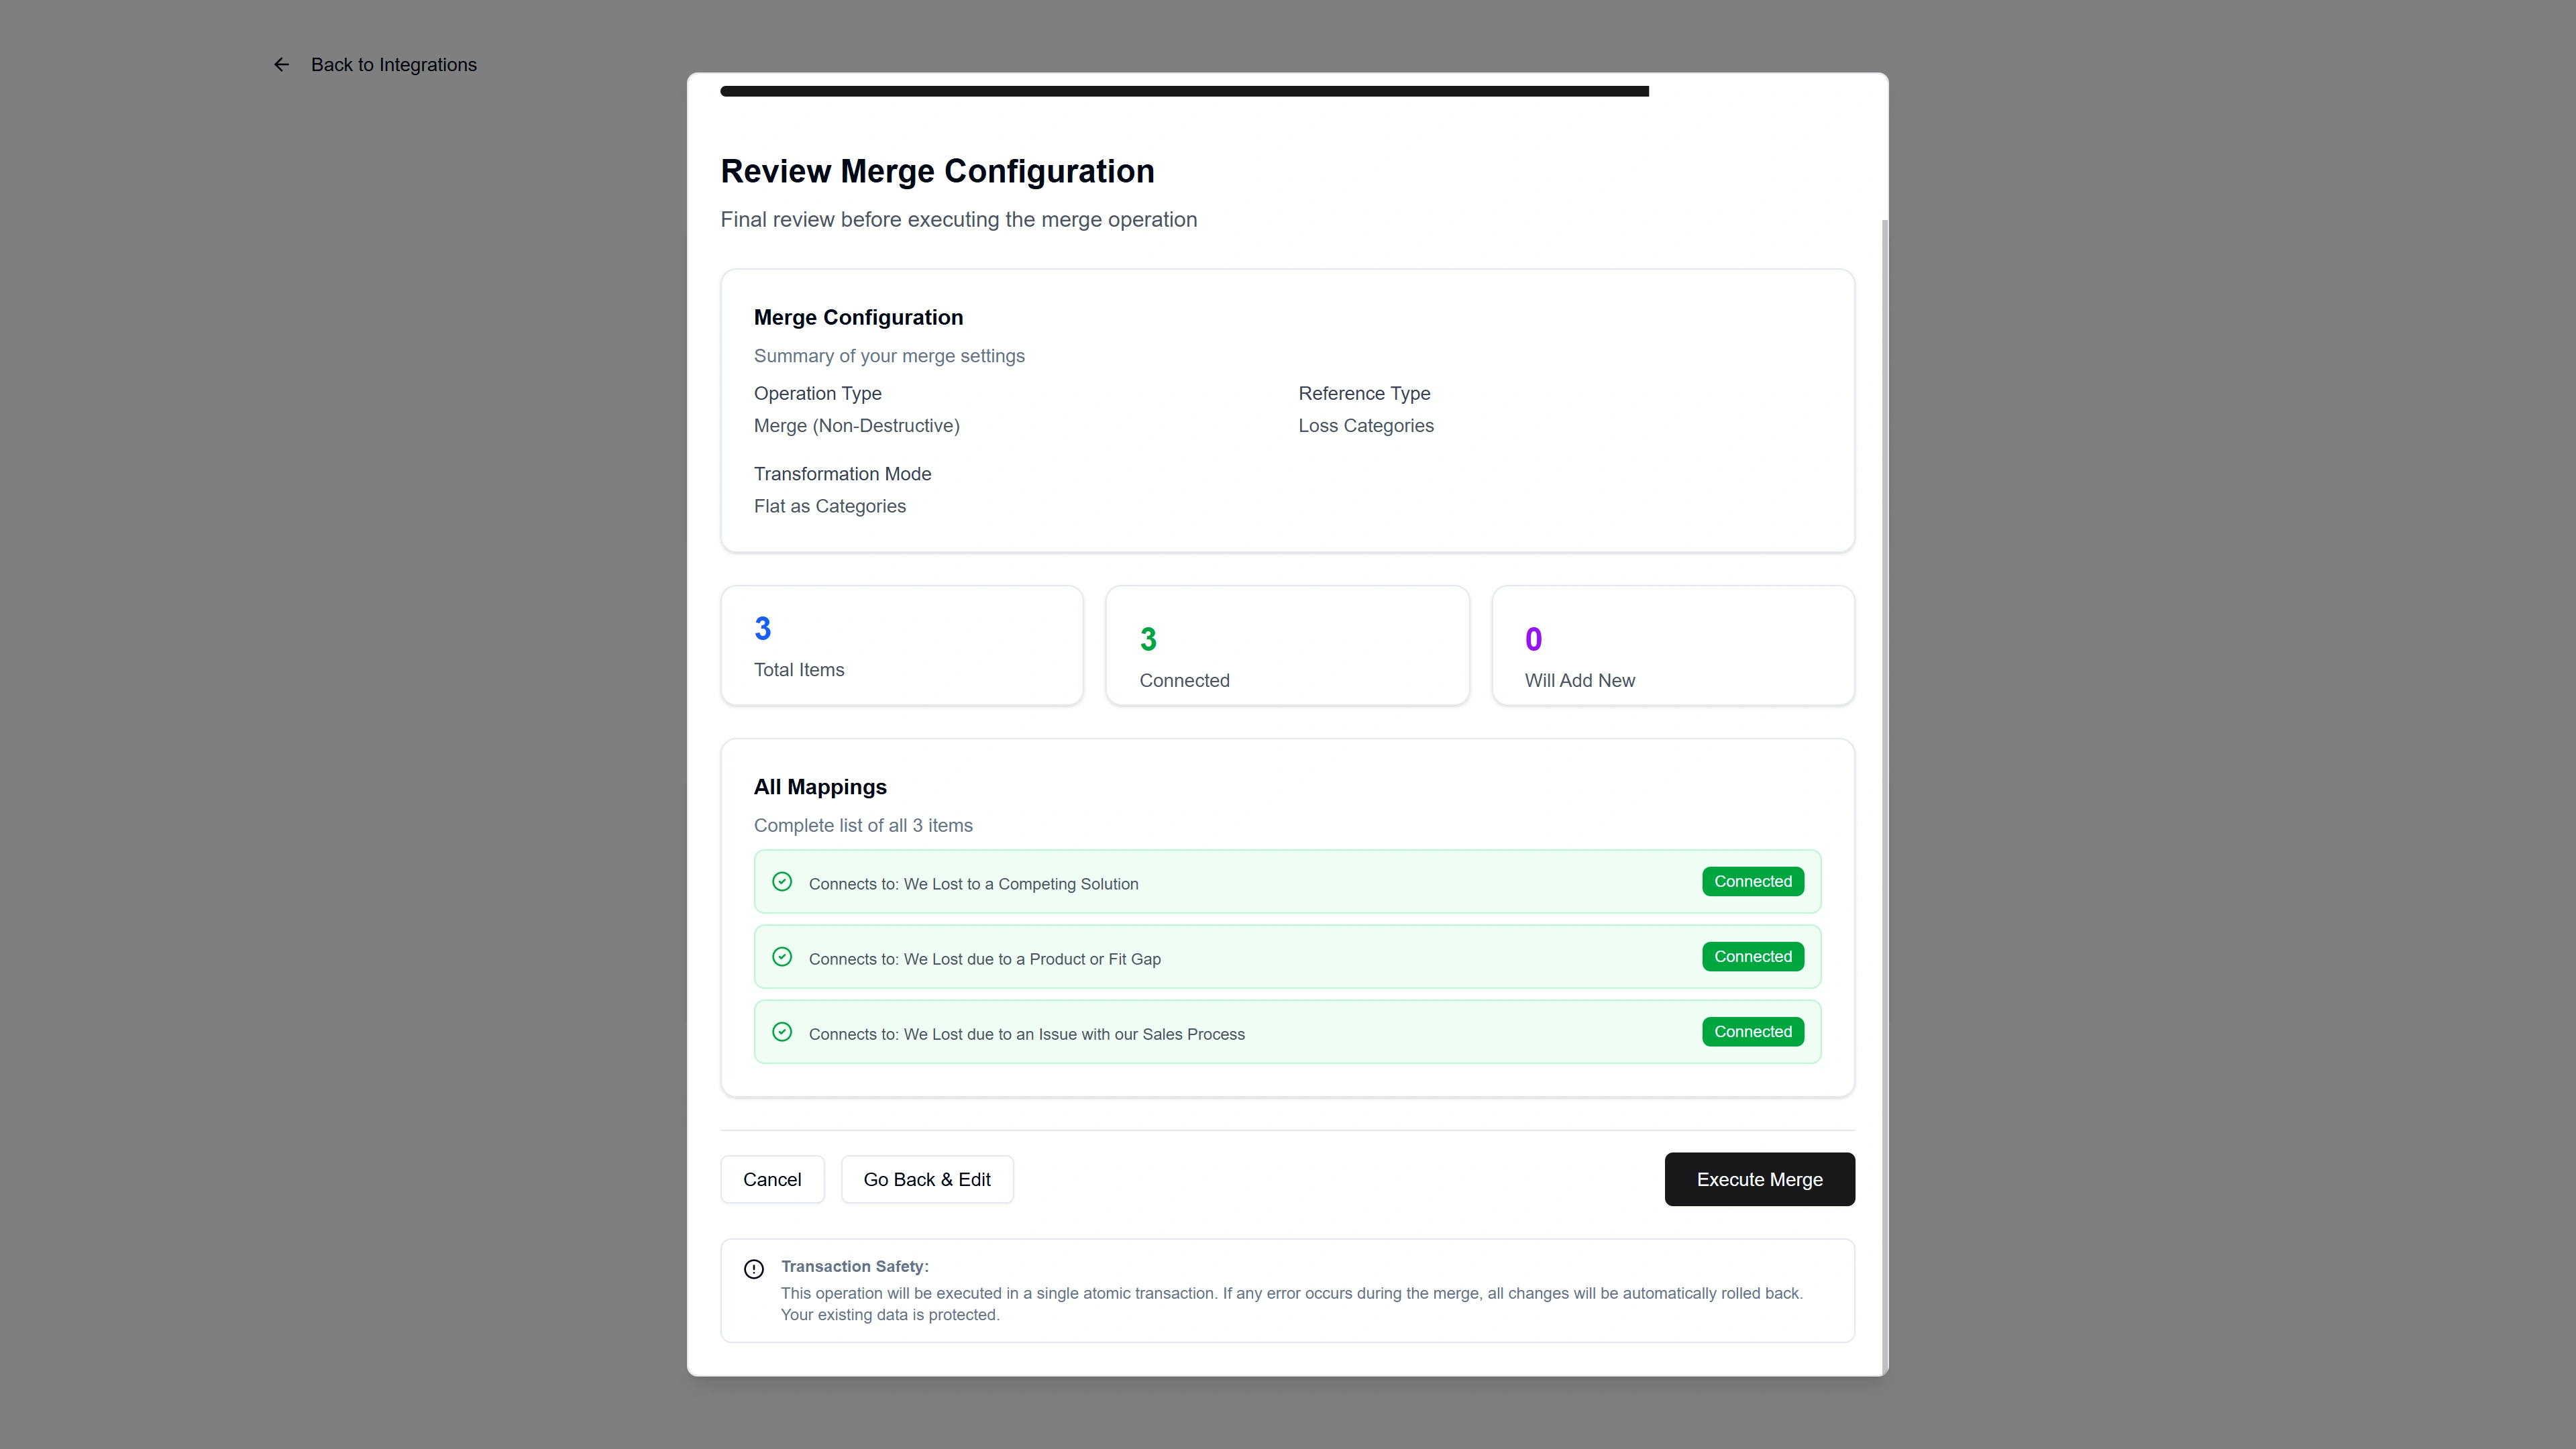
Then click “Done” to close the mapping dialog and return to the wizard.
If You Selected “Both Dropdown and Text Field”
You will complete both flows described above:
- First, the category mapping flow (Steps 10c through 10g above) to configure your dropdown-based loss categories.
- Then, the text field mapping step (Step 10c from the “Free Text” flow above) to select which HubSpot text field syncs with Playwise HQ’s Loss Reason Detail.
After completing or skipping loss tracking, the wizard proceeds to field-level mapping.
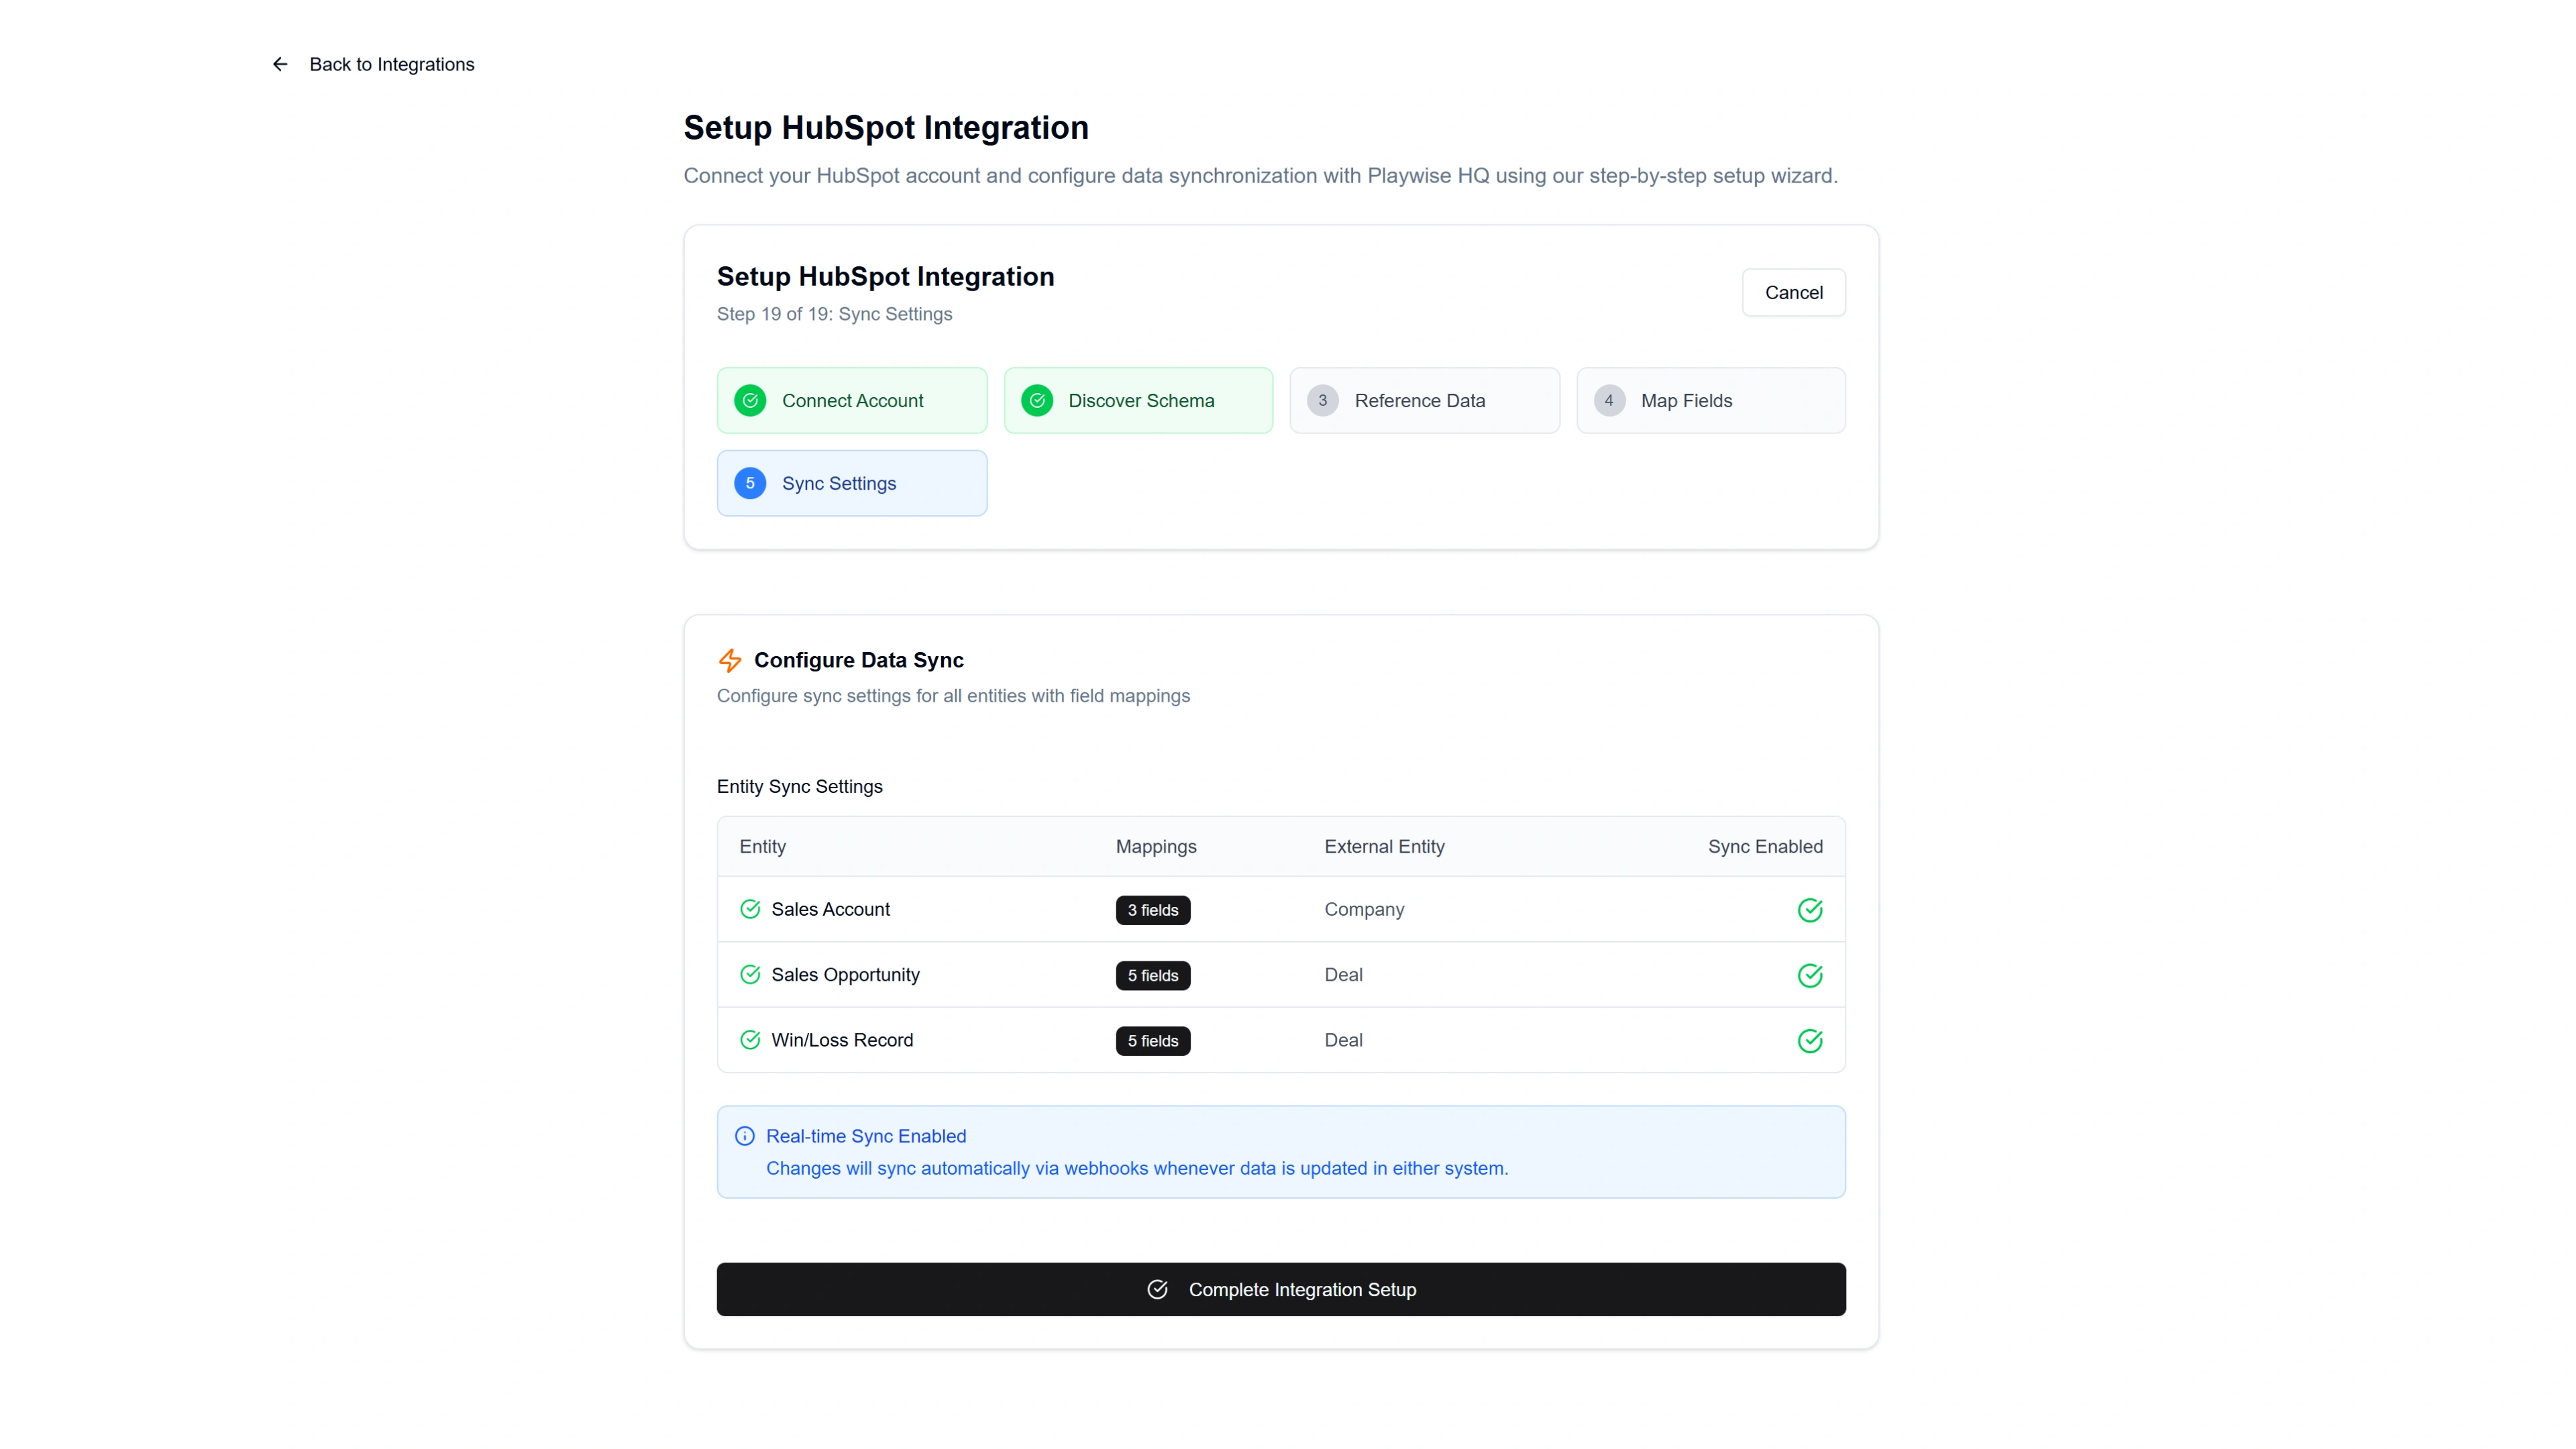
Step 11: Configure Sync Settings
The final wizard step lets you review and confirm your sync configuration.
You will see a table summarising each entity and its sync status:
| Entity | HubSpot Entity | Mapped Fields | Sync Enabled |
|---|---|---|---|
| Sales Account | Company | X fields | Yes |
| Sales Account Opportunity | Deal | X fields | Yes |
| Win/Loss Record | Deal | X fields | Yes |
As part of the integration wizard setup process mapping of many of the fields (including all of the mandatory fields) has been taken care of.
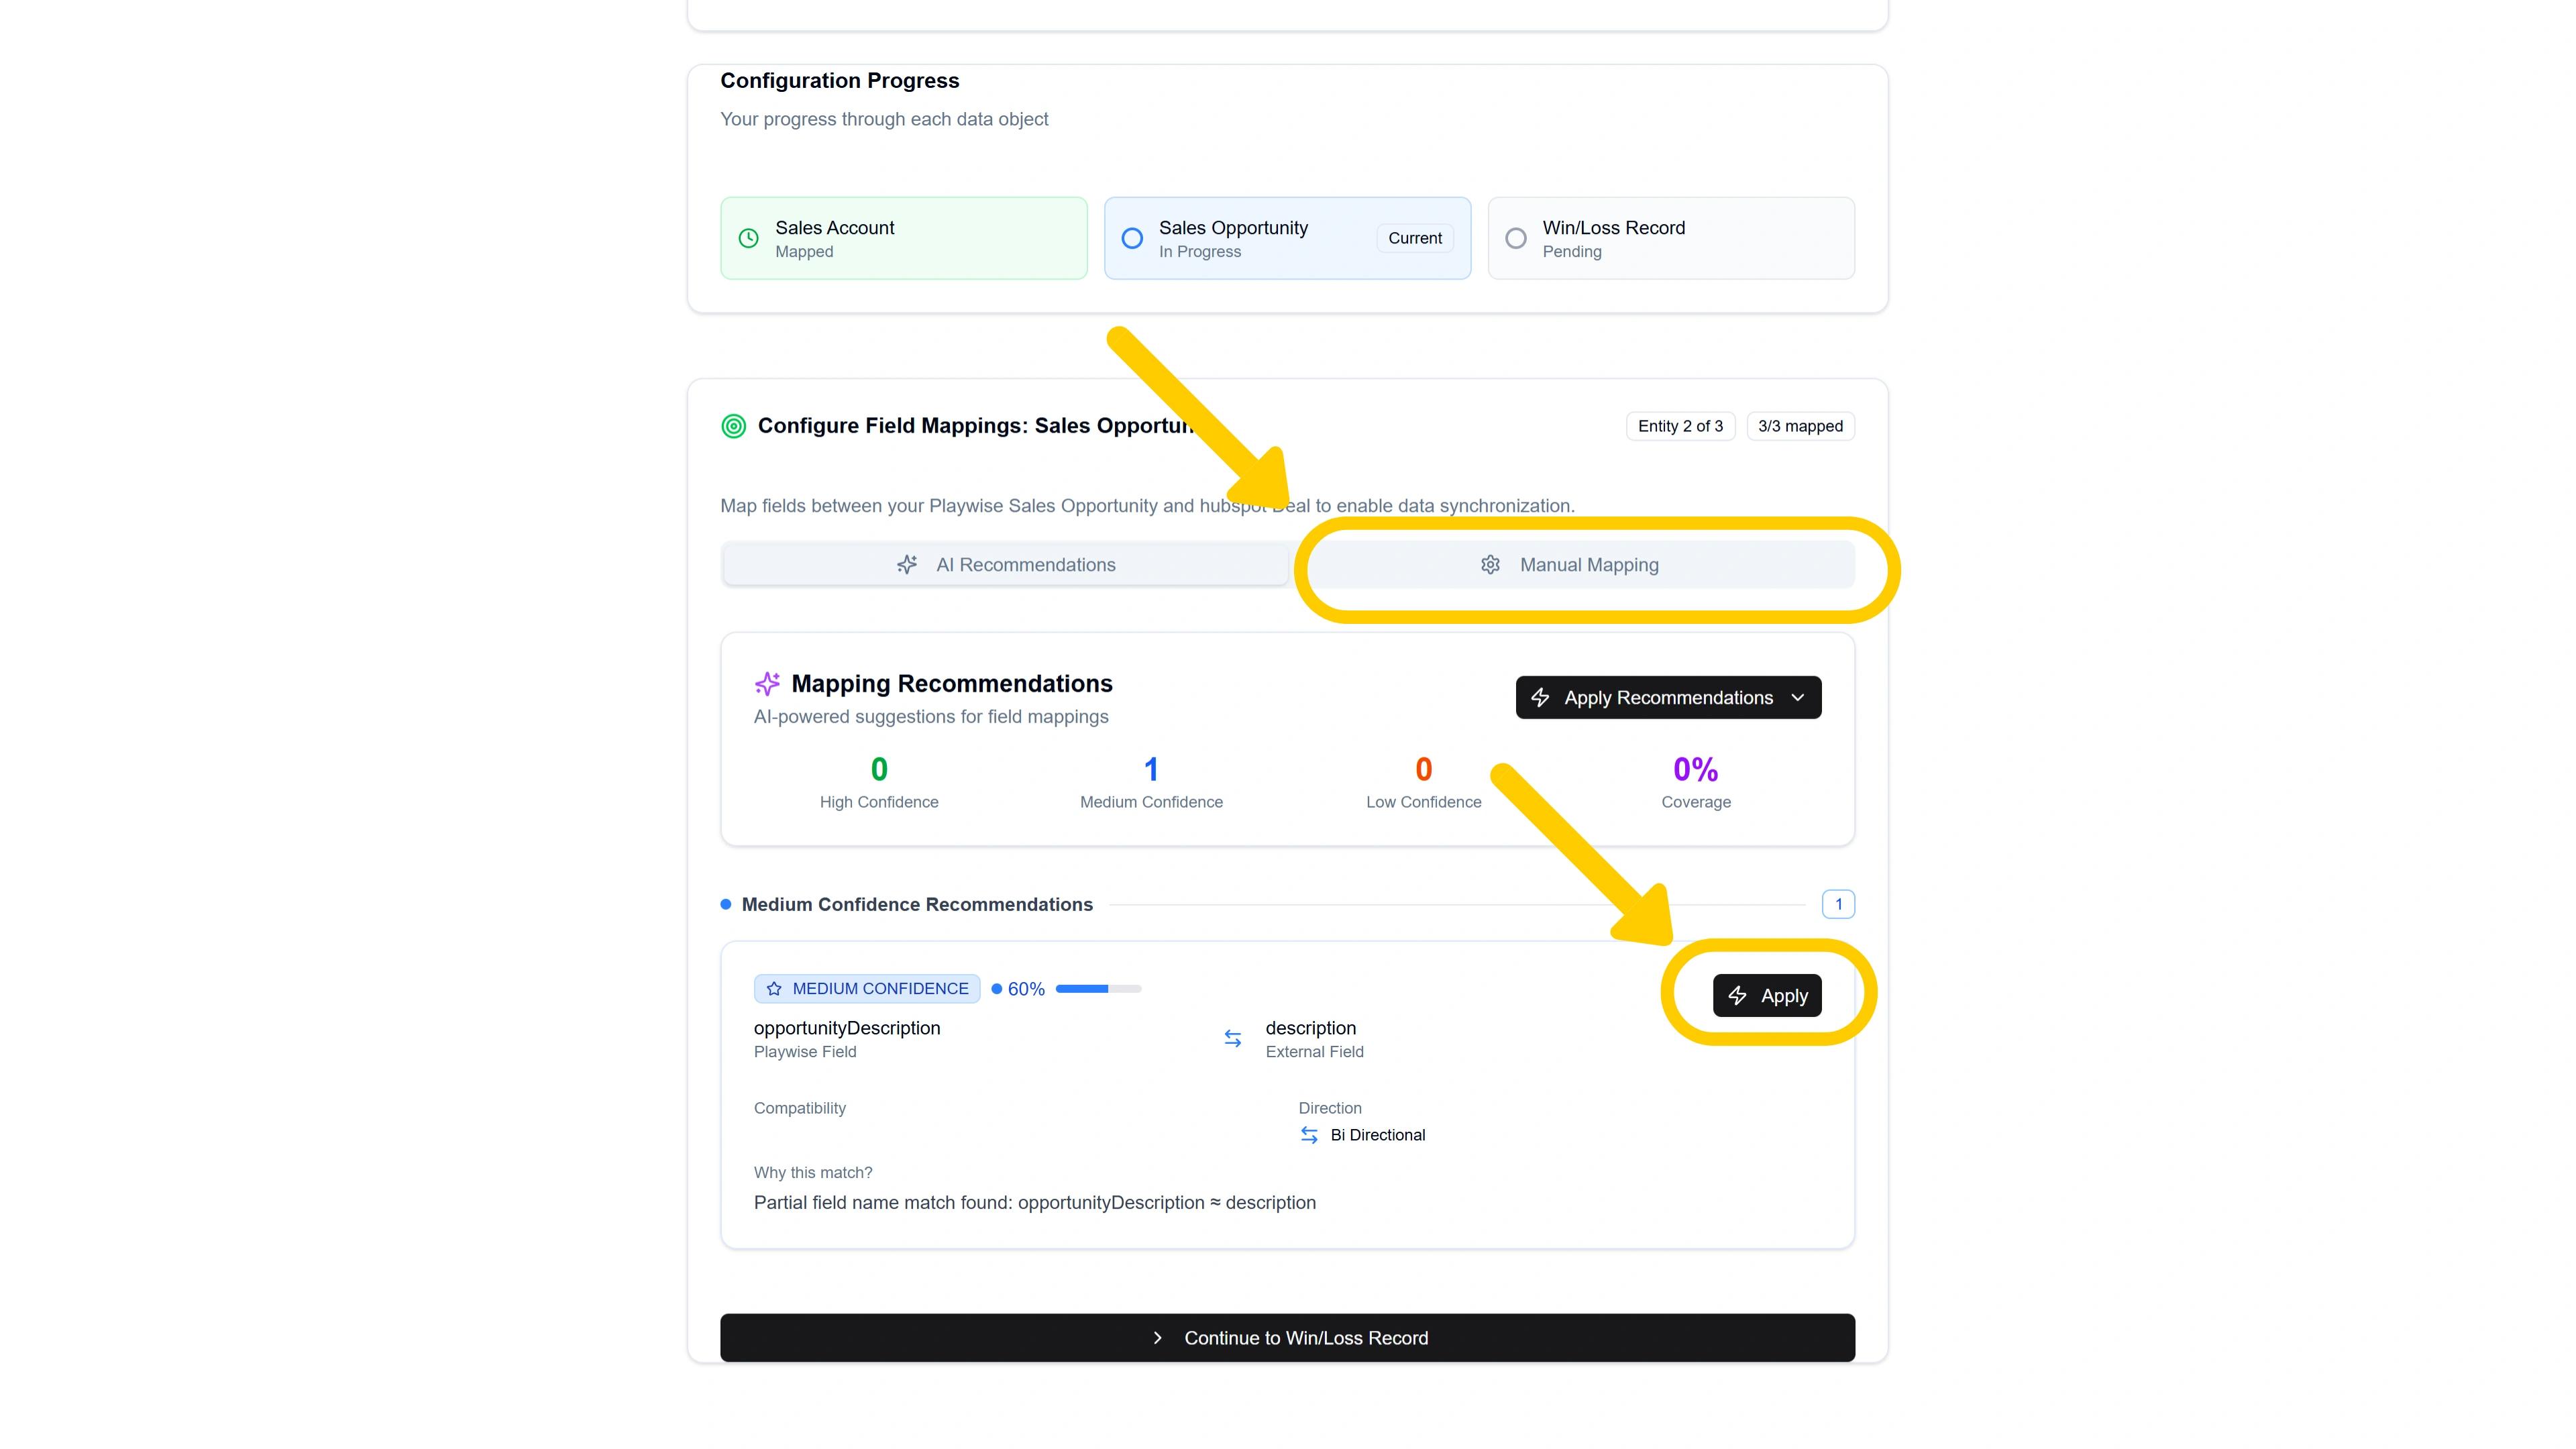
As you click “Save Mapping” you will progress through each of the different data objects. You need to save the mapping for each.
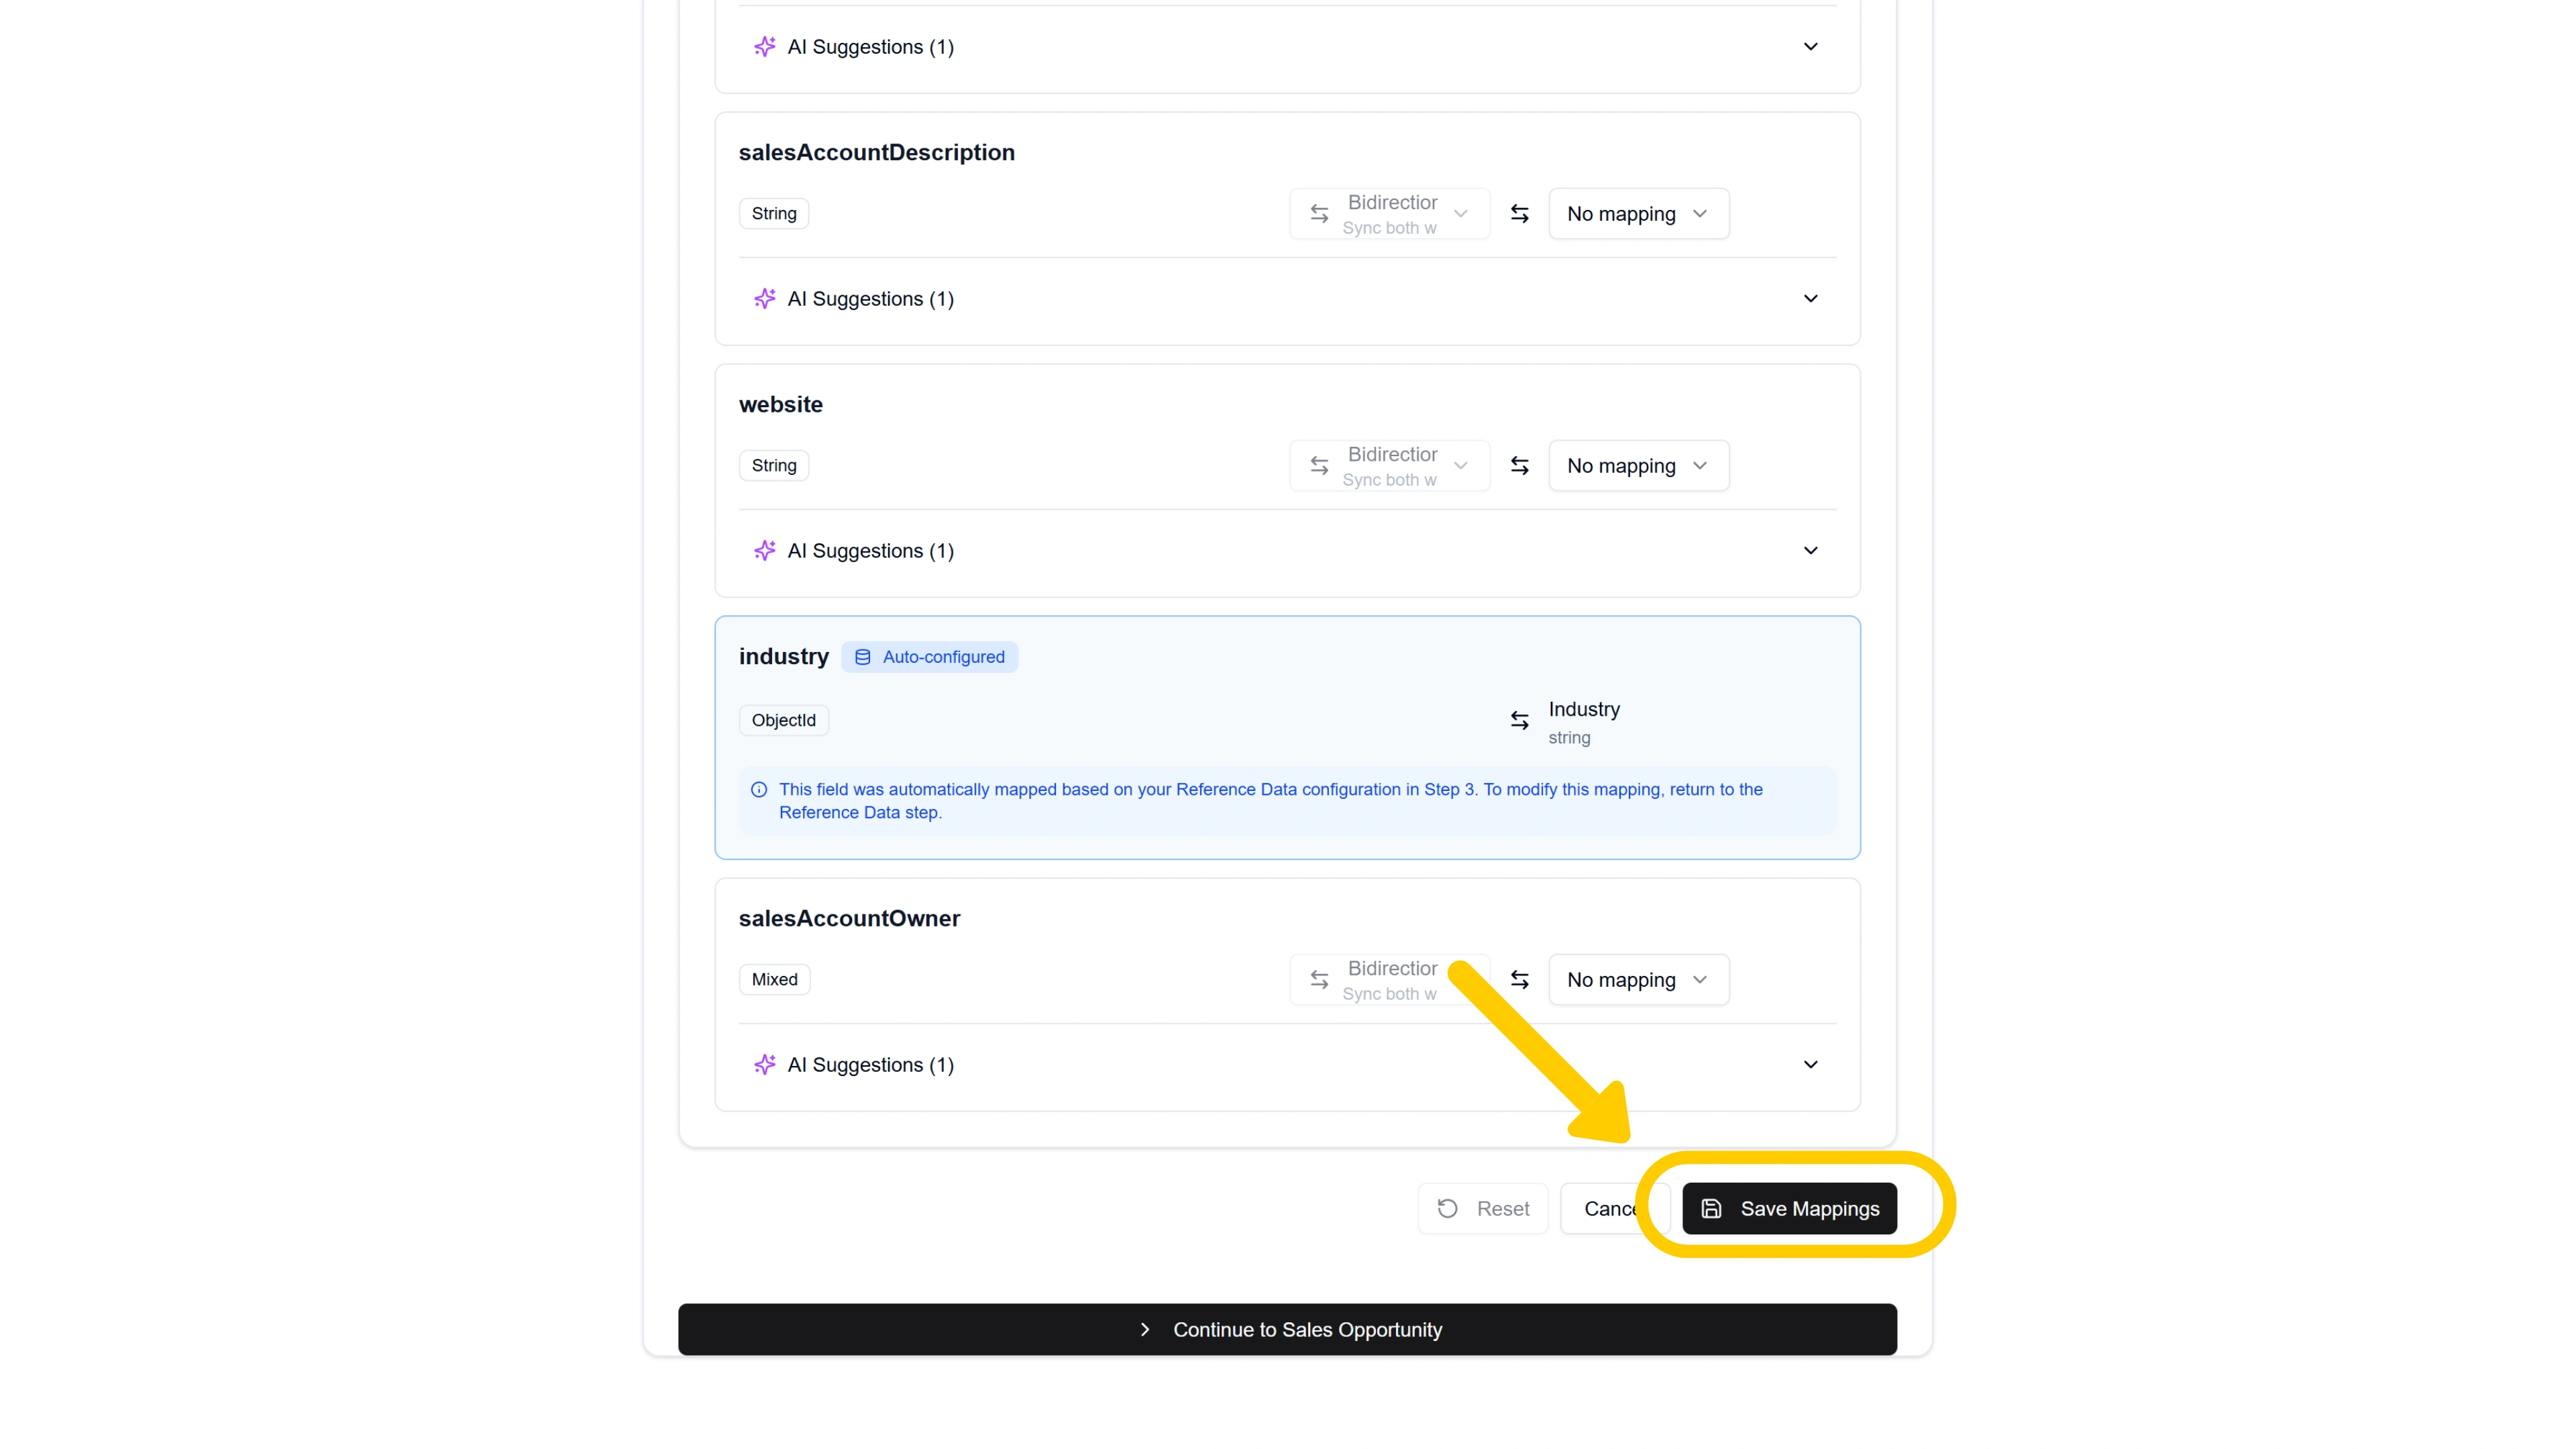
After clicking Save (above) you will progress to the next entity that needs mapping and confirmation. You need to save the mapping for each entity as you go.
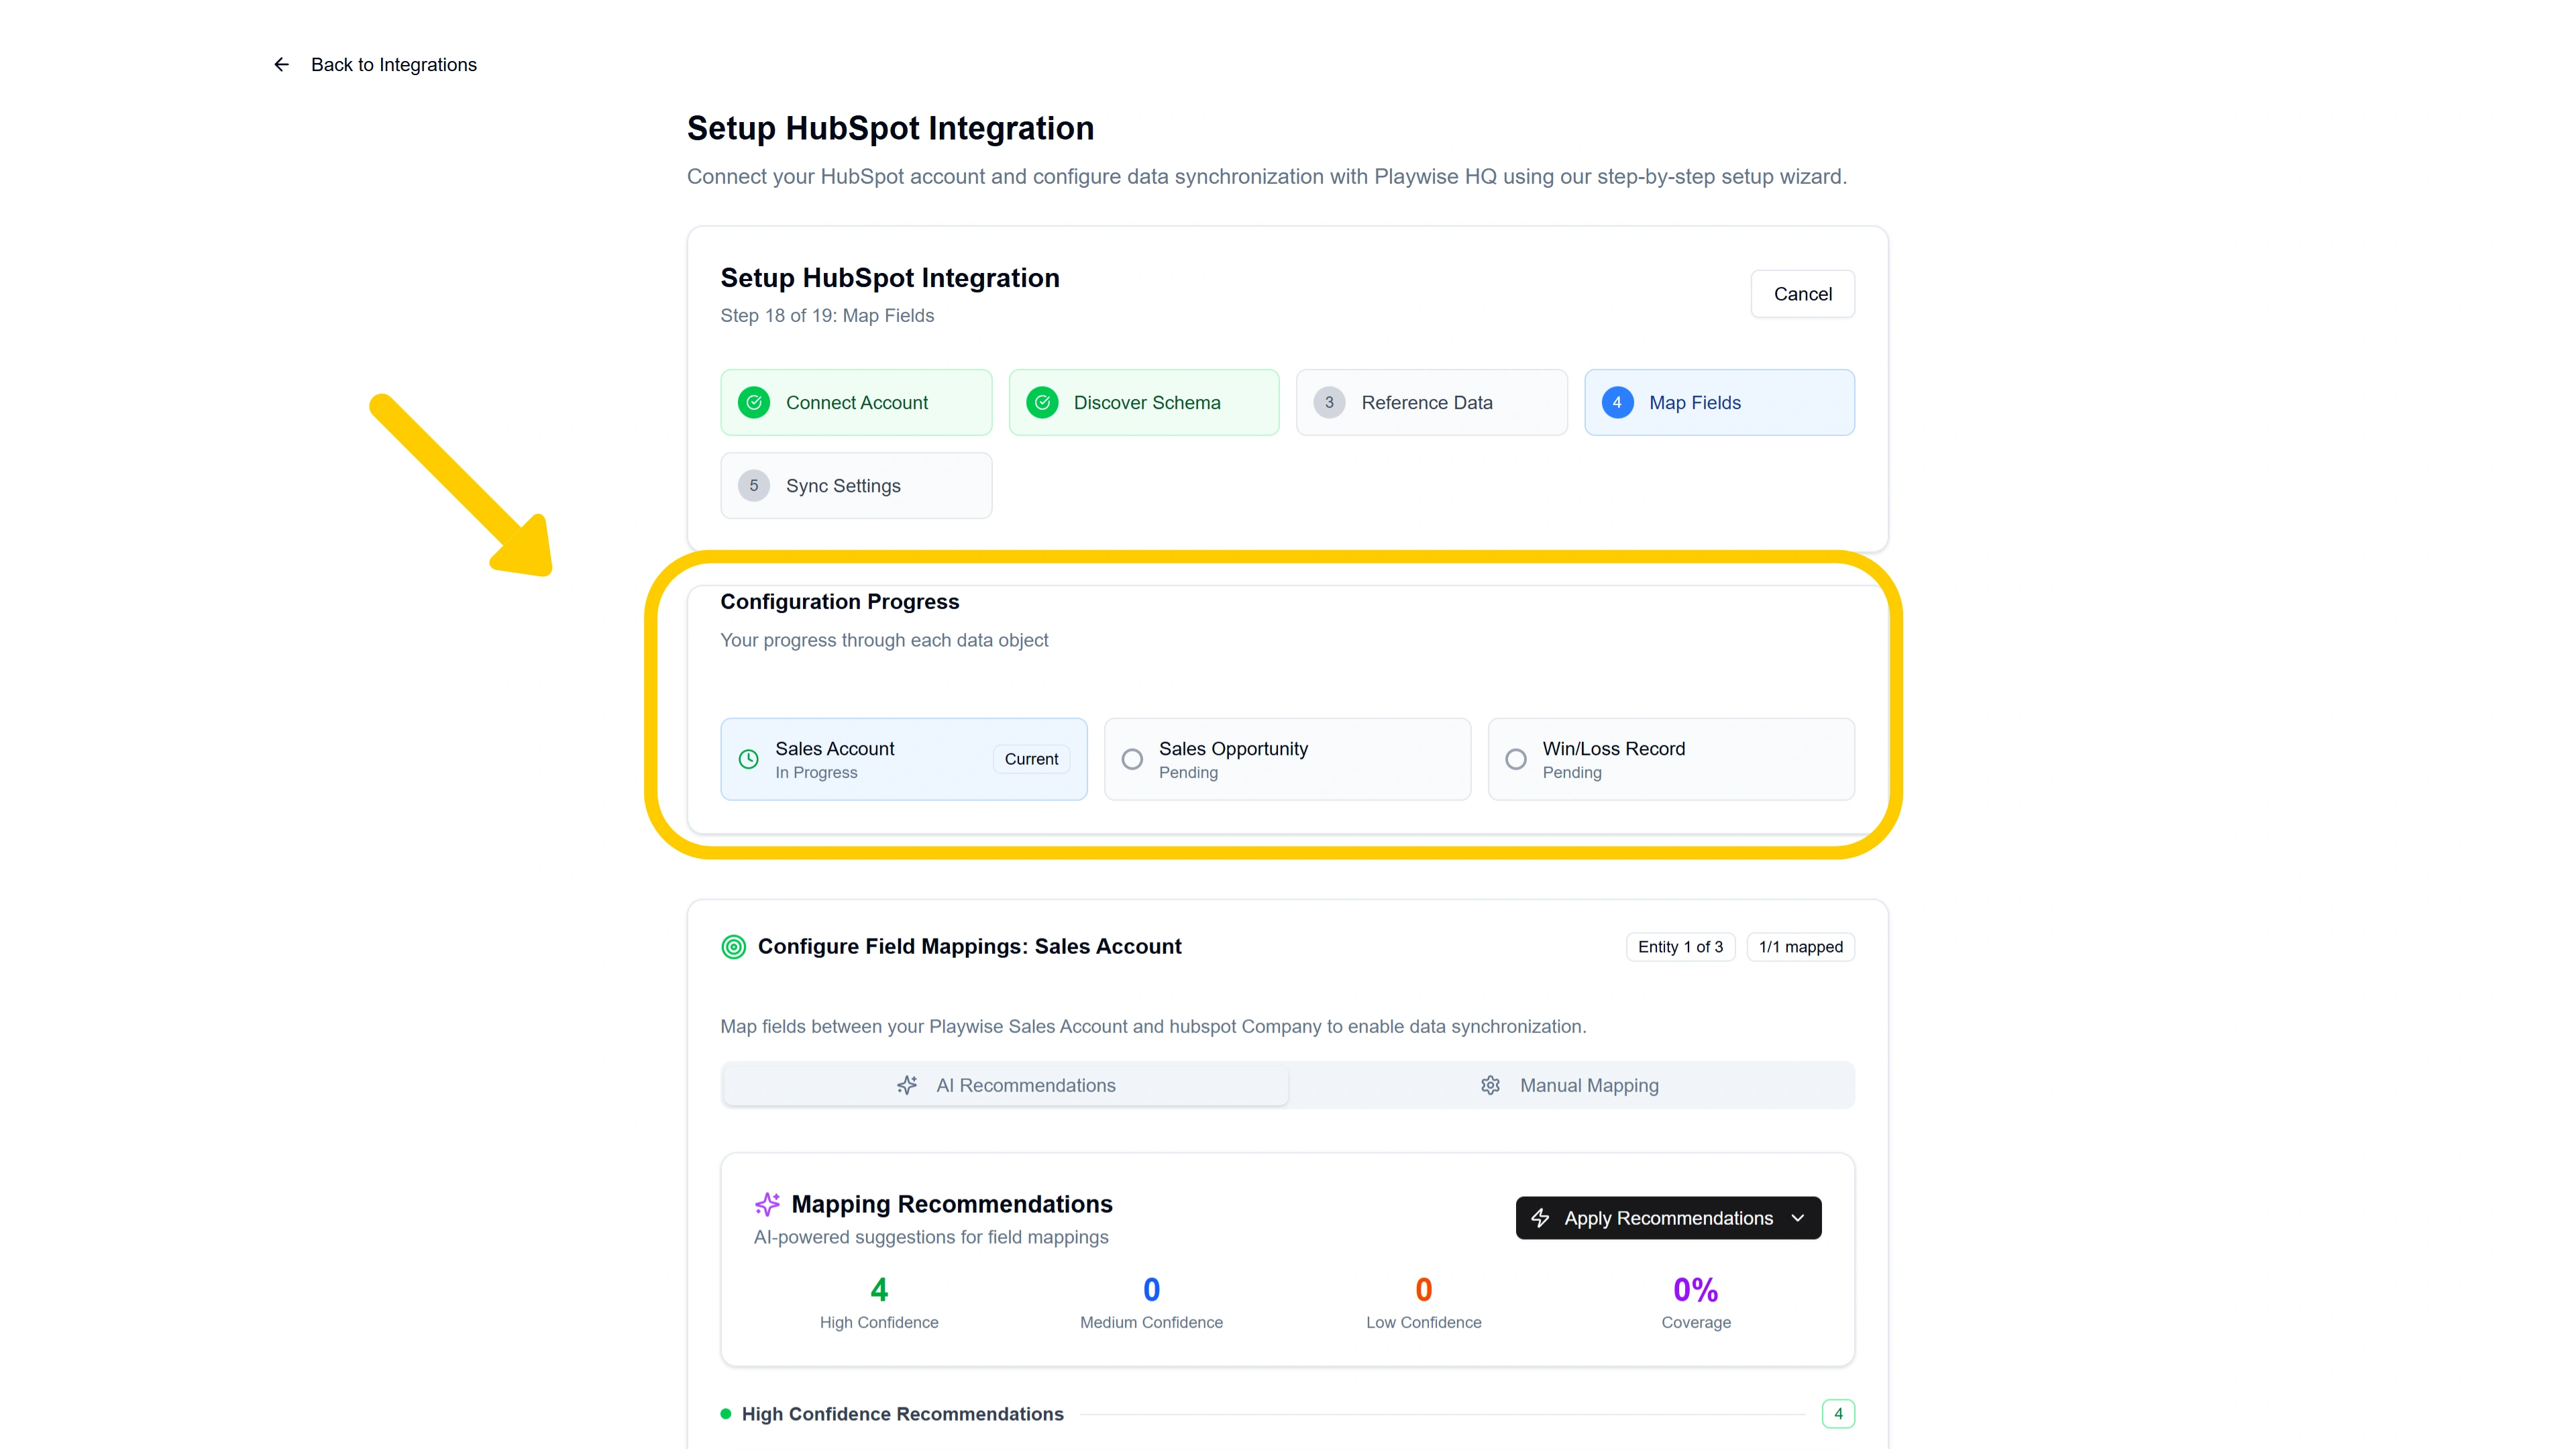
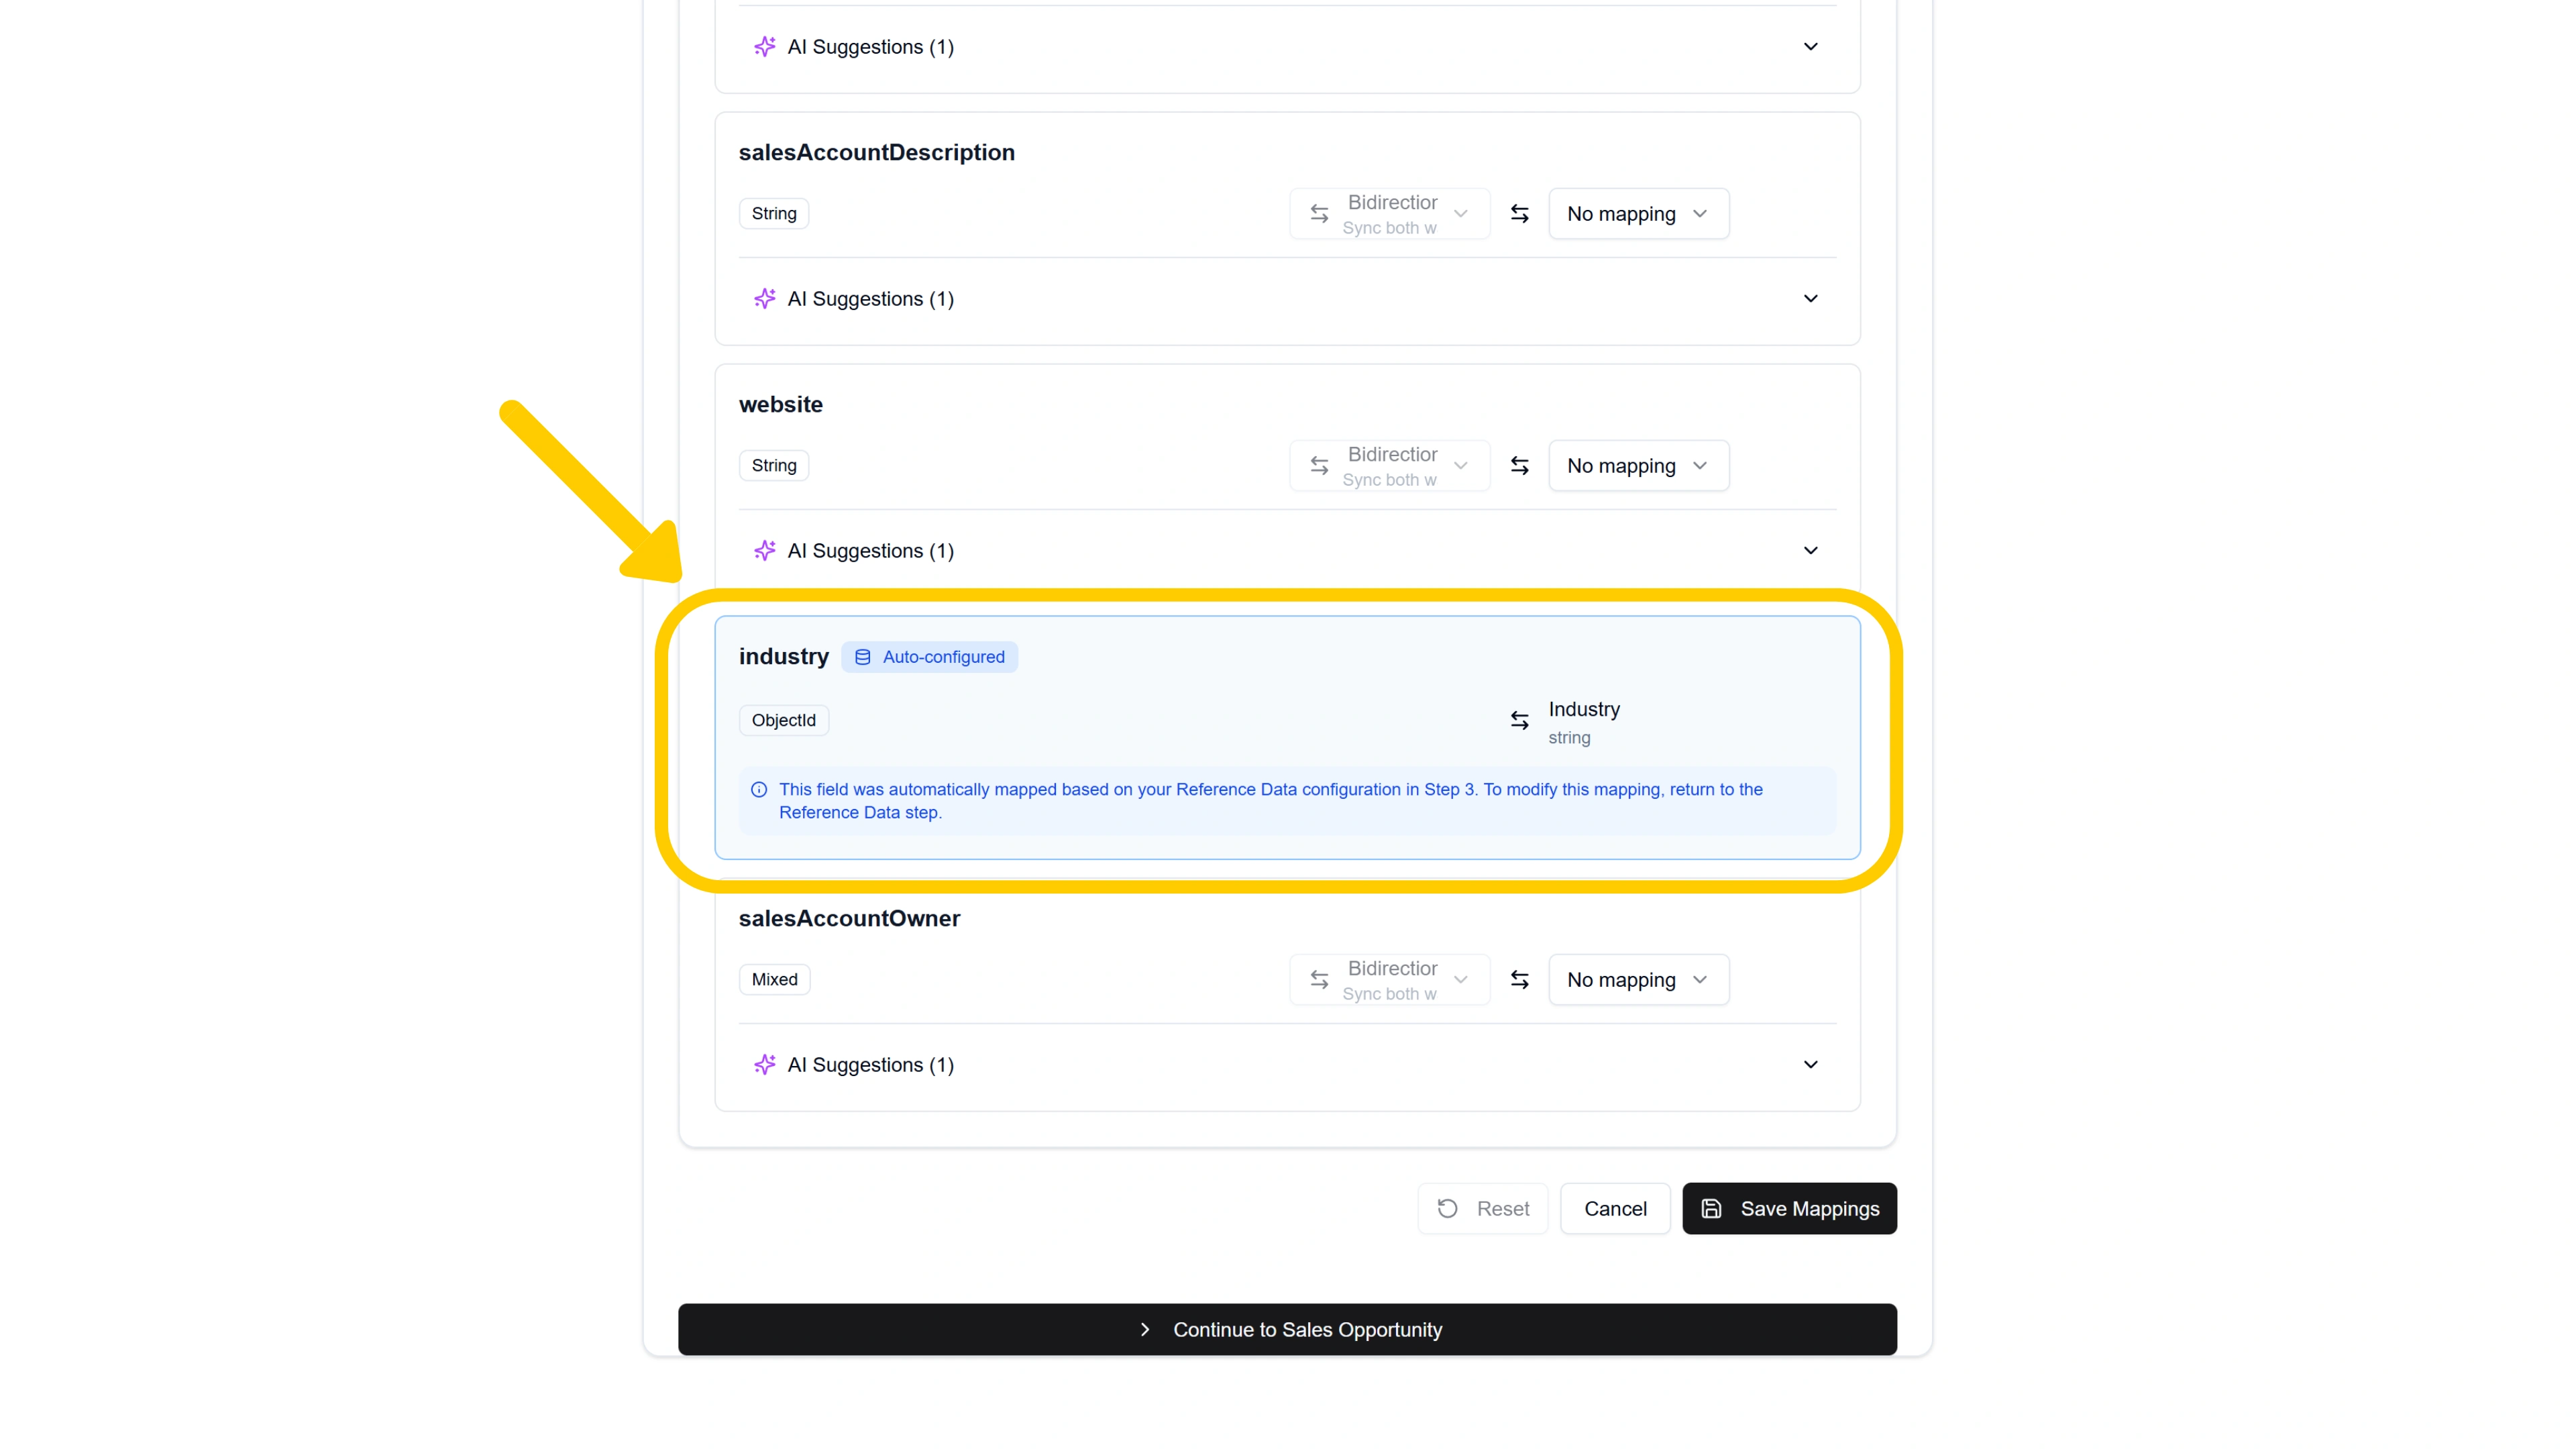
Along the way you will also see mappings that have been auto configured as part of the wizard driven set up process.
Playwise HQ will also present AI recommended field mappings. Or you can toggle to the manual tab to manually map any remaining fields.
Finally after saving mappings for each of the entities you will reach a screen to complete the integration.
After Setup: Managing Your Integration
Once the integration is operational, you can manage it at any time by navigating to Integrations > HubSpot > “Manage”.
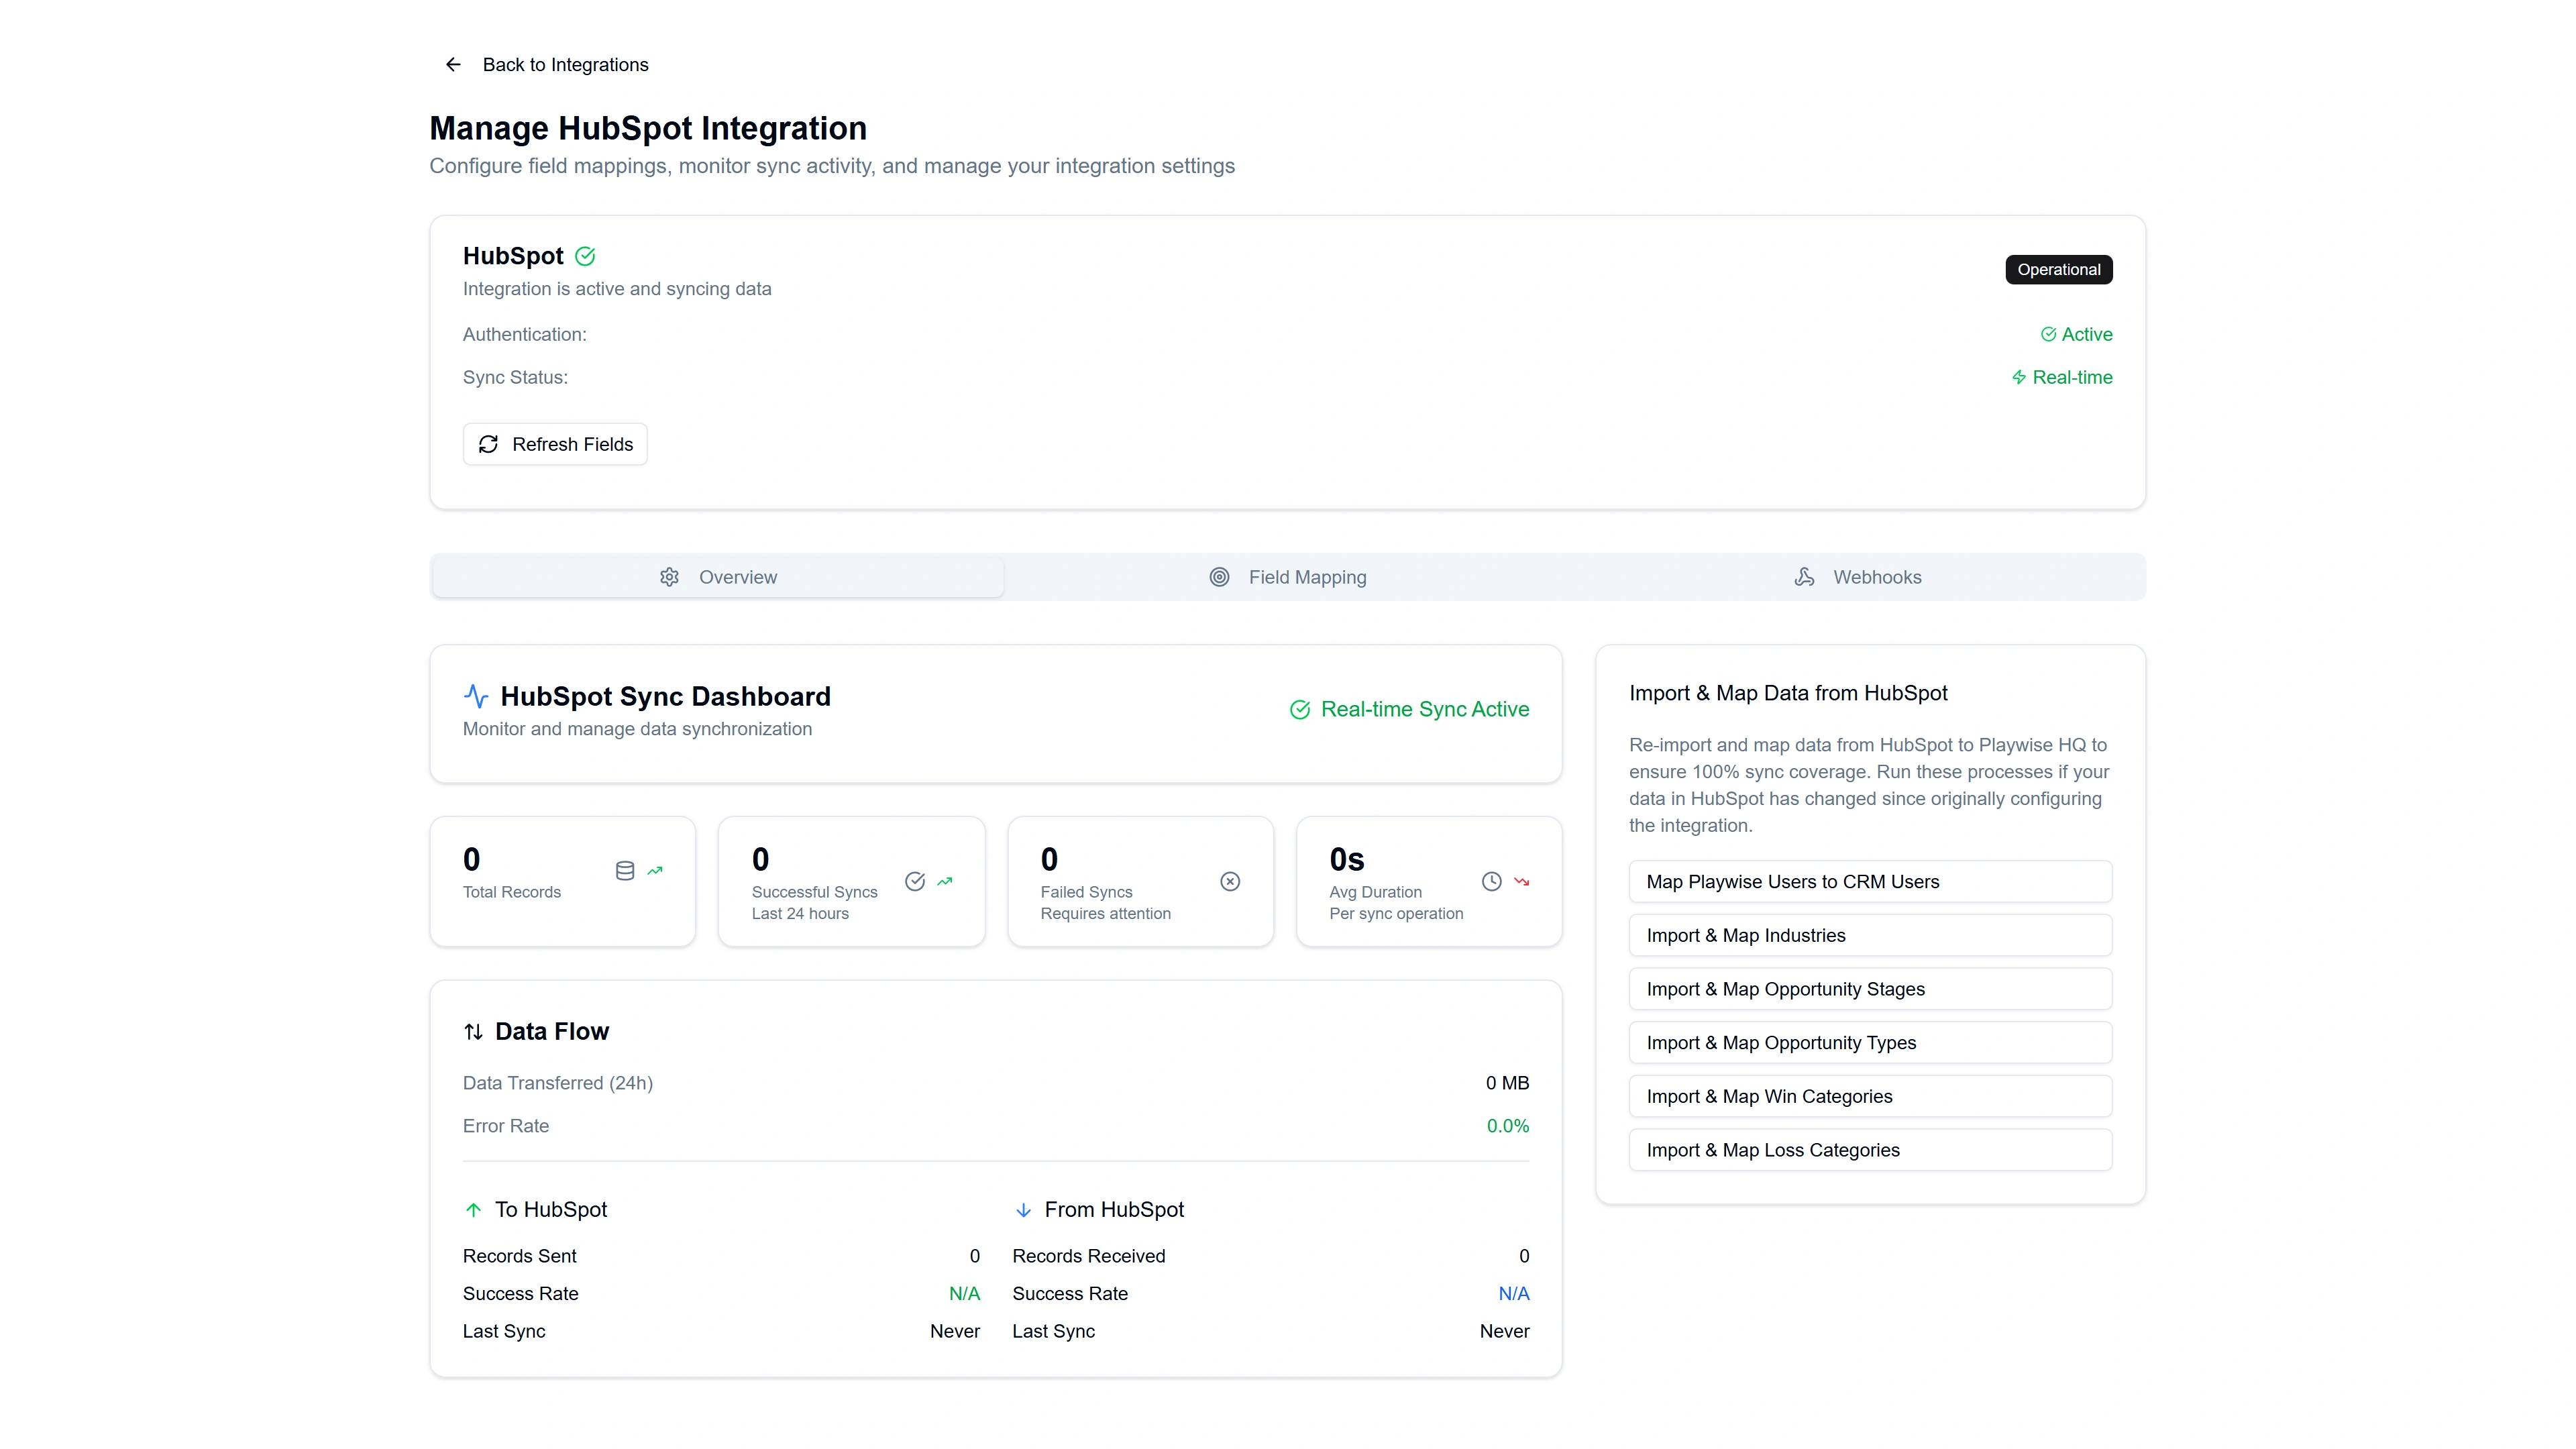
The management page has three tabs:
Overview Tab
- Sync status — Shows whether real-time sync is active, along with metrics such as total records synced, success rate, and last sync time.
- Import & Map Data — Buttons to re-import and re-map reference data if your HubSpot data has changed since the initial setup:
- “Map Playwise Users to CRM Users”
- “Import & Map Industries”
- “Import & Map Opportunity Stages”
- “Import & Map Opportunity Types”
- “Import & Map Win Categories”
- “Import & Map Loss Categories”
Field Mapping Tab
Allows you to adjust field mappings at any time using the same AI Recommendations and Manual Mapping interface from the setup wizard. Changes take effect immediately.
Webhooks Tab
Shows the status of your webhook connection, a list of subscribed event types, and a feed of recent webhook events for monitoring and troubleshooting.
Disconnecting the Integration
If you need to disconnect HubSpot:
- Navigate to your Hubspot account and uninstall the Playwise HQ application.
- When you return to Playwise HQ, an alert will appear asking: “Did you recently uninstall the Playwise HQ app from your HubSpot portal?”
- Click “Yes, I uninstalled it” to confirm and disconnect.
- Click “No, try reconnecting” to attempt a token refresh.
When disconnected:
- Real-time sync stops immediately.
- All your data, field mappings, and configuration are preserved.
- Synced records remain in Playwise HQ with their source of truth set to “local”.
- You can reconnect at any time — Playwise HQ will detect your existing configuration and skip the full setup wizard.
Troubleshooting Common Issues
“Connection Issue Detected” alert appears:
This usually means your OAuth token has expired or the Playwise HQ app was uninstalled from your HubSpot portal. Click “No, try reconnecting” to refresh the token. If that fails, you may need to re-authorise by clicking “Connect to HubSpot” again.
Fields are not syncing:
Check that the relevant entity sync is enabled on the management page. Also verify that the specific fields have valid mappings in the Field Mapping tab — look for validation warnings (orange triangles) that may indicate a type mismatch.
Win/loss records are not being created:
Ensure that you configured win and/or loss tracking during the setup wizard (Steps 8-9). If you skipped those steps, you can re-run them by returning to the management page and re-mapping your win/loss categories.